Horizontal vs. Vertical Engines

Horizontal vs. Vertical Engines

Drive shaft orientation is one of the most misunderstood aspects of small engines, leading to a lot of fallacies about the advantages and disadvantages of each design. How do you know which one you own? Does one design last more than the other? Is there a reason you should choose a vertical shaft engine over a horizontal shaft or vice versa? Here’s what you need to know to separate fact from fiction.

Model Designations

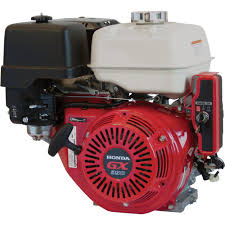
All Honda engine model names start with two letters to designate their engine family. Currently, this includes the GX and GC. If there’s a “V” after these two letters, the engine has a vertical shaft. Engines that are the same model family and displacement share the same basic design and provide identical performance no matter how the shaft is oriented.

Engine Wear and Lubrication

Myths are persistent about one design wearing out faster than the other, but these can be attributed to a misunderstanding about how these engines work.

Some older vertical shaft engines have the intake and exhaust valves positioned vertically. This draws hot exhaust gases along the bottom cylinder surface, resulting in slightly more wear on that side.
This has led people into believing that gravity is a factor, leading to increased wear on vertical shaft engines, but the same wear pattern is found around the exhaust no matter where the valve is positioned.

On the other hand, some people believe that horizontal shaft engines will wear out faster because the upright position of the cylinders keeps them from being lubricated as well as a vertical shaft engine. Both horizontal and vertical engines with splash lubrication use a dipper or scoop to pick up oil in the crankcase and fling it onto the components inside the engine. Even at idle, oil is being flung around the engine at a rate of 20-30 times per second, overcoming any issues with gravity by sheer force. Likewise, while the oil channel location may be a little different, pressurized oiling systems still pump oil up to the head and let it flow back to the crankcase in both engine designs.

Driving Equipment

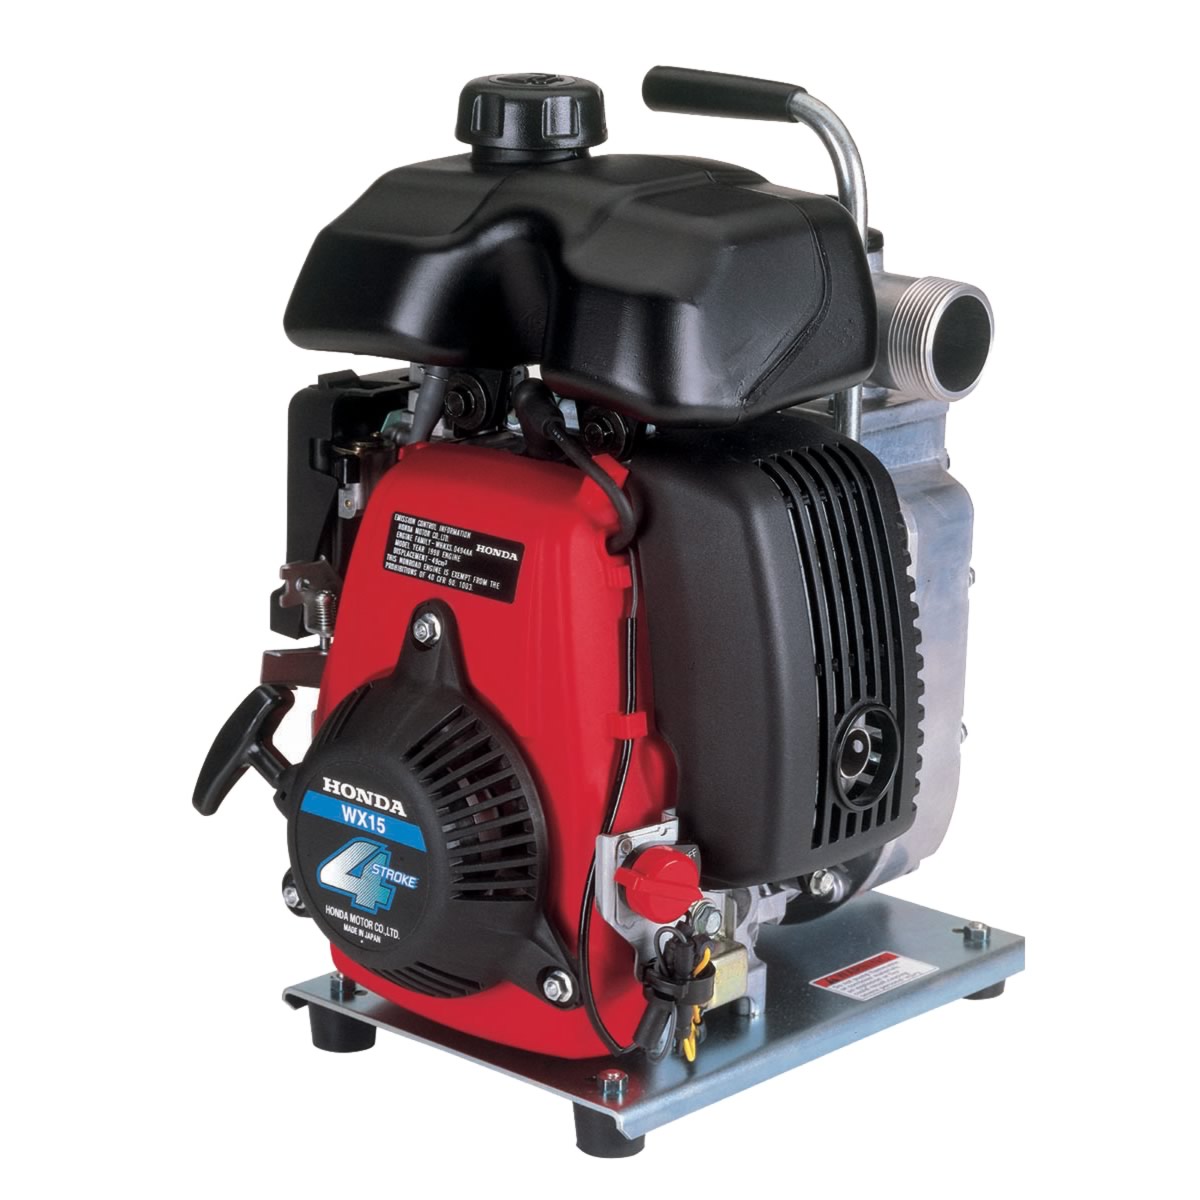
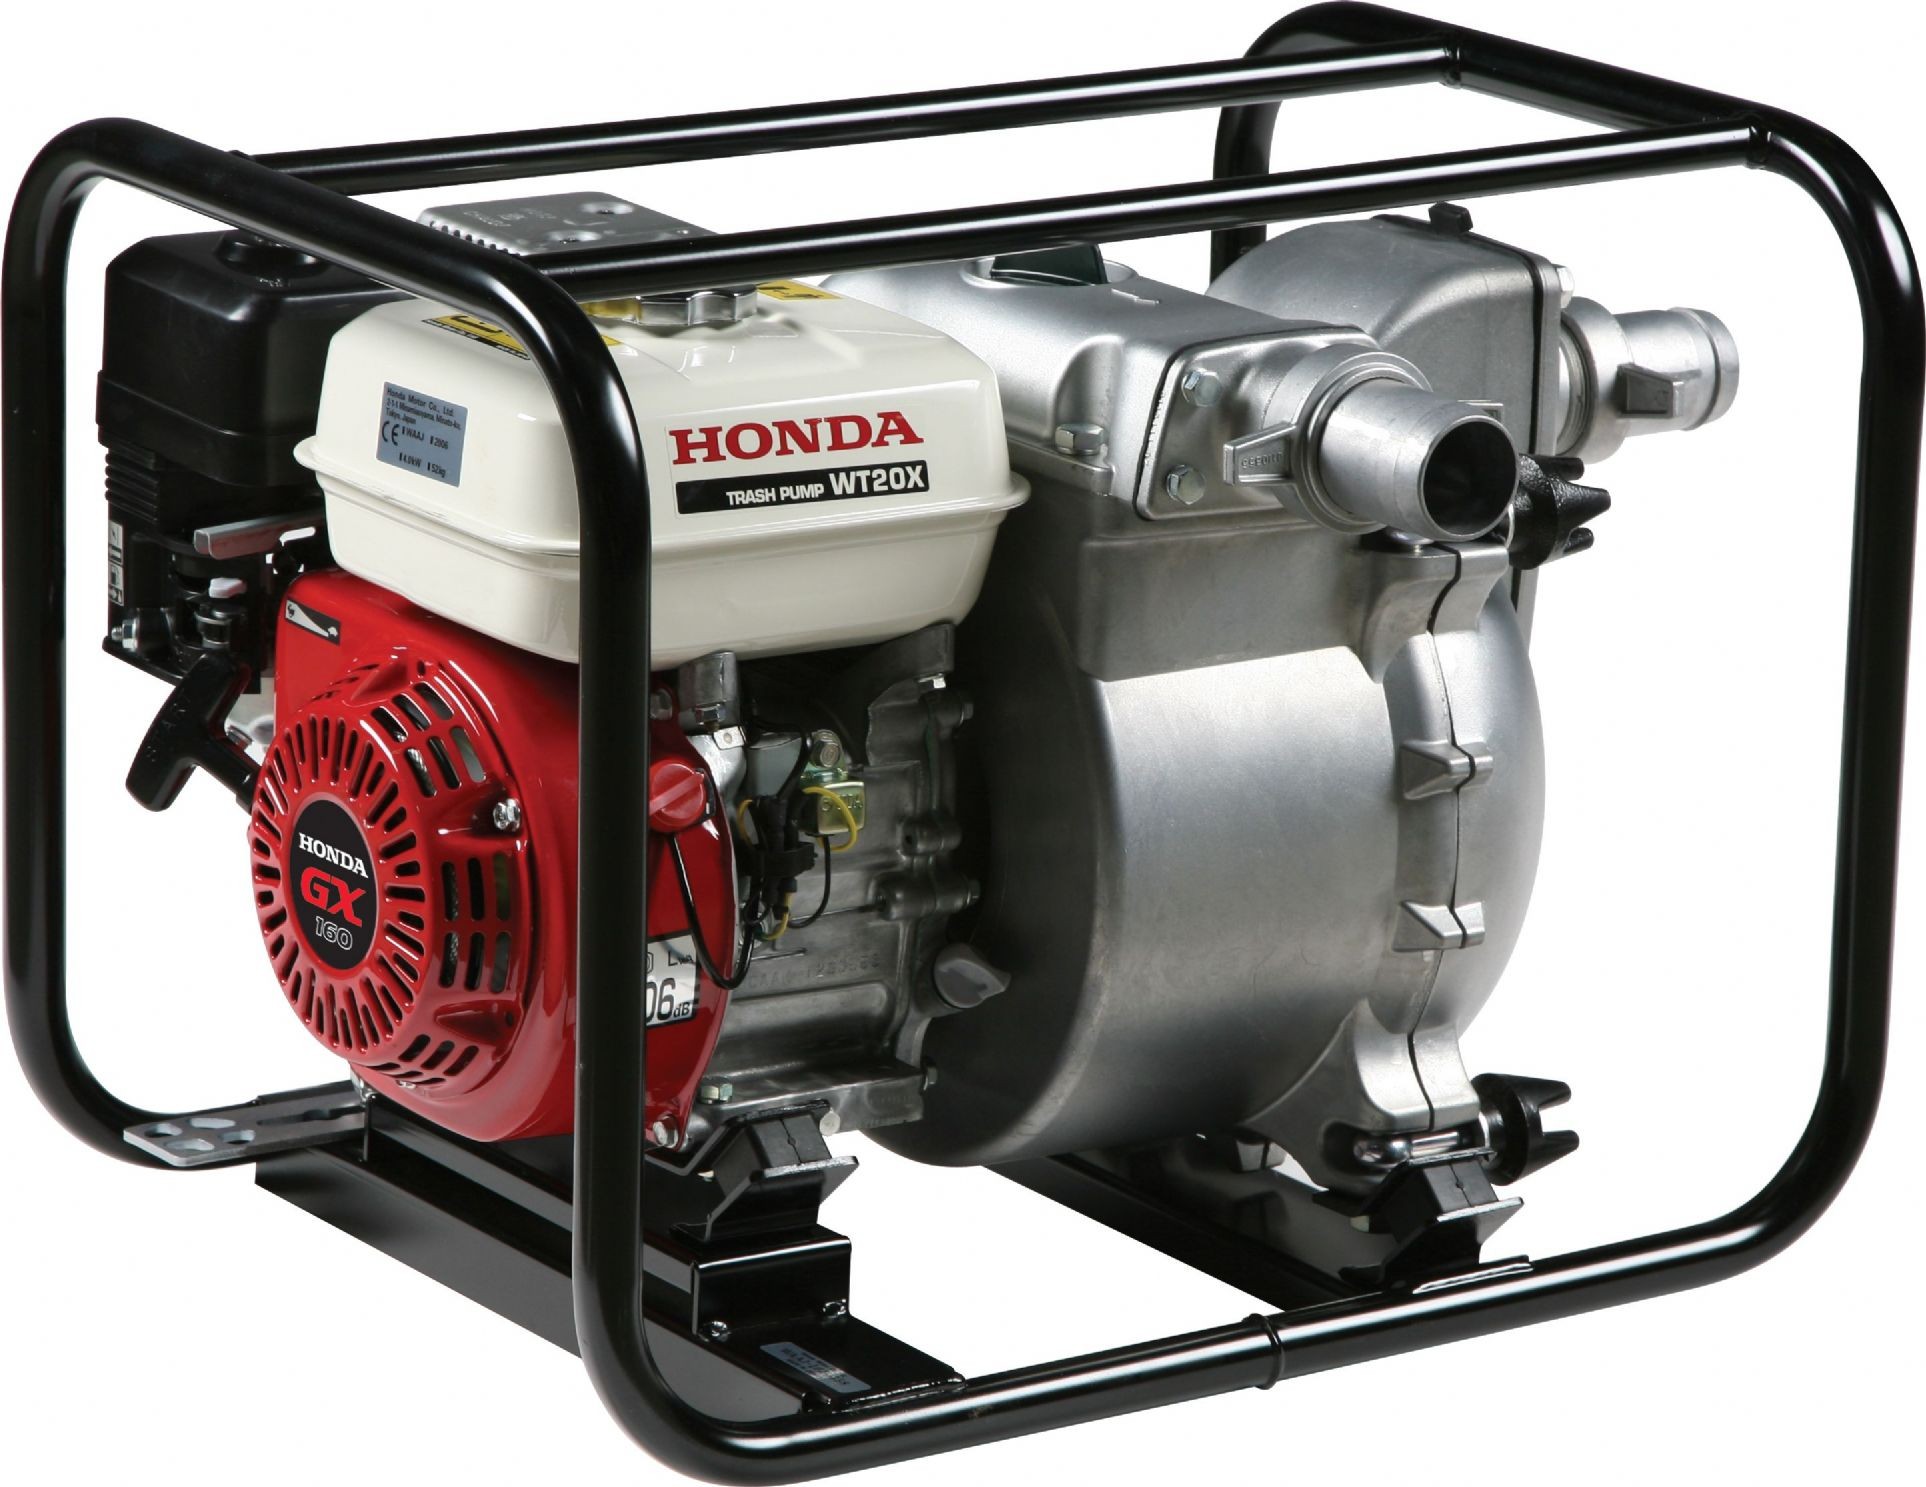
When engineers choose an engine, they decide on crankshaft orientation based on what makes the most sense to power the equipment. For example, the blade can be bolted directly to the drive shaft on a vertical shaft engine when used in a walk-behind mower, while a horizontal shaft is perfect for the pulley system used on an edger or the impeller in a water pump.

The only time you’ll likely have a choice between vertical and horizontal shaft engines is when you buy a riding mower. Some ZTR manufacturers choose to use horizontal shaft engines to reduce the overall length of the mower, while some older lawn tractors including several of Honda’s own models use a horizontal shaft engine to connect with the axle using a shaft drive. To connect the horizontal shaft to a vertically-oriented pulley, these mowers use a mule drive. This guides the belt along a pair of pulleys, bending them at a 90-degree angle. These added bends are more efficient and reliable than they sound, but they do complicate belt replacement.

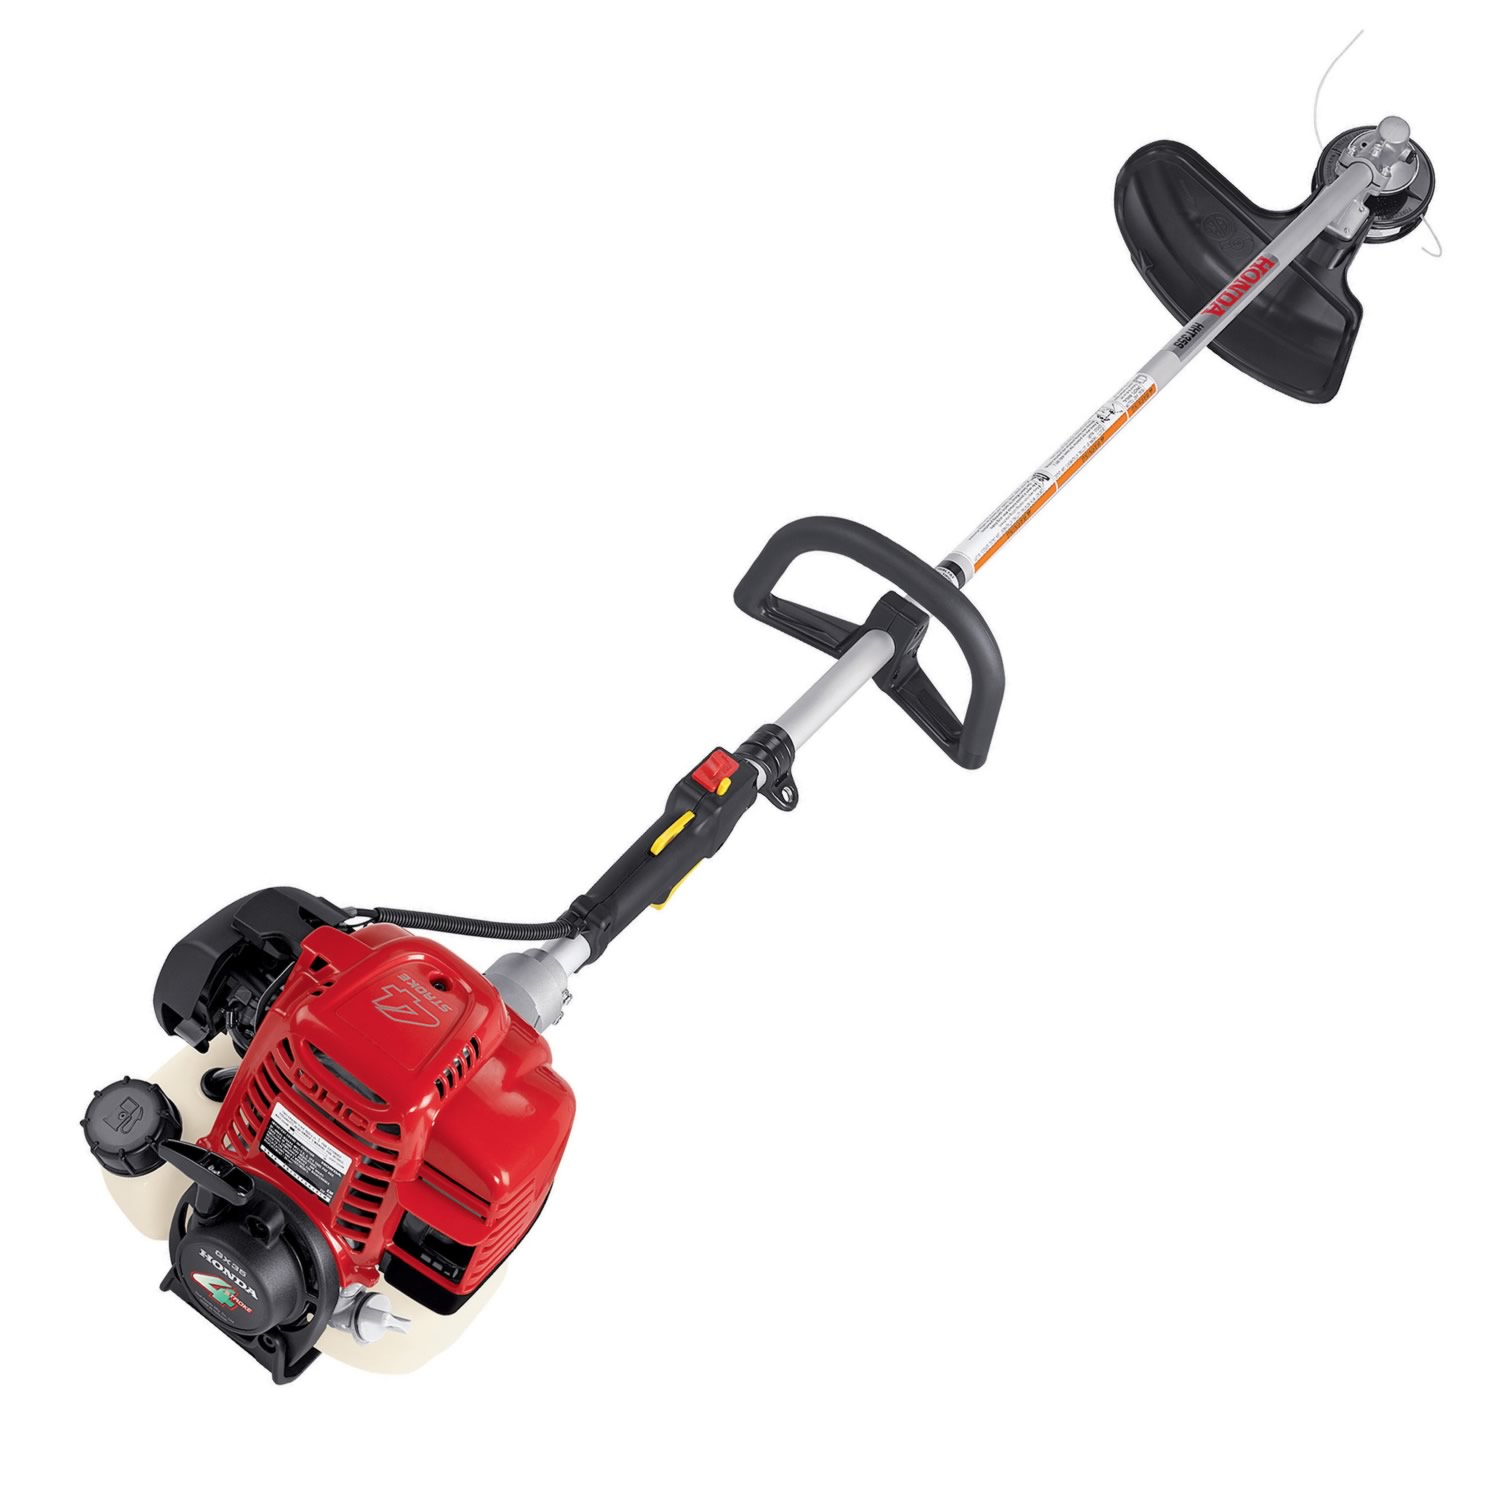
Blurring the Line: Mini 4 Stroke Engines

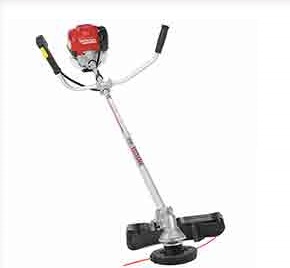
The GX25 and GX35 are technically vertical shaft engines, but their oiling system is designed to work at any angle. This lets them be used in place of two-stroke engines in handheld devices like string trimmers. These engines also find use in stationary equipment, mounted either horizontally, as seen in Honda’s own WX10 water pump, or vertically to power small augers.

Get Everything You Need for Your Honda Engine

No matter how your engine is built or what it’s powering, you can get the parts you need for it from www.hondalawnparts.com. We’re a certified dealer for Honda Engines and Honda Power Equipment so we can ship the OEM parts and accessories across the U.S. and Canada. Need help finding a part? Our site can show you factory parts diagrams and descriptions for your specific model so you know what you’re ordering will fit.

GX and GXV 690 Maintenance

GX and GXV 690 Maintenance

Honda makes quality engines, but it takes steady maintenance for them to live up to their reputation for reliability. Here’s what you need to know to keep your GX 690 or GXV 690 V-Twin in top running condition.

Maintenance Schedule

These maintenance tasks are easy enough that you can do them yourself:

Before each use – Check air filter and oil level.
After the first month or 20 hours of operation – Change the oil.
Every 6 months or 100 hours – Change the oil, clean the air filter and check the spark plug. Clean the spark arrester if your engine has one (GX 690 only.)
Every 200 hours – Replace the oil filter.
Every year or 300 hours – Replace the spark plug.
Every two years or 500 hours – Replace the paper air filter element.

Honda recommends having a small engine mechanic handle these maintenance tasks:

Every year or 300 hours – Check the idle speed and valve clearance, and replace the fuel filter
Every two years – Check the fuel tube and replace as needed
Every 1,000 hours: Clean the combustion chamber (GXV 690 only.)

Oil

This engine is designed to use oil that meets the requirements for API category SJ or later. Honda recommends oil viscosity based on the temperatures the engine will be operating in:

SAE 30 – 50-113ºF (10-45ºC)
Conventional 5W30 or 10W30 – 23-113ºF (-5-45ºC)
Synthetic 5W30 – 5-113ºF(-15-45ºC)

To get an accurate measurement when checking the oil, place the engine on a level surface and let it run for a couple minutes. This will splash some oil on the dipstick, so it needs to be cleaned and inserted all the way into the filler neck before checking the oil level. Some versions of this engine come equipped with Oil Alert, which will shut off the ignition automatically if the oil level is too low.

To change the oil, remove the drain plug, located directly below the starter on the GX 690 and next to the filler neck on the GXV 690. Once the oil has drained, reinstall the drain plug and a new sealing washer. If your engine is due for a new filter, remove the old one with an oil filter wrench. Using a strap wrench can damage the oil pressure switch. Coat the seal on the new filter with clean engine oil before installing. Screw in the filter by hand, then use the wrench to turn the filter another ¾ turn once the filter seats. Pour new oil into the oil filler neck, located on the top of the cylinder directly to the left of the dipstick. Add oil until the level comes up to the upper limit mark on the dipstick. Start the engine and check for leaks.

Air Filter

To access the filter, pull up on the latches at the sides of the air cleaner cover and pull the cover away from the engine. The paper filter and surrounding foam element can be removed by unscrewing the wing nut on the GX 690, while they can be lifted straight out of the air box on the GXV 690.

To clean the paper element, tap it on a hard surface or blow it out with compressed air. When using air, limit the pressure to 30 psi.

To clean the foam element, wash it in a non-flammable solvent or soapy water. Once the filter is dry, soak it in clean engine oil and squeeze it out to remove any excess.

Before reinstalling the filters, wipe out the inside of the air cleaner box.

Spark Plug

To remove the spark plugs, first, clean the area around the spark plug caps and disconnect them from the plugs. Use a 5/8 inch plug wrench to unscrew the plugs.

The spark plug gap should be between 0.028 and 0.031 inches (0.7-0.8 mm.) Replace the plug if it’s damaged, corroded, has a worn electrode or the sealing washer is in poor condition.

Always start the spark plug by hand to prevent cross-threading. Once seated, use the wrench to turn the plug another ½ turn if it’s new or 1/8-1/4 turn if it’s used to get a tight seal. Reconnect the spark plug caps.

Spark Arrester

If your engine has a round high-mount muffler, simply remove the screw from the tailpipe and slide out the arrester. If your engine has a flat side-mount muffler, you’ll need to remove the four bolts holding the muffler protector. With the muffler uncovered, remove the three screws holding in the arrester.

Use a wire brush to scrub off any carbon deposits. Replace the arrester if it has signs of damage.

Keep Your Engine Running with Quality OEM Parts

Hondalawnparts.com is a certified dealer for Honda Engines, letting us sell the parts you need to maintain your Honda engine no matter what it’s powering. Not sure what you need? Just pick your model and serial number, and our site can show you diagrams and descriptions to locate parts on your engine. We ship to any address in the United States or Canada.

Maintaining the WX15 Water Pump

Maintaining the WX15 Water Pump

Honda’s WX15 water pump may be small, but that doesn’t mean it’s disposable. By keeping up on maintenance, you can get the same reliable service you expect from the company’s full-size pumps.

Maintenance Schedule

Before each use – Check the air filter and engine oil level.
First month or 10 hours of operation – Change the engine oil.
Every three months or 25 hours – Clean the air filter.
Every 6 months or 50 hours – Change the engine oil.
Every year or 100 hours – Check the spark plug and clean the spark arrester (if equipped.)
Every two years or 300 hours – Replace the spark plug.

The air filter may need to be cleaned more often when operating in dusty areas. The engine oil should be changed every 25 hours if the pump is used under heavy loads or in high temperatures.

Honda recommends having the following maintenance be performed by a dealer:
Every year or 100 hours – Clean the fuel tank and filter, and check the idle speed, impeller and pump inlet valve.
Every two years or 300 hours – Check the engine valve clearance
Every 300 hours – Clean the combustion chamber

Fuel

When adding fuel, it should only come up to the fuel level mark, located at the base of the filler neck.

The engine can run on gasoline with up to 10% ethanol or 5% methanol. It’s important that this fuel is fresh: either use it within one month of purchase, or up to three months after purchase if it has been treated with a fuel stabilizer. If you will store your pump for longer or you use it sporadically, drain the fuel tank and carburetor before storing. To drain the carburetor, remove the drain bolt directly below the fuel valve, then turn the fuel valve to “ON.”

Oil

The engine powering this pump comes with Honda’s Oil Alert system. If the engine oil level is too low, it will shut off the engine to prevent internal damage.

To check the oil, remove the cap from the oil filler neck. Wipe off the attached dipstick, then put it back into the neck without screwing it in. To drain the oil, remove the drain plug directly below the filler neck. Be sure to install a new sealing washer before screwing the plug back into the crankcase.

This engine holds 8 oz. of oil. Honda recommends 10W30 motor oil for most operating conditions, while SAE 30 oil can be used between 50 and 104ºF. Always use oil that is SAE certified SJ or later.

Air Filter

To open the air cleaner box, push down on the two latch tabs on the top of the cover, then swing the cover out and down.

To clean the air filter, wash it in warm, soapy water or a nonflammable solvent. Gently squeeze the filter to remove the water or solvent, then let the filter dry. Dip the filter in clean engine oil, then squeeze it out. Never twist the filter: this can alter its shape, which can keep it from making a good seal inside the air cleaner box. Always wipe out the inside of the air cleaner before reinstalling the filter.

Spark Plug

To find the spark plug, look at the top of the fuel tank. The plug is directly below the round indent in the side of the tank.

To remove the plug, unhook the spark plug cap, then unscrew the plug with a 5/8 inch spark plug wrench. The gap between the electrodes should be between 0.024-0.028 inches (0.60-0.70 mm.) Replace the plug if the electrodes or insulator are damaged, or the plug has fouled.

When installing the spark plug, first thread it in by hand to prevent cross-threading. Use the plug wrench to tighten down the plug, turning an extra 1/8 turn once the plug is seated against the engine to get a good seal. If you’re installing a new plug, turn it an extra ¼-½ turn to form the washer to the plug and engine opening.

Spark Arrester

A spark arrester isn’t included from the factory, but it can be added to the muffler on any WX15 pump to meet local fire regulations.

To access the spark arrester, first, remove the muffler protector. It’s held on by three 5 mm bolts: two are located on the bottom of the cover, while the third is on the top right side. Remove the screw on the side of the exhaust outlet and slide out the arrester.

Clean any carbon buildup on the arrester screen with a wire brush. Replace the spark arrester if it has signs of holes, cracking or other damage.

Get the Parts You Need to Maintain Your Honda Pump

Hondalawnparts.com is a certified dealer for both Honda Engines and Honda Power Equipment. Our site has built-in factory information including parts diagrams and descriptions, making it easy to find what you’re looking for from hoses to spark plugs. We ship across the U.S. and Canada.

Maintaining WB20 and WB30 Water Pumps

Maintaining WB20 and WB30 Water Pumps

Want your WB20 or WB30 general purpose pump to provide years of trouble-free service? Here’s what you need to know to keep up on maintenance from using the right fuel to getting a good spark.

Maintenance Schedule

Each use: Check engine oil level and air cleaner
The first month or 20 hours of operation: Change oil
Every three months or 50 hours: Clean air filter
Every 6 months or 100 hours: Change oil, check the spark plug, clean sediment cup and, if equipped, spark arrester.
Every year or 300 hours: Replace the spark plug.

Honda recommends having this pump professionally serviced every 6 months or 100 hours to clean the combustion chamber, fuel tank, and filter, and every year or 300 hours to check the idle speed, valve clearance, impeller and pump inlet valve.

The WB20 and WB30 use different engines, but because they use the same basic design, maintenance is virtually identical.

Fuel

The engines in these pumps are designed to run on 86 Octane or higher with a maximum of 10% ethanol (E10) or 5% methanol. Use a stabilizer if fuel will be left in the tank for more than one month after purchase. Replace the fuel after three months.

When adding fuel, only fill to the bottom of the filler neck. The inch of air space left in the tank is needed to let the fuel expand when heated up during operation or storage. Make sure the vents in the cap are clean to let air enter the tank as fuel is drawn into the carburetor.

Oil

To get an accurate reading when checking the oil level, wipe off the dipstick and insert it into the filler neck without screwing it in.

Honda recommends oil with an API service category SJ or later. 10W30 will work under most conditions, and SAE 30 can be used at operating temperatures between 50 and 105ºF.

To drain the oil, remove the drain plug to the left of the oil filler neck. Use a new sealing washer when reinstalling the drain plug to ensure a tight, leak-free seal.

The engine in the WB20XT holds 0.59 quarts, while the engine in the WB30XT holds 0.61 quarts. When adding fresh oil, it should come up to the edge of the filler neck.

Air Filter

To open the air cleaner box, remove the wing nut on the top of the box followed by the cover washer and air cleaner cover. From there, the filter and grid can be lifted off of the carburetor.

If the air filter is dirty, clean it using a non-flammable solvent or water and a mild detergent. Once dry, soak the filter in clean engine oil and squeeze out any excess.

Sediment Cup

To clean the cup, set the fuel valve lever to “OFF.” Unscrew the sediment cup, located directly below the fuel switch, and remove the O-ring that sits between the cup and the carburetor.

Wash the cup in a non-flammable solvent. Place a new O-ring in the carburetor opening and reinstall the sediment cup. Open the fuel valve and check for leaks.

Spark Plug

Remove the spark plug cap and wipe away any dirt. The plug can be removed with a 13/16 inch spark plug wrench. The plug gap should be between 0.028 and 0.031 inches (0.7-0.8 mm.)

When installing the plug, screw it in by hand to prevent cross-threading, then tighten it down with the plug wrench. Once the plug seats, turn it another 1/8-1/4 turn if it’ s a used plug, or ½ turn if it’s a new plug.

Spark Arrester

These pumps don’t come with a spark arrester, but one can be added to meet local fire and safety regulations. Let the engine cool for at least a half hour before handling the muffler.

To access the arrester, first, remove the two 8mm nuts attaching the muffler to the engine. Remove the muffler.

Next, remove the four 5 mm screws from the muffler protector, then remove the protector from the muffler.

Remove the 4 mm screw from the muffler outlet. You can now slide out the spark arrester.

Clean off carbon deposits on the arrester with a wire brush. If there are cracks or holes in the arrester, it needs to be replaced. Reassemble in reverse order.

Get the Parts You Need for Your Honda Water Pump

Hondalawnparts.com is a certified Honda Power Equipment and Honda Engines dealer. From hoses to spark arresters, if it’s Honda, we can ship an OEM replacement to your door whether you live in the U.S. or Canada. Need help finding a part? Browse our water pump accessory section or select your model using our search engine to see Honda factory diagrams and pick what you need.

Which Type of Water Pump is Right for You?

Which Type of Water Pump is Right for You?If you need a pump, Honda probably makes something to fit your needs. Which type of water pump is right for you? It depends on where the pump is used and the type of water that needs to be moved. Here’s what you need to consider when choosing a pump.

Types of Pumps

Honda makes pumps in four general categories, each with a specific purpose in mind.

De-watering: These pumps are built to handle clean water with debris up to 3/8 of an inch in diameter, which is the size of a marble. Models include the lightweight WX, general purpose WB and high-pressure WH.

General purpose: The WMP20 is the only Honda pump approved for industrial and agricultural chemicals. It comes with a housing and seals designed for chemical resistance, but it can also be used to pump water.

Construction: These pumps are built for high volume applications and water with high solids content. WT trash pumps are basically beefed-up de-watering pumps, capable of handling solids up to two inches in diameter. That’s between the size of a golf ball and a billiard ball. The WDP diaphragm pump is built for severe conditions. It can pump water with up to 25% debris content and with solids up to 2.4 inches in diameter, and it won’t overheat if run dry.

Submersible pumps: These electric pumps are perfect for fixed locations. They’re fitted with float switches, activating the pump when the surrounding area starts to flood. The WSP50 and WSP100 are trash pumps, while the other models are de-watering pumps.

Choosing a Pump for Removing Water

To match the pump to your application, you need to consider both the amount and size of debris in the water. These are general guidelines for common applications:

Clear, silt and slimy water – All pumps
Muck water – All models except WSP submersible
Slow seepage – WDP diaphragm pump
Fast seepage – All models
Manholes and cofferdams – All models except for WX lightweight de-watering pumps
Quarries: WH high-pressure de-watering pumps, WMP multi-purpose, WT trash and WSP submersible
High solid content: WT and WDP construction pumps or WSP50 and WSP100 submersible trash pumps
Deep piling: WSP submersible pumps
Industrial and agricultural chemicals: WMP multi-purpose pump

Choosing a Pump to Supply Water

Water used to supply equipment is usually clean or almost clean, so the main consideration is flow rate. These are general guidelines for common equipment and applications:

Mixers, pavers, concrete curing and non-potable water wagons – WB general purpose de-watering, WMP multi-purpose and WT trash pumps
Sprinklers and nozzles – WH high-pressure de-watering pumps
Fountains and garden irrigation – WSP submersible pumps

Head and Flow Rate

Head is the vertical distance the pump can move water. This is divided into suction head, the maximum height at the end of the intake hose and the intake of the pump, and discharge head, the height between the discharge port and the end of the discharge hose. Submersible pumps draw water in from the bottom of the pump housing, so they only have a discharge head.

Quoted flow rates and head are under ideal conditions. The actual flow rate will decrease as head increases, and both head and flow rate will decrease as hose length increases. The suction head is controlled by surrounding air pressure: quoted lift is at sea level, while real world lift will decrease by about a foot for every 500 feet of elevation. Chemicals and trash-filled water can be heavier than clean water, which further decreases pump rates.

To take the confusion out of selecting a pump, Honda offers a free program called “Pump Select.” Once you give the program information about your operating conditions, it can recommend a pump that will best fit your needs.

Getting the Parts and Accessories You Need for Your Honda Pump

Hondalawnparts.com has more than just lawn equipment parts: we carry everything for Honda engines and power equipment, including pumps. We have a section dedicated to pump accessories so you can put together the hoses and filters you need for your application, or you can find OEM replacement parts by selecting your model and serial number. Our site has built-in factory parts diagrams and descriptions to help you find what you’re looking for. We ship across the U.S. and Canada.

Submersible Electric Water Pumps

Submersible Electric Water Pumps

Honda’s gas-powered pumps are great for temporary use, but what if you have a situation where you need to move water in a fixed area continuously? By using sealed electric motors, their submersible pumps can handle constant operation, making them perfect for jobs ranging from irrigation to flood cleanup.

Uses

These pumps are perfect for stationary applications where electric power is readily available. Unlike gas-powered pumps, these submersible pumps can be run constantly for days or even weeks at a time as long as they’re fully submerged. These models are commonly used for these applications:

– Pumping clear water to and from fountains and pools
– Draining flooded areas in enclosed spaces such as basements
– Garden irrigation
– Removing seepage in residential, commercial and industrial buildings
– Removing waste water from washing machines, water softeners, cisterns and dehumidifiers

These pumps are rated for continuous use when pumping water up to 104°F and can be used for intermittent use for pumping water up to 140°F. That’s high enough to handle almost any fresh water continuously and brief pumping of water direct from a household water heater. However, they are not rated to handle corrosive fluids like sea water.

Built with Honda Quality

It may not have one of the company’s famous engines, but these pumps are still built with the attention to detail that gives Honda products their reputation for reliability. This starts with a stainless steel case that will remain rust free where coated cases will eventually rust. It insulates the motor with a blanket of air, keeping everything cool when submerged in warm water. Oil lubricated mechanical seals prevent damage if the pump runs dry, and a float switch is included with every model to shut the pump off automatically once the area has been drained. The motor is further protected by a built-in thermal automatic reset to prevent overloading. The pump shaft rides on shielded ball bearings for hundreds of hours of maintenance-free service.

Models

Honda makes both water and trash pumps. Water pumps can handle solids up to 3/8 of an inch in diameter, and they have top-mounted discharge ports. Trash pumps can handle solids up to two inches in diameter and have side-mounted discharge ports.

Along with flow rates and solids capacity, there are two other factors that need to be taken into account when choosing a pump. Head is the maximum vertical distance the pump can move water. Since the intake is built into the bottom of the pump, this is the distance from the pump outlet to the top of the system. Power cable length also limits the placement of the pump. It’s built into the pump for a watertight seal, and due to high power demands, it should be plugged directly into an outlet.

Water Pumps

The WPS33 has a 1/3 hp motor that can move up to 40 gallons of water per minute. It has a maximum head of 23 feet, and it comes with a 20-foot power cable. The WSP53 uses a ½ hp motor, giving it a maximum flow rate of 70 GPM and a maximum head of 44 feet. It comes with a 50-foot power cable. The WSP73’s ¾ hp motor pumps water up to 54 feet high at a rate of 74 GPM. It comes with a 50-foot power cable.

Trash Pumps

The WSP50’s ½ horsepower motor pumps water at a rate of 110 GPM. It has a total head of 32 feet and comes with a 25-foot power cable. The WSP100’s one horsepower motor moves up to 150 GPM with a head of 42 feet. It comes with a 25-foot power cable.

What You Need to Use a Submersible Pump

Setting up a submersible pump is much simpler than setting up a gas-powered pump. The strainer is built into the base of the pump, while the discharge opening is designed for use with solid or flexible pipes with G2 pipe fittings. A no-return valve should be built into the pipe system. A heavy cable or rope should be tied to the handle of the pump to lower it into the water and raise it back up. The plug is designed to use with three prong grounded sockets.

Getting Parts for Your Water Pump

www.hondalawnparts.com is a certified dealer for Honda Power Equipment, letting us offer OEM parts for everything Honda makes from gas-powered diaphragm pumps to electric submersible pumps. Whether you need a strainer or a float switch, we can ship your order to any address in the U.S. or Canada.

HHT35SUKAT Brushcutter

Honda_HHT35SUKAT

Sometimes you need a brushcutter, but it doesn’t make sense to have a separate piece of equipment. With Honda’s HHT35SUKA, you can have a single machine that is built for brushcutting and can be fitted with a trimmer head, making it an all-in-one machine. To fit these dual roles, it comes with a durable flex shaft and an efficient, high torque engine to give it the strength for serious cutting while still being small and light enough for frequent use.

Control

While Honda’s trimmers use a loop handle and a single strap harness, this brushcutter comes with a bike handle and a dual strap harness. This puts the weight of the machine on the operator’s shoulders, balancing the shaft so it takes minimal effort to swing the head back and forth when mowing.
Since the throttle is located on the right grip, the operator can stand in a natural position. Together with a weight of just 16.1 lbs, this brushcutter is comfortable enough for all-day use.

Engine

The HHT35SUKA is powered by Honda’s GX35 Mini 4-stroke. This brings several benefits over a two-stroke other than improved emissions and the ability to use straight gasoline.

Two-strokes only make power near the top of their RPM range, while this engine’s torque curve is almost flat. This lets it power out of situations that would stall a two-stroke engine.

Two-strokes push in fresh air and fuel while pushing out exhaust gases at the same time using the crankshaft. Inevitably, some fuel gets pushed out of the engine before it can be burned, resulting in high emissions and fuel consumption. The GX35’s intake is sealed when pushing out exhaust gases, resulting in emissions low enough to meet regulations across the U.S. while reducing fuel consumption by as much as 50%. This design also significantly reduces noise.

This engine shares much of its design with Honda’s GC series. It uses an overhead cam driven by an internal timing belt built to last the lifetime of the engine. Ball bearings support the crankshaft, while the connecting rod rides on a roller bearing, reducing friction and vibration. There’s even an automatic decompression system, so it takes almost no effort to get the engine started. Best of all, the crankcase’s baffle system keeps the oil in place no matter what position the engine is in, and the rotary slinger keeps oil circulating as the engine is tilted. This means the UKA can be stored and used at any angle, just like a two-stroke powered brushcutter.

Cutting

This model comes with a blade barrier kit pre-installed to shield the operator from debris, set of safety glasses and a 10 inch, 80 tooth saw blade for cutting brush and wood. Honda also offers three, four and 8 tooth blades for lighter grass and weed cutting.

Trimming

The UKA comes with a Kwik Loader head. Instead of using a reel that can get tangled, this head takes pre-cut lengths of line that lock into the head automatically. The version used in this model is designed for Ultra Quiet line. Together with the four-stroke engine, this makes this trimmer one of the quietest on the market. This head cuts a 17-inch swath.

Honda also offers OEM alternatives to fit your preferred cutting style. The Pro-tap head has a button on the bottom that can be bumped against the ground to release more line. It’s designed to index one or two lines and can hold up to 20 feet of line on the spool. The Prolux Semi-matic spool is the standard head on Honda’s other trimmers. It has both an automatic and bump feed mechanism. The unused line can be removed by turning the center of the head. Like the Pro-tap it holds up to 20 feet of line. Other options including Prolux manual heads are also available.

Warranty

The HHT35SUKA and its engine are guaranteed for one year of commercial use or two years of residential use. The flex shaft is guaranteed by a limited lifetime warranty.

Getting Parts for the HHT35SUKA

Need to fix your Honda brushcutter? Looking to get a different trimmer head or a new blade? Visit www.hondalawnparts.com. We’re a certified Honda Power Equipment and Honda Engines dealer, letting us offer the full range of OEM parts from Honda and their manufacturing partners. Need help finding the right part? Once you select your model and serial number, our site can show you information direct from the factory including parts descriptions and exploded parts diagrams. We can ship whatever you need to any address in the U.S. or Canada.

Honda Trimmers

honda trimmers

String trimmers have to be small and light, forcing manufacturers to make compromises on usability and reliability. However, Honda has managed to address those issues with their own trimmers. Built around their compact four stroke engines, these trimmers have operator-friendly features and a long list of accessories to take the frustration out of yard work.

Mini 4 Stroke Engine

Tightening emissions laws mean the two-stroke’s days are numbered, but there are plenty of reasons to choose Honda’s Mini 4 Stroke over a two-stroke aside from its low pollution design. A clever oil baffle system keeps the engine lubricated in any position, so they can be used and stored like a two-stroke. Since it still has an oil sump, straight fuel can be used to power the engine instead of oil and fuel mixtures.

The valves seal the combustion chamber when the air and fuel ignite, making the engine much quieter.
Intake and exhaust cycles are also separated, so fresh fuel doesn’t flow straight out of the engine. This improves fuel efficiency up to 50%. This also helps the engine is getting the exact mix of air and fuel it needs, making it easier to start. Torque is produced over a wider RPM range, so these trimmers don’t bog down as easily as two-stroke models.

Trimmers

Honda’s trimmer models use a loop handle that lets the operator switch hand positions for less fatigue. A single strap harness and safety glasses are included. The HHT25STLA comes with a 25 cc engine, weights 13.1 lbs. and uses a Semi-Matic bump head to cut a 17-inch swath. The HHT35STLA is similarly equipped, but it uses a 35 cc engine and weighs 14.8 lbs.

Brushcutter

The HHT35SUKA comes from the factory with everything you need for brushcutting, including a double harness, a debris barrier, and a 10-inch saw blade. A Kwik Loader head is also included for string trimming, cutting the same 17-inch swath as the standard trimmers. This model also uses a wide bicycle-style handle makes the brushcutter easy to control while minimizing kickback. The UKA is powered by a 35 cc engine and weighs just over 16 lbs. with the cutting head installed.

VersAttach

There are plenty of landscaping jobs that can benefit from motorized power, but it doesn’t make much sense to have a piece of equipment that will only be used a couple times a year. With Honda’s VersAttach system, several tools can be attached to a single power unit, reducing cost and maintenance. Compatible tools include an edger, trimmer, pruner, hedge trimmer, cultivator, and blower. Extensions are also available to increase the unit’s reach.

Most buyers will find they get the most use out of the trimmer attachment. It comes with a bump head and cuts a 16.5-inch swath. Safety glasses and single harness are included. Honda offers a three tooth grass blade for light brush, but there’s no provision for larger blades, nor can these units be fitted with a double harness.

Power units include the 25 cc UMC425 and the 35 cc UMC435. All VersAttach tools are compatible with both models.

Accessories

Honda offers three, four and 8 tooth grass/weed blades in 9 and 10-inch sizes as well as a 24 tooth brush blade for the HHT25 and an 80 tooth brush blade for the HHT35. These blades are also compatible with the HHT35UKA brushcutter. When using a metal blade on a trimmer, a barrier kit should be installed to deflect debris, while a double sling is recommended to give the operator better control of the trimmer’s position.

The heads on these units are compatible with several trimmer heads including the Kwik-Loader and Prolux’s manual and semi-manual heads.

Warranty

Honda guarantees their trimmers and Mini 4 Stroke engines for two years residential or one year of commercial use. The flex shaft, which transfers power from the engine to the head, has a limited lifetime warranty.

Get the Parts and Accessories You Need Straight from Your Browser

As a certified Honda Power Equipment and Honda Engines dealer, www.hondalawnparts.com is able to offer the full range of OEM parts and accessories for these trimmers. Our site has built-in factory parts diagrams and descriptions, and you can search for parts based on your equipment’s engine and serial number. We ship across the U.S. and Canada.

How Honda Develops Engines

High Altitude Honda Engine

How does Honda develop their world-renowned small engines? It takes an effort spread across research and development facilities across the globe. Borrowing design tools, materials and other developments across the company, engineers both here and abroad work to make sure that each engine fits their applications and each application fits their engines, even if they aren’t made by Honda.

Developing Engines Hand-in-Hand with Applications

Honda introduced their first general purpose engine just 5 years after opening their doors, and they started making waves in 1954 with its follow-up, the four-stroke T-type. In a market dominated by two strokes and big diesels, this engine stood out for its ease of use. It was first used in backpack sprayers shipped to Brazil, but the engine would find its true place in the domestic market. With more people heading to Japan’s cities to find work, farmers needed a way to do more work with less manpower. Demand for labor-saving devices skyrocketed, leading Honda to start building their own small-scale farming equipment.

From that point forward, the small engine division and the power equipment division were linked. While other engine manufacturers acted independently, Honda was able to find and address issues in their engine designs by developing them side-by-side with equipment. This can be seen in their entry into two markets: compact generators and lawnmowers.

Sony introduced their portable Micro-TV in 1962, leading Honda to develop an equally tiny generator prototype to use this portable television on the go. Seeing the potential for such a device, they launched the world’s first compact generator, the E300, in 1965. To get this new design to work, they designed a new 50 cc engine specifically for the application and in the process introduced the world’s first timing belt.

50ccWith the release of their first mower in 1978, they introduced a unique blade brake clutch system that would shut off the blades if the operator lets go of the handle. This made the mower safer and ended the hassle of restarts required with competing systems. This feature is still built into some of their lawn mower engines today.

Developing an Engine

Honda’s small engines start their development at the small equipment lab at Honda R&D Co, Ltd, located in the outskirts of Tokyo. Sitting between two elementary schools, this small office building houses everything you’d expect to see in an automobile development lab, but on a smaller scale. Advanced CAD and simulation software is used to develop prototypes which are put through a battery of tests on-site. These tests include everything from cold weather testing in a room that has artificial snowfall to a high-temperature room that can stress and prematurely age engines to quickly identify the sources of common breakdowns. The quietness of Honda’s engines is the result of tests in an anechoic chamber. It blocks all outside noise so engineers can isolate and identify where noises come from inside the engine.

These designers are able to use production techniques and materials developed in Honda’s labs across the globe. In the U.S. alone, Honda has 14 research and development centers working on everything from jet engines to new materials. Honda also performs final small engine development for North America at a research center in Haw River, NC. Established in 1993, this 11,000 square foot facility makes sure each model can tolerate our widely varying weather conditions while meeting emissions standards.

Working with Equipment Manufacturers

When an equipment company wants to use a Honda engine in their products, they don’t just order a few units and bolt them on. Instead, they go through a development process with Honda to make sure the engine and equipment are fully compatible.

First, the manufacturer contacts a regional distributor. Together, they work out what engine will best fit the application as well as pricing, availability, technical requirements and other issues.

Once the manufacturer knows the basics, they can build a Honda-powered prototype. This equipment is then tested at the Haw River lab to make sure the engine will work properly. This includes factors like oil temperature, vibration, operating speeds and engine loads. Wiring and mounting systems are also inspected to make sure they’ll be reliable.

Maintaining the Quality of Your Honda Engine

Want to maintain the quality engineering of your Honda small engine? When you need parts, visit www.hondalawnparts.com. As a certified dealer, we’re able to offer the full line of OEM parts, letting you keep your engine running just like it did when it left the factory. Our site even has factory information including parts descriptions and exploded diagrams so you can quickly find what you need. We ship across the U.S. and Canada.

Pump Hoses: Getting the Right Setup for Your Honda Pump

Pump Hoses: Getting the Right Setup for Your Honda Pump

Buying a pump is easy, but it can be a lot harder picking the right hoses. Which hose materials should you choose? What about thread compatibility? What’s the difference between a basket strainer and a skimmer strainer? Here’s what you need to know to choose the right combination of parts to fit your needs.

Hoses

The optimum hose length is the minimum you need to get the job done. As length increases so does flow resistance, which can reduce your pump’s performance.

Intake hoses need to have an internal structure to resist vacuum forces. PVC hoses are good for general use, while EPDM is more abrasion resistant, making it a good choice for trash pumps.

Discharge hoses have to withstand outward pressure, but these stresses are much lower than those experienced by the intake hose. Basic lay flat hose has a low-pressure rating, typically below 80 PSI, and is intended for pumping water downhill or across flat surfaces. When pumping water over slight inclines, look for a hose with at least a 150 PSI. As with intake hoses, EPDM lining is the best choice for trash pumps.

Keep in mind that pressure ratings for all hoses are based on an operating temperature of 68ºF. Maximum pressure will decrease in higher temperatures, so it’s better to err on the safe side if you regularly pump warm water.

Connector Types

Pin lug ends use threads like a garden hose. These usually need to be tightened down with a large spanner. Hoses typically come with threads on both ends so multiple hoses can be connected using to get the right length. All Honda pumps have pin lug threads on the intake and discharge openings.

Camlock ends use a quick connect system with two cam arms that fold in to lock the hose in place. This allows the hose to be connected and removed without the use of tools. Camlock adapters can be added to threaded connectors, including the openings on your Honda pump.

Threads and Gaskets

There are two widely used thread standards on water and trash pumps: NST and NPSH. NST is National Standard Thread, another name for NFPA 1963. This thread is common on firefighting equipment. NPSH is National Pipe Straight Hose thread. It’s slightly smaller in diameter than NST, and it has more threads per inch. This thread is commonly used on water and trash pumps across the industry, including Honda’s pumps. Both threads are straight, so they don’t self-seal like tapered plumbing threads. To make the connections water-tight, a separate seal must be added to the face of the connector.

Strainers

A strainer covers the opening of the intake hose to block materials that are too big for the pump to handle. Hole size should be chosen based on the maximum debris size your pump can handle. As for materials, plastic works well for regular pumps, while metal can withstand impacts from large debris drawn in by trash and diaphragm pumps.

Basket strainers work well for general use, while skimmer strainers are best for completely draining bodies of water. These have a low profile to pull in water until it’s almost gone without starving the pump.

Get the Parts You Need to Complete Your Honda Pump

When you need OEM parts and accessories for your Honda, visit www.hondalawnparts.com. We have both complete boxed hose kits with everything you need to start using your pump and individual parts so you can build hoses for specific requirements. You can see what we have to offer on our pump accessories page, or enter your pump’s model and serial number to see parts and kits that will fit your equipment. Need parts for your pump’s case or engine? Our site can show you factory diagrams and descriptions so you can get exactly what you need. No matter what you order, we can ship it to any address in the United States or Canada.