Getting the Most from the HRR216PKA Walk-Behind Mower

HRR216PKA Walk-Behind Mower

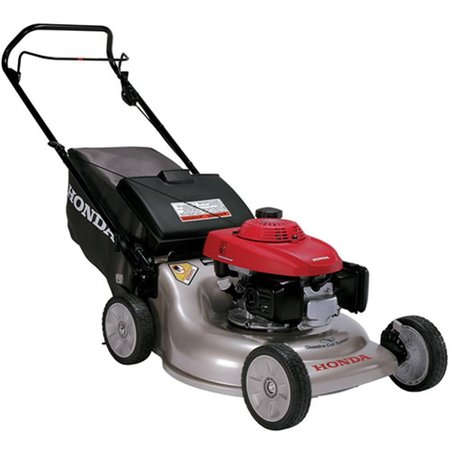
The HRR216PKA is Honda’s least expensive mower, making it the most common choice for homeowners new to the brand. Despite its price, it still offers all the innovation you expect from Honda, which makes using it different from anything else from the market. Here’s how you can get the most out of this unique mulching mower.

Using the Clip Director

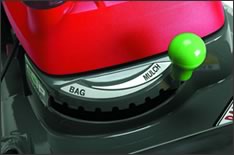
Unlike most walk-behind mowers, the PKA has a rear-mounted discharge chute. The Clip Director, located next to the base of the handle, operates a door that can cover this chute. This eliminates the need for a mulch plug.

To change mowing modes, push in the button and move the lever to either “Bag” or “Mulch.” If you want to discharge clipping without mulching them, set the Clip Director to “Bag.” Clippings will be sent out of the rear discharge chute without being re-cut.

Cutting Height

Height is set by moving the levers next to each of the wheels. With the levers moved all the way toward the rear of the mower, the cutting height is 1 1/8 inches. Adjustment isn’t linear: as the levers are moved forward, the cutting height increases to 1 ¾, 2 ½, 3, 3 ½ and finally 4 inches.

Fuel

The engine used in this mower is designed to use gasoline that contains up to 10% ethanol. This fuel should be used within 30 days of purchase, or within 90 days if it’s treated with a fuel stabilizer. When adding fuel, only fill the tank up to the bright red fuel lever gauge inside the filler neck. After filling the tank, move the mower away from the fueling location. This prevents the ignition of any remaining fuel vapor.

Smart Drive Control

The mower’s self propulsion is controlled by pushing on the palm pads of the smart drive control: the harder you push, the faster the mower will go. Letting up on these pads shuts off the drive system, letting you push the mower when maneuvering around trees and other obstacles.

To adjust the position of the Smart Drive Control, move the adjustment lever on the back of the controls to the left to unlock. Rotate the controls until they’re in a comfortable position, then move the adjustment lever to the right to lock them in place.

If the drive system isn’t engaging like it should check the cable tension. With the engine off, then put the drive control levers in their lowest position. Push down on the levers while rolling the mower backward. The mower should stop before the levers are pointed straight down. If it doesn’t stop, find the adjuster, located between the bottom of the handle and the mower. Loosen the jam nut. It may be helpful to mark one side of the long adjuster nut. Pull the mower backward without using the Smart Drive Control. If you don’t feel resistance, turn the adjuster nut clockwise one turn. Keep rolling the mower and turning the adjuster until the mower wheels lock up when pulling the mower backward. Turn the adjustment nut counterclockwise 8 times and tighten the lock nut.

Microcut Blades

The Microcut system uses two blades stacked on top of each other. The upper blade is narrow with an angled cutting edge, while the lower blade has large winged ends to increase vacuum.

To access the blades, tilt the mower on its right side so the fuel tank is facing up. This keeps fuel from flooding the carburetor.

When fitting blades to your mower, the upper and lower blades should be stacked on top of each other, followed by a set of directional washers and bolts. The outer edge of the washers should face toward the blades. Torque the blade bolts to 36-43 ft-lbs.

Grass Bag

To attach the bag, lift the guard on the back of the mower and set the bottom edge of the bag opening against the bottom of the discharge chute. Push the bag forward to lock it into place.

Over time, the pores in the bag can become clogged, keeping air from passing through and reducing the amount of grass entering the bag. If this happens, remove the bag from the mower and wash it with a garden hose or pressure washer. The grass bag can be used again once it’s completely dry.

Mowing on Hills

This mower is designed to handle slopes up to 20 degrees. When mowing on a hill, go across it instead of up and down.

Getting Parts for Your Honda Mower

Hondalawnparts.com is an authorized Honda Engines and Honda Power Equipment dealer, which means we carry everything you need to maintain your HRR216PKA mower. Our site can show you parts based on your model and serial number, and it even has built-in parts diagrams direct from the manufacturer, making it easy to find what you need. We ship across the US and Canada.

Versamow: Solving Common Problems with Mulching Mowers

Versamow: Solving Common Problems with Mulching Mowers
What is Versamow? Honda touts this as a single feature, but it’s really a combination of design elements included on HRX mowers that give them the flexibility to fit any mowing situation. By using a clever chute control and advanced blades, the mower can mulch wet grass and leaves, get more clippings into a bag and even operate in two mowing modes at one time.

Microcut Twin Blade: More Cuts for Better Performance

Instead of making blades with different amounts of lift that have to be swapped out when going between mowing, bagging or discharge, Honda fits their mowers with a pair of blades that work in any situation. While in discharge mode, the leading edges of these blades cut grass twice with each pass, leaving finer clippings. In mulching mode, the vacuum created by the blades blows clippings upward into the mowing chamber to fall back town for another cut.

The added edges cut down clippings faster, letting HRX models mulch grass that would bog down other mowers while creating a very fine mulch that’s quickly digested by microorganisms, returning nutrients to the soil. The dual cutting action also makes for smaller, more compact clippings when bagging, stuffing up to 40% more grass in the bag than competitors’ walk-behind mowers.

Clip Director: Getting the Right Balance

Instead of being stuck in bagging, mulching or discharging modes, the Clip Director lets you vary the amount of grass that is kept inside the mowing chamber for mulching and the amount that is released to the bag or the discharge chute. With 9 positions, you can balance mulching with discharging for the best results.

The lever moves a door on the back side of the deck. In the highest bagging setting, the door is fully open, drawing all the clippings into the bag. Move it to the highest mulching setting, and the door is fully closed, trapping the clippings in the mowing chamber where they’re cut down to size before falling to the ground. Want to discharge clippings? With the bag removed, clippings that go through the door will fall through a chute and end up on the ground.

Having trouble deciding which mode you should use to mow your lawn? If the lawn is too thick or wet to mulch all of it, you can direct some of the clippings out of the deck, mulching the rest. If you want a clean finish without having to bag lots of grass, you can use the Clip Director to divert some grass toward the deck or chute. This lets you leave a small amount of clippings that will blend in with the lawn and cut down on the amount of yard waste you have to dispose of.

The deck is also designed to work with the Clip Director when mulching leaves. Just set it one or two positions away from the full mulch position, and the leaves will be kept in the mowing chamber long enough to be cut down to size before being discharged.

What Else Can I Expect from a Versamow-Equipped Mower?

When clippings come through the door, they fall out of the rear of the deck like a high-end landscaping mower, spreading them out instead of leaving piles as you mow. Since there’s no chute sticking out of the side, the mower is narrower, making it easier to maneuver.
The chute cover stays on the mower, lifting up when you want to install the bag, and the Microcut blades work for all types of mowing. That means you can switch between mulching, bagging and discharging clippings without needing to use tools or install extra parts like a mulch plug.

Get the Performance Your Honda Mower Was Designed For

When you want quality OEM parts for your mower, visit www.hondalawnparts.com. We’re an authorized dealer for Honda Engines and Honda Power Equipment, so we can provide you with everything you need to keep your HRX cutting as good as it did when it was new. Our site has built-in factory parts diagrams and descriptions so you can be sure you’re ordering exactly what you need. We ship across the USA and Canada.

Caring for Your Generator’s Battery

EB2800iElectric start is one of the best features you can have on a generator, letting you turn a key whenever you need power. However, that starter won’t work if you aren’t keeping up with the maintenance on your generator’s battery. Here’s what you need to know about keeping your generator ready to start the next time you have a power outage, go on camping trip or work in a remote area.

Does My Generator Have a Battery?

The battery is only used to power the generator’s electric starter and has no connection to the unit’s AC power generation system. If your model doesn’t have an electric starter, it doesn’t have a battery.

These current models have electric start, and thus have a battery:
EU3000iS
EM4000S
EB5000
EM5000S
EB6500
EM6500S
EU7000i
EB10000

Honda doesn’t list battery maintenance as part of the regular maintenance schedule, but it’s a good idea to clean the connections at least every 6 months or 100 hours of use. Honda also recommends recharging the battery monthly if the generator isn’t in frequent service.

Battery Handling Safety

Battery components contain lead. Always wash your hands after handling the battery or terminals.

If you spill this acid onto yourself, contact medical personnel immediately and do the following to limit the damage the acid can do to your body:

Eye contact — Flush the eye with water from a cup or container for 15 minutes. Do not use water under pressure, including water directly from a faucet, as this can cause eye damage.

Skin contact — Remove any clothing that came in contact with the acid. Flush the affected area with large quantities of water.

Swallowing — Drink water or milk. Do not induce vomiting.

Accessing the Battery

Current EM series generators store the battery behind a cover directly below the outlets, while earlier open frame generators place the battery behind a metal grid next to the engine. To access the battery on EU Series generators, the entire front panel must be removed.

Once you can access the battery, remove the negative battery terminal first, followed by the positive terminal.

Smaller batteries used in enclosed units have a band that can be unclipped to remove the battery. Larger batteries are held on by a set plate. To remove this plate, loosen the flange nuts on the ends of the plate. Pull the plate off of the battery and slide the battery and battery tray out of the generator.

Battery Electrolyte

The electrolyte level needs to stay between the upper and lower marks on the battery cells. If the level dips below the lower mark, the battery can sulfate, losing the ability to store electrical power.

The lower and upper-level marks are marked on the outside of the battery directly below the terminals. If one of the cells is low, carefully pry up the battery cell caps located next to the terminals. Add distilled water to the cell, then reinstall the cap.

If the battery seems to lose electrolyte rapidly, or the battery is weak despite following maintenance guidelines, have your generator inspected by a dealer. It could be an indication of a dying battery or a faulty charging system.

Cleaning

Any corrosion on the battery or terminals should be cleaned off with a brush and a mix of baking soda and water. This basic solution will neutralize the acid that has collected on these components.

Charging

Charge the battery at 10% of its amp hour rating for three to four hours. It’s common for replacement batteries to have different specifications from the ones originally installed in Honda’s generators. When setting the charge rate, go by the Ah rating printed on top of the battery, not the specifications in your owner’s manual.

Keep Your Generator Running with Genuine Honda Parts

We can’t ship batteries, but if you need anything else for your Honda generator, you can get it from www.hondalawnparts.com. From battery bars to fuses, you can find the right parts for your equipment quickly and easily using our advanced search engine. When you select your model, it will show you factory parts diagrams and descriptions so you can see what you’re ordering and where it fits on your generator. We can ship whatever you need to any address in the USA or Canada.

EM6500s Generator

EM6500s Generator

Are you looking for a generator that’s powerful enough to use for home backup or powering electric tools while still being portable? The EM6500s is Honda’s most powerful residential model, offering up to 7,000 watts of peak power along with an advanced control system that provides steady current that is safe for the most sensitive electronics. It also uses heavy-duty components including the company’s most advanced GX-Series engine, so it’s tough enough for commercial users.

Performance

The EM6500s is powered by Honda’s iGX 390 engine. The iGX’s ECU handles the choke, throttle, and ignition automatically, taking the guesswork out of starting and operation. Honda’s Eco-Throttle automatically adjusts engine RPM to meet load requirements to reduce fuel consumption and noise. At 50% load, this generator can run up to ten and a half hours on one 6.2 gallon tank of fuel. A built-in gauge makes it easy to plan for downtime when refueling. The engine is fitted with a battery-powered electric starter. If the battery is dead, the engine can still be started using the back-up recoil starter.

All of this is packed into a frame with folding handles and wheels, making it easy to move around job sites or set up for emergency power. While running, the noise from this generator is between 64-66 dB, which is about as loud as a chainsaw.

What Can This Generator Power?

The EM6500s can produce 6,500 watts of steady power with a peak of 7,000 watts for up to 10 seconds. This peak power comes into play with reactive loads: devices with electric motors need extra power when they start up, but once underway, their power demand drops. Here are some common appliances that can be powered with this model:

  • Energy Star-certified refrigerator or freezer
  • Microwave
  • Sump pump
  • Furnace fan
  • Hair dryer
  • Electronics including TVs and computers
  • Garage door opener
  • Power tools

Plentiful, Clean Electricity

This model’s iAVR intelligent automatic voltage regulation reduces voltage fluctuation up to 50% compared to other AVR systems. It does this by uses iGX’s electronic control system to all but eliminate RPM fluctuations when loads change. By evening out electricity supplied to the inverter, the EM6500s is able to deliver clean, steady power that won’t burn out electronics.

For connections to household appliances, there are two 20 amp duplex outlets for a total of four GFCI-protected 125-volt sockets. For higher demand applications, there are two locking plugs: one 30 amp 125-volt socket and one 30 amp socket that can be used in 125 or 250-volt modes. By flipping a switch on the panel, the dual mode socket can be set to 125 volts without limiting the generator’s maximum output. All outlets are protected by circuit breakers to prevent overload in case of a short.

There’s also a 12-volt connector that taps into the charging system for the generator’s starter battery. By attaching an optional charging cord, the generator can be used to charge automotive batteries.

Accessories

Honda knows these generators have applications in home and work use, so they’ve created accessories accordingly. For home backup power, there’s an available remote start kit and a transfer switch to wire the generator directly into the house electrical system. For those who want to use this generator for power at job sites, Honda offers a hanger kit to hoist it up buildings or keep it out of reach of thieves.

Warranty

The EM6500s and its iGX engine are guaranteed for three years of residential or commercial use.

Get the Parts and Accessories You Need for Your Honda Generator

Hondalawnparts.com is an authorized Honda Engines and Honda Power Equipment dealer, letting us offer the full line of Honda OEM parts and accessories for the EM6500s including transfer switches, cables, and maintenance parts. Browse our site’s generator accessory section, or find the right part for your equipment by using our advanced search engine. When you enter your model and serial number, our site can show you factory diagrams and descriptions so you can be sure you’re buying something that’s compatible with your model. We can ship your order to any address in the U.S. or Canada.

Generator Safety

Honda generator

A generator makes remote work easier, gives you more options when camping and be a lifesaver when you lose grid power. However, if they aren’t used correctly, they can be dangerous: the CDC estimates around 70 people die each year due to generator misuse. With a little preparation, you can set up your Honda generator to provide the power you need without the risk.

Carbon Monoxide

Dozens of people die each year from carbon monoxide poisoning caused by using a generator.
This odorless gas fills up the spaces on red blood cells that normally carry oxygen, causing asphyxiation. These deaths are caused by using the generator inside or too close to a house. If the engine is inside a garage, the exhaust gases can collect, building up lethal levels of CO.

Why does this happen? Partly it’s because people don’t realize the danger, and partly because they don’t plan ahead to use their generator outdoors. If you’re getting your first generator when you face a major power outage, this probably isn’t going to cross your mind. When you buy a generator, you also need to buy the extension cables needed to get the power where you need it while still keeping the generator in a safe place.

To be safe, the generator should be at least 20 feet away from doors, windows and vents. Plan accordingly, pairing the generator with cords that will carry current into the house where you need it.

Picking the Right Cables

The extension cables you use with your generator should be able to carry the maximum current rated for the outlet, be rated for outdoor use, and the insulator on extension cables should be made out of TPE. Product labeling can be confusing, but you can find the information you need printed on the cable itself. If you see the letters “S,” “E” and either “W” or “W-A,” it meets these requirements. If you see an “O” or “OO,” the cable is also oil resistant, which is good if the cable will be running through a garage.

The wire itself should be thick enough to handle high current loads. Look for “AWG” on the cord followed by a number. This is the wire gauge. A 14 or 12 gauge wire can handle 10-15 amp loads, while 10 gauge can handle loads over 15 amps.

GFCI and Shock Prevention

Most 120-volt duplex outlets on Honda generators come with a Ground Fault Circuit Interrupter (GFCI). This device cuts the circuit if a fault is detected, which can happen if there is a short caused by a failing appliance or a damaged cable. Test the outlet before each use by pushing in the “Test” button. If the reset button pops out, the GFCI is working. Push the reset button to re-enable the outlet. If the red light next to the outlet is blinking, the GFCI has failed and needs to be repaired before the outlet is used.

Protecting the People Restoring Your Power

While you may be safe from electrocution, improper installation can put line workers in danger. If you have your generator wired into your home electrical system, you are legally required to have a professionally-installed transfer switch. This device cuts off the house wiring from the grid, preventing electricity from your generator from reaching outside lines. Without it, a worker could pick up what should be a dead line and be electrocuted.

Fires

Running out of fuel in a mower is a good excuse to take a break, but if you’re using a generator for emergency power, you probably want to keep the engine running. If you have a small spill onto a hot or running engine, the resulting fire could put you in the emergency room. Even enclosed generators can have fires as the result of spilled gas dripping between the maintenance covers or onto the tailpipe.

When it’s time to add more gas, shut off the generator and let the engine cool for 15 minutes. This reduces the chance of starting a fire if fuel drips onto the engine or exhaust.

Move the generator 10 feet away from where you were using it before refilling. Once the tank is full, move it back to where it was. This prevents leftover fumes from igniting when you restart the engine.

Get the Quality Parts and Accessories You Need for Your Generator

Hondalawnparts.com is a certified dealer for Honda Power Equipment and Honda Engines. We carry parts as well as OEM accessories including transfer switches, covers and extension cords. Need help finding the right part? When you select your model and serial number from our search engine, our site will show you factory diagrams and parts listings specific to your generator. We can ship what you need to any address in the United States or Canada.