Servicing the EU7000is Generator

EU7000is Generator
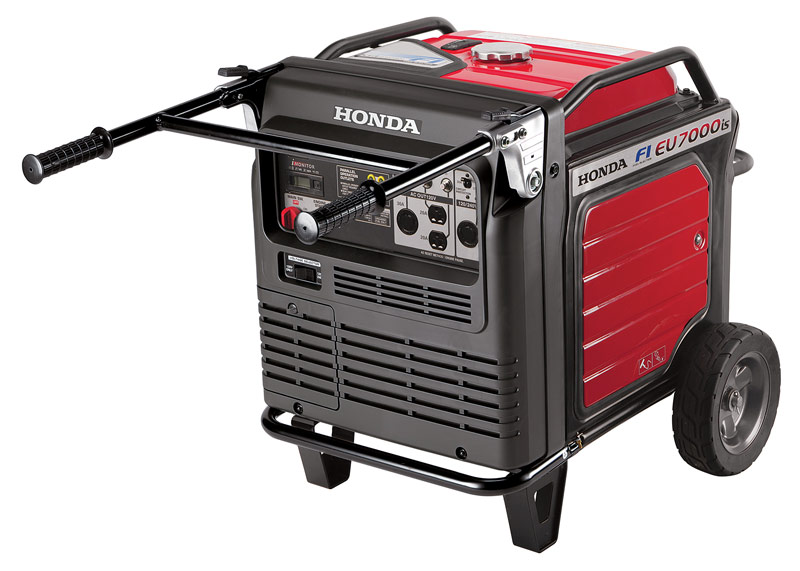
Whether you use your EU7000is as a work site or backup generator, you really can’t predict when you’re going to need it. Here’s how you can keep your generator ready to use at a moment’s notice and avoid problems down the line.

Maintenance Schedule

Before each use: Check oil, air cleaner and GFCI circuits.
First month or 20 hours of operation: Change the oil.
Every three months or 50 hours: Clean the air filter.
Every 6 months or 100 hours: Change the oil, check the spark plug, and clean the spark arrester.
Every year or 300 hours: Replace the air filter and spark plug.

If the generator is only used occasionally, the battery should be recharged once a month.

Honda recommends having the EU7000is professional serviced for the following maintenance.
Every year or 300 hours: Check the valve clearance.
Every 1,000 hours: Clean the combustion chamber, fuel tank and fuel tube. Replace fuel pump filter.

GFCI

With the engine running, the light next to each GFCI outlet should be green. Push the “Test” button on each duplex outlet. This creates a short that will trigger the system, and the light will turn off. Push the “Reset” button. The light should be green again. If the light blinks red at any time, the plug needs to be serviced before the generator can be used.

Oil

To check the oil, first open the right side maintenance cover. Remove the oil filler cap at the base of the engine. Wipe off the dipstick, then insert it into the filler neck without screwing it in. If the oil level doesn’t come to the top of the marks on the dipstick, add oil.

To change the oil, remove the right side maintenance cover and the rubber seal directly below the engine drain bolt. Place a catch can under the generator and remove the drain bolt. Once the crankcase is empty, reinstall the drain bolt with a new sealing washer. Remove the dipstick and add oil through the filler neck. This engine holds just under 1.2 quarts of oil. When full, the oil level should be at the edge of the filler neck.

Honda recommends SAE 10W30 oil with an API service category of SJ or later. 5W30 can also be used for most temperatures, and SAE 30 can be used at temperatures above 50ºF.

Air Cleaner

To access the air cleaner, remove the left side maintenance cover, lift up on the two clips on the top of the air cleaner cover, then tilt the cover down.

The cleaner has three components: a foam filter, a grid-shaped guide and a paper filter.

To clean the foam filter, wash it in soapy water and squeeze it out. Once dry, dip it in clean engine oil and squeeze it out again. Do not twist the filter.

Do not clean the paper filter. If it’s dirty, it should be replaced.

Wipe the dust off of the air cleaner cover and guide before putting the air cleaner back together.

Spark Plug

To access the plug, remove the left side cover. Next, remove the spark plug inspection cover on the top of the engine. Disconnect the plug cap and use a plug wrench to unscrew the plug.

The electrode gap should be between 0.028 and 0.031 inches (0.7-0.8 mm). Replace the plug if the electrode is worn down, the plug is fouled, or the insulator is damaged.

Thread the plug in by hand, then torque it to 13.3 lb-ft. If you don’t have a torque wrench, turn a used plug 1/8-1/4 turn after it seats. When installing a new plug, turn it ½ turn after it seats to form the sealing washer to the engine.

Spark Arrester

The exhaust can stay hot for up to a half hour after the engine has been used. Let it cool completely before cleaning the spark arrester.

To access the arrester, remove the two screws on the muffler tailpipe on the right side of the generator. Remove the tailpipe and slide out the spark arrester. Clean the spark arrester with a wire brush. If the arrester is damaged, it needs to be replaced.

Battery Charging

To access the battery, lock the handles in the carrying position. Remove the screw for the battery cover on the lower left of the generator’s front panel. Disconnect the battery’s negative terminal, followed by the positive terminal. Unhook the battery strap and slide the battery out of the tray.

Charge the battery at 1.1 amps for 5 to 10 hours. To install, follow the previous instructions in reverse order, being sure to connect the positive terminal before the negative terminal.

Get the Parts You Need Straight from Your Browser

Hondalawnparts.com is a certified Honda Engines and Honda Power Equipment Dealer, so we carry everything you need to maintain and repair your EU7000is generator. We can ship your order anywhere in the U.S. or Canada.

Getting More from Your Trimmer with Blades and Accessories

Honda_HHT35SUKAT

Honda’s trimmers are set up for mowing straight from the manufacturer, but with the right accessories, you can use your HHT Series for a variety of landscaping tasks. Switching to a blade can turn your trimmer into a brush mower or sapling cutter, while improved heads and harnesses can make your equipment easier to use.

Barrier Kit

On older models, the cutting line shield, grass blade cutter shield, and brushcutter shields use different designs. The newer HHT25 and HHT35 now use just two shields: one for string trimming and one that works with any blade.

Both the HHT25 and HHT35 need a different deflector to work with cutting blades. This kit isn’t needed for the HHT35SUKAT, which is equipped for brushcutting from the factory. Kickback can be a problem when using blades, so these kits also include a double harness, letting you carry the weight of the trimmer evenly on your shoulders, letting you use your hands solely for control the cutting head.

Grass / Weed Blade

A string trimmer head can cut grass while bouncing off walls and fences. However, if you won’t be working around these obstacles, a grass/weed blade will cut just as well without needing line or having issues with clogging. This makes these blades are perfect for mowing wide areas.

Honda used to offer weed/brush blades, but new, stronger grass/weed blades can do the same job while still performing well on light growth. These blades are available with different numbers of teeth. A blade with fewer teeth will cut faster, while a blade with more teeth will leave a cleaner cut.

Honda makes 10-inch diameter blades with three or four teeth for the HHT35 series of trimmers. HHT25 owners can equip their trimmer with a 9-inch blade that has three, four or 8 teeth.

Brush / Wood blades

Resembling a circular saw blade, these blades are designed to cut woody growth including high grass and saplings. The tooth profile is similar to the blades found on chainsaws and delivers the same type of cut.

Honda offers a 24 tooth brush/wood blade for HHT25 trimmers and an 80 tooth blade for HHT35 trimmers. If you’re looking to buy a trimmer and want to regularly use it for cutting wood, consider the HHT35SUKA. It has a bicycle handle, which makes it easier to control kickback.

Trimmer Heads

Most models come with the Semi-matic trimmer head. It holds up to 20 feet of line and has both an automatic mechanism to release line as it wears down and a bump feed mechanism that releases line manually by pushing the button on the bottom of the head. More line can also be released by turning the center of the head, which is handy when you need to get the last bit of line off before reloading the spool. The Pro-tap is an upgraded version of the Semi-matic bump feed head. It works the same, but it uses tougher construction to withstand the rigors of commercial use.

For those who want a quieter trimmer or hate dealing with spools, Honda offers the Kwik Loader head. It uses a mechanism that grabs onto pre-cut lengths of line when pushed in and will release the line when pulled outward without needing tools. It’s designed specifically for Prolux Ultra Quiet line which has an aerodynamic spiral shape that reduced noise by 20%. This head comes with the HHT35SUKA from the factory.

Get Blades, Guards and More Shipped to Your Door

As a certified dealer for Honda Power Equipment and Honda Engines, www.hondalawnparts.com is able to offer the full selection of OEM parts and accessories for your trimmer. Check out our String Trimmer Parts & Accessories section, or select your model and serial number to see parts that are compatible with your equipment. We ship across the United States and Canada.

Servicing Your Honda Trimmer

honda trimmersIs your trimmer due for a tune-up? Not sure how to work on the Mini 4 Stroke engine? Here’s what you need to do to keep your Honda string trimmer or brushcutter in top condition.

Maintenance Schedule

The first month or 10 hours: Change the oil.
Every 3 months or 25 hours: Clean the air filter.
Every 6 months or 50 hours: Change the oil, check the drive cable, check cooling fins
Every year or 100 hours: Check spark plug, spark arrester, fuel filter and fuel tank
Every two years or 300 hours: Replace spark plug
Every two years: Check fuel and oil lines, replacing as needed

Honda recommends getting a professional service every year or 100 hours. The technician will check the engine’s idle speed, valve clearance, and clutch shoes as well as lubricate the gear case.

Engine Oil

Used oil can be poured out of the filler neck, then added through the same opening. Using a syringe will make it easy to add the small amount of oil these engines need to stay lubricated. The 25 cc engine holds 2.7 fl. oz. (80 ccs) of oil, while the 35 cc engine holds 3.4 fl. oz. (100 ccs.) Honda recommends using 10W30 oil that meets API service category SJ or later.

Air Filter

To access the filter, close the choke to keep debris from entering the engine, then squeeze tabs on top of the cover and swing the cover down.

To clean the filter, wash it in soapy water. Once dry, place the filter in a plastic bag with about an ounce of clean engine oil. Knead the bag to distribute the oil, then squeeze out the filter to remove any excess oil. Wipe out the air cleaner box before reinstalling the filter.

Removing the Fan Shroud

The fan shroud is held on using a single bolt top-mounted bolt. It can be removed using either a 4 mm or 5/32 inch hex wrench. The shroud needs to be out of the way to access the spark plug, spark arrester and cooling fins.

Spark Plug

The plug can be removed with a 5/8 inch plug wrench. The electrode gap should be between 0.024 and 0.028 inches (0.60-0.70 mm). Replace the plug if it’s fouled or has signs of electrode or insulator damage. If you’re reinstalling a used plug, turn the plug 1/8-1/4 turn once seated. If you’re installing a new plug, turn ½ turn or torque the plug to 8.8 ft-lbs. (12 Nm) to seal the crush washer against the engine.

Cooling Fins

The surface of the engine block should be cleaned occasionally to remove dirt that can reduce heat transfer. Use a brush or cloth to wipe down the fins.

Spark Arrester

The arrester is built into the opening of the muffler and is held in place with two 6 mm screws. Once removed, scrub off any carbon deposits on the underside of the arrester with a wire brush. If the arrester mesh is cracked or has holes, it needs to be replaced.

Throttle Cable

Check the condition of the cable and the action of the throttle lever. If the lever doesn’t move smoothly or there is visible damage to the cable, the cable should be replaced.

There should be between 1/16 and 1/8 inch of free play when moving the throttle lever. If the cable is too loose, adjust the throttle cable tension using the adjuster next to the carburetor. Loosen the 10 mm lock nut, which is the nut closest to the carburetor. Turn the adjusting nut, located on a clamp opposite of the lock nut, to adjust the free play. Once the throttle play is correct, tighten the lock nut.

Fuel Tank and Filter

To clean these parts, remove the fuel filler cap and pour the gasoline into a fuel can. Use a piece of hooked wire to snag the fuel tube and pull it out of the tank. Inspect the fuel filter on the end of this hose. If it’s dirty, clean it with a non-flammable solvent. Replace the filter if it’s damaged or excessively dirty. To clean the tank, rinse it out with a non-flammable solvent. Once everything is clean and dry, push the filter and tube back into the tank.

Get the Parts You Need for Your Honda Delivered to Your Door

Hondalawnparts.com is a certified dealer for Honda Power Equipment and Honda Engines, letting us ship the OEM parts and accessories you need for your trimmer. Browse our string trimmer section, or select your model using our search engine to see parts information specific to your trimmer. We ship to any address in the U.S. or Canada.

Setting Up a Honda Submersible Pump

Setting Up a Honda Submersible Pump
A Honda submersible pump is perfect for stationary pumping, powering fountains, clearing ponds and draining basements. However, you can’t just screw on a couple of hoses and put them to use like a standard pump. To put your WS Series to work, you need to get power to the motor, set up a drainage system and make sure you can retrieve it.

Where Can I Use My Pump?

All pumps are rated for continuous use moving water as hot as 104º and can handle brief spikes up to 140ºF. If the pump does start to overheat, a built-in thermal reset will shut off the motor, then restart it once the pump has cooled down.

The WSP50 and WSP100 can handle solids up to two inches in diameter, while Honda’s other pumps are limited to solids up to 3/8 inches in diameter. All pumps can handle muck water. These pumps should not be used to move corrosive or flammable liquids including mine run-off, seawater, and fuel.

The motors used in these pumps are designed for 115 volts, so they’ll work with household current. Power needs to come from a GFCI-protected outlet on a circuit that can supply 15 amps. Most household circuits supply either 15 or 20 amps, so be aware that it can be easy to overload the circuit if you’re running the pump alongside other appliances.

The pump plug should be connected directly to this outlet. Adding an extension cord can increase resistance, shortening the life of the motor. If you’re looking for a pump that can be used far from an outlet, consider getting a WSP53 or WSP73. Both models come with 50-foot power cables.

The operating location needs to meet the ANSE/NEPA 70-1984 standard, which covers ignitable materials. Fuel cans, sawdust, gas heaters and other natural gas appliances should be kept far away from this pump.

Attaching a Rope

You can lift the pump by the handle, but it’s really there to attach a rope so the pump can be lifted out of deep water. Use a strong rope made out of a waterproof material like pure polypropylene or a polyester and propylene blend. Never pull the pump up by the power cord.

Building a Discharge Pipe

The pump needs to be attached to a PVC or ABS pipe that matches the size of the pump outlet. The highest point of the pipe should be at least 15 inches higher than the highest water surface. Outlets on all models use standard pipe threading, so the discharge pipe can be attached using a standard threaded end. A 90-degree elbow can be attached directly to the threaded end when building a pipe for a side discharge pump.

An in-line check valve should be installed in the pipe to prevent backflow. This valve should be 12-18 inches above the pump outlet. The pipe also needs to have a 1/8 inch hole about 5 inches above the outlet to preventing air locking.

Setting Up a Sump Basin

A sump is the lowest point in a structure, whether it’s a boat or a building. A sump basin is a container placed at this point to collect water, which can then be removed by the pump. This basin should be made of concrete, fiberglass or plastic. The diameter of the basin needs to be sized to keep the pump supplied with water to maintain the pumping rate:

Under 24 inches — Up to 35 GPM
30 inches — up to 60 GPM
36 inches — up to 100 GPM
48 inches — up to 150 GPM

If you’re using an existing basin, clean out any debris before fitting your pump.

Setting Up the Float Switch

The distance between the switch and the pump is set by adjusting the clamp that holds the switch cable to the pump. When the switch is level or tilted upward, it will activate the pump. The seals are oil lubricated so they won’t melt if the pump is starved.

If you’re placing your pump in a sump basin, the switch should turn on when the water reaches a height of 13-14 inches. To test this out, pour water into the area around the pump, check that it’s switching on, and repeat. If you’re getting consistent results, the switch is set up correctly.

Missing Something?

Do you need parts for your submersible pump? Hondalawnparts.com specializes in Honda small engine and power equipment including everything from lawnmower engines to these electric pumps. Our site has factory diagrams and descriptions built in so you can be sure you’re ordering exactly what you need. We ship across the USA and Canada.