Servicing the EU1000i

EU1000i Generator
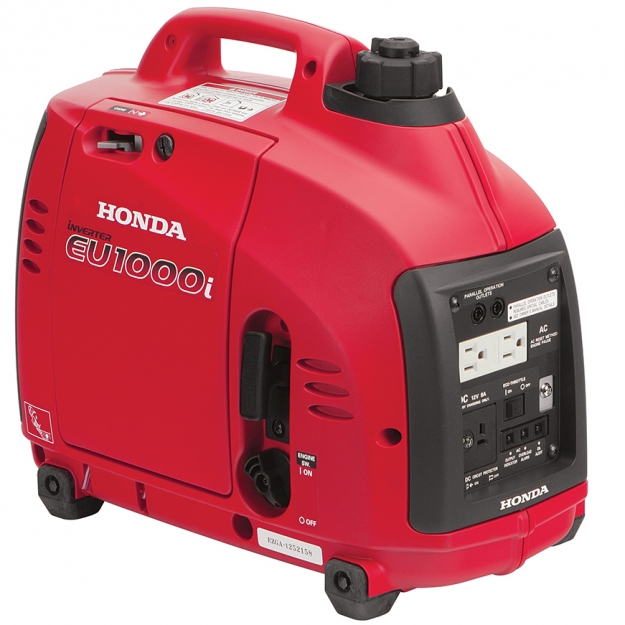
The EU1000i may be fully enclosed to keep down noise, but it’s still simple enough that owners can do most of the maintenance themselves. Here’s how you can keep Honda’s tiny EU1000i generator ready to power your tailgate parties and camping trips.

Maintenance Schedule

Most maintenance is easy enough that you can do it yourself:

Before each use – Check the oil and air filter.
After the first month or 10 hours of use – Change the oil.
Every three months or 50 hours – Clean the air filter.
Every 6 months or 100 hours – Change the oil, check the spark plug and clean the spark arrester.
Every two years or 300 hours – Replace the spark plug.

Honda recommends having a professional perform the following maintenance:

Every year – Clean the fuel tank and fuel filter
Every two years – Check the fuel line for cracking.
Every 300 hours Clean the combustion chamber.

Fuel

Fuel should be used within one month of purchase. If the fuel is treated with a stabilizer, it can be used up to three months after purchase.

When adding fuel, do not fill past the red mark inside the filler neck. The top of the cap has a lever that opens and closes a vent. This vent should be open while the engine is running and while the engine is cooling down after use. Once the generator is cool, the vent should be shut to prevent fuel from leaking during transport and storage.

Accessing the Engine

The EU1000i has three maintenance covers:

To access the air filter, dipstick and drain plug, remove the maintenance cover on the left side of the generator. Turn the cover screw counter-clockwise and lift the cover up.

To access the spark plug, remove the access cover on top of the generator next to the handle.

To access the muffler, remove the cover on the rear of the generator. It’s held in by four 5 mm screws.

Oil

10W30 and 5W30 oil are recommended for all operating conditions. SAE 30 can be used at temperatures above 50°F.

This engine has Oil Alert, which will shut off the engine if the oil level is too low. If this feature is triggered, it will turn on a light on the control panel.

To check the oil level, remove the dipstick from the filler neck, located on the bottom left of the engine. Wipe off any oil and reinsert the dipstick, but don’t screw it back into the filler neck.

To change the oil, turn off the engine switch and close the fuel filler cap vent. Remove the dipstick and unscrew the drain plug at the base of the engine. Tilt the generator, letting the used oil flow down through the channel on the case into a container. Reinstall the drain plug. Add oil through the filler neck. With the generator sitting on a level surface, the oil should come up to the edge of the neck. This engine holds about 8 ounces of oil.

Air Filter

The air box is located to the right of the engine. To access the filter, push down on the tab at the top of the air box cover and lift the cover straight up.

Clean the filter in warm, soapy water. Squeeze out the filter and let it air dry. Dip the filter in clean engine oil and squeeze it out. To make this process cleaner, consider putting the filter and oil in a plastic bag. Do not twist the filter when washing or oiling.

Spark Plug

The spark plug is accessed through a maintenance cover on top of the generator. The plug gap should be between 0.024-0.028 inches (0.6-0.7 mm.) Replace the plug if the washer or insulator are damaged, or the electrode is worn down.

When installing the plug, thread it in by hand until it seats. Use a spark plug wrench to turn it another ¼ turn if you’re reinstalling a used plug, or ½ turn to crush the washer on a new plug.

Spark Plug Arrester

The arrester is inside the tailpipe, sandwiched between the muffler and the engine’s exhaust port. Once the back cover is off, remove the three 6 mm bolts holding the muffler onto the back of the engine. Remove the muffler. It should come off with the spark arrester and gasket. Pull the spark arrester out of the muffler and scrub off any carbon deposits with a wire brush. If the arrester or gasket are damaged, they should be replaced. Reinstall in reverse order.

Need Something For Your Honda Generator?

Hondalawnparts.com is an authorized Honda Engines and Honda Power Equipment dealer. That means we can ship OEM parts and accessories to your door whether you live in the U.S. or Canada. We have sections for common parts and generator accessories, or you can use our search engine to find the right part for your specific equipment model. Our site even has factory diagrams and descriptions, so you know exactly what you’re ordering.

EU1000i Generator

EU1000i GeneratorAre you looking for portable power without having to sacrifice quality? Honda’s EU1000i generator is perfect for camping and tailgating, offering enough power for common appliances, while its lightweight design makes it easy to move. A full enclosure keeps down noise, while advanced features like Eco Throttle and Oil Alert save money on fuel and repairs, making it the perfect choice for electric power on the go.

Output

This generator can output a steady 900 watts (7.5 amps) and peaks at 1,000 watts (8.3 amps) to handle momentary load spikes. Like Honda’s other generators, the EU1000i has a built-in inverter to create a clean power waveform. That means the alternating current coming out of the outlets is smooth and steady like it is from grid power, so it won’t burn out sensitive electronics.

The 0.6-gallon gas tank can power this generator for up to three hours and twelve minutes at 100% load, and about 7 hours and 6 minutes at ¼ load. Honda’s Eco Throttle automatically adjusts engine speed to match the current electrical load, so you’ll always get the best fuel consumption.

Power and Noise

The generator is driven by a four-stroke, 50cc GXH engine. The GHX is a popular choice for water pumps, compact farming equipment, and go-kart racing. The engine, generator, and circuitry are housed in an enclosed case to keep things quiet. When running, it makes 42-50 dB of noise, which is about as loud as the ambient noise in an office building. In most situations, unless you’re standing next to it, you won’t really notice the sound from the engine.

Portability and Serviceability

The engine on switch and starter handles are built into the side of the case, and there’s a built-in oil channel and spark plug access for easy maintenance. Oil Alert comes standard, shutting off the engine if the oil level is too low to keep the engine lubricated. The generator measures 20 x 13 ¼ inches and weighs just 29 lbs, making it easy to carry using the built-in handle.

Connecting To Your Appliances

Appliances connect to the generator through a 125-volt duplex outlet rated at 15 amps. That’s two standard outlets sharing the same circuit breaker. There’s also a 12 volt, 96-watt connector rated at 8 amps for recharging automotive batteries. Using this connector requires an optional 12-volt cable. The front panel has indicator lights for overload and Oil Alert, and there’s a large ground terminal connector for using an external ground. Granted, you’re unlikely to be using this low power generator in ways that would require an external ground, such as using appliances on metal floors or wet areas.

What Can This Generator Power?

If it’s something you’d use for camping or tailgating, there’s a good chance the EU1000i will be able to power it. Here are some common appliances that are compatible with this generator:

– Microwaves up to 650 watts
– TVs
– Media devices including Blu-Ray players, game consoles and media streamers
– Coffee makers
– Blenders
– Slow cookers
– Two-way radios
– Computers
– Phone chargers

Electric motors are reactive loads, requiring large amounts of power to start before settling down and drawing small amounts of current. For this reason, power draw from refrigerators, air conditioners, pumps and all but the smallest power tools are too much for this generator, even if the rated watts or amps are well within its operating range.

Need more power? The EU1000i has a parallel connector, letting you link two of these generators together with an optional parallel cable, doubling output without sacrificing portability.

Warranty

Honda guarantees the EU1000i and the GXH50 that powers it for two years of residential use or one year of commercial use.

Everything You Need for Your Honda in One Place

Hondalawnparts.com is more than just lawn care: we carry OEM parts and accessories for everything from Honda Power Equipment and Honda Engines including their generators. Check our Generator Accessories section for parallel cables and 12-volt cables, or use the search engine to find replacement parts for your specific model. Our site can break down parts listings down to specific serial number ranges, and it can show you factory parts diagrams and descriptions so you can be sure you’re ordering the right part. We ship across the U.S. and Canada.

EM6500s Generator

EM6500s Generator

Are you looking for a generator that’s powerful enough to use for home backup or powering electric tools while still being portable? The EM6500s is Honda’s most powerful residential model, offering up to 7,000 watts of peak power along with an advanced control system that provides steady current that is safe for the most sensitive electronics. It also uses heavy-duty components including the company’s most advanced GX-Series engine, so it’s tough enough for commercial users.

Performance

The EM6500s is powered by Honda’s iGX 390 engine. The iGX’s ECU handles the choke, throttle, and ignition automatically, taking the guesswork out of starting and operation. Honda’s Eco-Throttle automatically adjusts engine RPM to meet load requirements to reduce fuel consumption and noise. At 50% load, this generator can run up to ten and a half hours on one 6.2 gallon tank of fuel. A built-in gauge makes it easy to plan for downtime when refueling. The engine is fitted with a battery-powered electric starter. If the battery is dead, the engine can still be started using the back-up recoil starter.

All of this is packed into a frame with folding handles and wheels, making it easy to move around job sites or set up for emergency power. While running, the noise from this generator is between 64-66 dB, which is about as loud as a chainsaw.

What Can This Generator Power?

The EM6500s can produce 6,500 watts of steady power with a peak of 7,000 watts for up to 10 seconds. This peak power comes into play with reactive loads: devices with electric motors need extra power when they start up, but once underway, their power demand drops. Here are some common appliances that can be powered with this model:

  • Energy Star-certified refrigerator or freezer
  • Microwave
  • Sump pump
  • Furnace fan
  • Hair dryer
  • Electronics including TVs and computers
  • Garage door opener
  • Power tools

Plentiful, Clean Electricity

This model’s iAVR intelligent automatic voltage regulation reduces voltage fluctuation up to 50% compared to other AVR systems. It does this by uses iGX’s electronic control system to all but eliminate RPM fluctuations when loads change. By evening out electricity supplied to the inverter, the EM6500s is able to deliver clean, steady power that won’t burn out electronics.

For connections to household appliances, there are two 20 amp duplex outlets for a total of four GFCI-protected 125-volt sockets. For higher demand applications, there are two locking plugs: one 30 amp 125-volt socket and one 30 amp socket that can be used in 125 or 250-volt modes. By flipping a switch on the panel, the dual mode socket can be set to 125 volts without limiting the generator’s maximum output. All outlets are protected by circuit breakers to prevent overload in case of a short.

There’s also a 12-volt connector that taps into the charging system for the generator’s starter battery. By attaching an optional charging cord, the generator can be used to charge automotive batteries.

Accessories

Honda knows these generators have applications in home and work use, so they’ve created accessories accordingly. For home backup power, there’s an available remote start kit and a transfer switch to wire the generator directly into the house electrical system. For those who want to use this generator for power at job sites, Honda offers a hanger kit to hoist it up buildings or keep it out of reach of thieves.

Warranty

The EM6500s and its iGX engine are guaranteed for three years of residential or commercial use.

Get the Parts and Accessories You Need for Your Honda Generator

Hondalawnparts.com is an authorized Honda Engines and Honda Power Equipment dealer, letting us offer the full line of Honda OEM parts and accessories for the EM6500s including transfer switches, cables, and maintenance parts. Browse our site’s generator accessory section, or find the right part for your equipment by using our advanced search engine. When you enter your model and serial number, our site can show you factory diagrams and descriptions so you can be sure you’re buying something that’s compatible with your model. We can ship your order to any address in the U.S. or Canada.

Servicing the EU7000is Generator

EU7000is GeneratorWhether you use your EU7000is as a work site or backup generator, you really can’t predict when you’re going to need it. Here’s how you can keep your generator ready to use at a moment’s notice and avoid problems down the line.

Maintenance Schedule

Before each use: Check oil, air cleaner and GFCI circuits.
First month or 20 hours of operation: Change the oil.
Every three months or 50 hours: Clean the air filter.
Every 6 months or 100 hours: Change the oil, check the spark plug, and clean the spark arrester.
Every year or 300 hours: Replace the air filter and spark plug.

If the generator is only used occasionally, the battery should be recharged once a month.

Honda recommends having the EU7000is professional serviced for the following maintenance.
Every year or 300 hours: Check the valve clearance.
Every 1,000 hours: Clean the combustion chamber, fuel tank and fuel tube. Replace fuel pump filter.

GFCI

With the engine running, the light next to each GFCI outlet should be green. Push the “Test” button on each duplex outlet. This creates a short that will trigger the system, and the light will turn off. Push the “Reset” button. The light should be green again. If the light blinks red at any time, the plug needs to be serviced before the generator can be used.

Oil

To check the oil, first open the right side maintenance cover. Remove the oil filler cap at the base of the engine. Wipe off the dipstick, then insert it into the filler neck without screwing it in. If the oil level doesn’t come to the top of the marks on the dipstick, add oil.

To change the oil, remove the right side maintenance cover and the rubber seal directly below the engine drain bolt. Place a catch can under the generator and remove the drain bolt. Once the crankcase is empty, reinstall the drain bolt with a new sealing washer. Remove the dipstick and add oil through the filler neck. This engine holds just under 1.2 quarts of oil. When full, the oil level should be at the edge of the filler neck.

Honda recommends SAE 10W30 oil with an API service category of SJ or later. 5W30 can also be used for most temperatures, and SAE 30 can be used at temperatures above 50ºF.

Air Cleaner

To access the air cleaner, remove the left side maintenance cover, lift up on the two clips on the top of the air cleaner cover, then tilt the cover down.

The cleaner has three components: a foam filter, a grid-shaped guide and a paper filter.

To clean the foam filter, wash it in soapy water and squeeze it out. Once dry, dip it in clean engine oil and squeeze it out again. Do not twist the filter.

Do not clean the paper filter. If it’s dirty, it should be replaced.

Wipe the dust off of the air cleaner cover and guide before putting the air cleaner back together.

Spark Plug

To access the plug, remove the left side cover. Next, remove the spark plug inspection cover on the top of the engine. Disconnect the plug cap and use a plug wrench to unscrew the plug.

The electrode gap should be between 0.028 and 0.031 inches (0.7-0.8 mm). Replace the plug if the electrode is worn down, the plug is fouled, or the insulator is damaged.

Thread the plug in by hand, then torque it to 13.3 lb-ft. If you don’t have a torque wrench, turn a used plug 1/8-1/4 turn after it seats. When installing a new plug, turn it ½ turn after it seats to form the sealing washer to the engine.

Spark Arrester

The exhaust can stay hot for up to a half hour after the engine has been used. Let it cool completely before cleaning the spark arrester.

To access the arrester, remove the two screws on the muffler tailpipe on the right side of the generator. Remove the tailpipe and slide out the spark arrester. Clean the spark arrester with a wire brush. If the arrester is damaged, it needs to be replaced.

Battery Charging

To access the battery, lock the handles in the carrying position. Remove the screw for the battery cover on the lower left of the generator’s front panel. Disconnect the battery’s negative terminal, followed by the positive terminal. Unhook the battery strap and slide the battery out of the tray.

Charge the battery at 1.1 amps for 5 to 10 hours. To install, follow the previous instructions in reverse order, being sure to connect the positive terminal before the negative terminal.

Get the Parts You Need Straight from Your Browser

Hondalawnparts.com is a certified Honda Engines and Honda Power Equipment Dealer, so we carry everything you need to maintain and repair your EU7000is generator. We can ship your order anywhere in the U.S. or Canada.

Honda’s New EU2200i Generator

Honda's New EU2200i Generator

This spring, Honda is replacing their popular EU2000i generator with the new EU2200i. While it may look identical to its predecessor, it has a new engine, more power, and an easier to use design.

Power

The EU2200i makes 10% more power than the model it replaces, yet the size and weight are almost identical. In real-world use, that extra 200 watts is enough to power a 42-inch LCD TV. The extra power can also handle reactive loads better, taking the worry out of using appliances with electric motors.

This upgrade is thanks to a new engine/generator combo. It’s based on the GXR120, an engine built for earth rammers used in construction. The flywheel and alternator are built into a single unit to save space and weight. Higher grade magnets in the stator are thinner and maintain overall diameter. This reduces weight and increases power output. This configuration makes one dB less noise than the EU2000i’s GX100.

Increased torque lets the Eco Throttle keep the engine speeds down, further reducing noise and fuel consumption. The 0.95-gallon fuel tank can keep the generator running for 3.2 hours at constant 100% load and 8.1 hours at a 25% average load.

Output

This generator is rated at 120 volts with a steady output of 1,800 watts and a peak output of 2,000 watts. It uses an inverter with an in-house designed microprocessor to control output. This “clean” electricity is safe for powering electronics.

Convenience

Color-coded components make it easy to follow the steps needed to start the engine. Automatic decompression makes the engine easier to turn over with the pull starter.

Maintenance is also easier. A larger oil filter opening, a longer spout, and wider oil drain gutter make it easier to change the oil.

The generator includes a fuel shut off valve to burn off remaining fuel in the carburetor after use, avoiding most stale fuel issues. If there isn’t enough oil in the crankcase, Oil Alert can shut off th engine before it’s damaged. Redesigned case ducting maintains temperatures in high heat environments.

Models

The EU2200i comes with a 120-volt duplex outlet and a 12 volt DC outlet. Along with this standard model, there will be three other versions of this generator:

The Camo comes with a case wrapped in Realtree’s APG camouflage. It has a combination of sharp and soft detail woodlands patterns to simulate depth. Otherwise, it’s identical to the regular EU2200i.

The Companion can connect with all versions of the EU2200i and EU2000i, doubling available power. This model has a 30 amp, 125-volt locking plug outlet and a 20 amp, 125-volt single outlet. This generator is a great choice for backup power.

The EB2200i is designed with commercial users in mind. It meets LA-ETL and OSHA requirements and comes with 20A 125V GFCI Duplex outlet and a GFCI neutral bond.

All models weigh 46.5 lbs.

Warranty

Honda guarantees all versions of this generator for three years of residential or commercial use.

Getting Parts and Accessories for Honda Generators

Whether you plan on getting an EU2200i soon or you already have a Honda generator, you can get everything you need for it from www.hondalawnparts.com. As a certified dealer, we’re able to offer OEM parts and accessories including parallel cables, covers and even transfer switches. Check out our generator accessory section, or pick your model from our search engine. It has factory parts diagrams and descriptions that let you find exactly what you need. We can ship your order to any location in the U.S. or Canada.

Setting Up the EB2800i and EG2800i Generators

EB2800i

The EB2800i and EG2800i are recent additions to Honda’s generator lineup, combining low noise and low weight with tough frame construction. If you just bought one of these models, there are a few things you should know before you start using it.

Safety

Running an internal combustion engine indoors can kill you in just a few minutes, even if you have doors and windows open. Carbon monoxide in the exhaust keeps red blood cells from carrying oxygen, leading to asphyxiation and death. Plan ahead by getting extension cables to deliver power where you need it while leaving the generator outside. Always run the generator at least three feet (one meter) away from any building walls or roofs.

If you hook your generator up to your household wiring, you are legally required to have it connected to a transfer switch installed by a professional electrician. This switch cuts the connection between the house wiring and the grid, where it could electrocute line workers.

What You Need to Set Up Your Generator

Every generator Honda makes is tested at the factory. There may be some residual fluids left over, but gas and oil still need to be added during setup. Unlike some equipment, oil is not included in the box. Honda recommends using SAE-certified 10W30 motor oil for most operating conditions. Along with oil and fresh gas, you’ll also need a long funnel to add oil to the engine.

Unboxing the Generator

These generators weigh a little under 70 lbs so they can be moved by a single people. The box is designed so that the generator can be lifted straight up out of the top. Inside, you should find three items:

  • The Generator
  • The Owner’s Manual
  • A registration card

Your generator can be registered by sending in the registration card, filling out a form on the Honda Power Equipment website, or scanning the QR code in the “Registration” section of the owner’s manual. You need to register your generator to get recall information and make warranty claims.

Oil

Add oil before trying to start the generator. Even with the Oil Alert system, it’s possible to damage internal components by repeatedly turning over the engine.

To add oil, start by unscrewing the oil dipstick/cap, located at the base of the engine next to the frame rail. Pull it out and set it aside.

Place a rag under the filler neck and use a funnel to add 10W30 oil to the crankcase. It should take between 12-13.5 oz. (340-380 ml.) The oil is at the right level once it’s at the edge of the filler neck. Screw the dipstick back into the engine.

The Oil Alert system will shut down the engine if there isn’t enough oil in the crankcase. Indicator lights for the system are located on the front panel.

Fuel

The engine can run on automotive gasoline that has an octane rating of at least 86 and a maximum of 10% ethanol. This fuel should be fresh, purchased within 30 days, or within 90 days if it has been treated with a stabilizer: if you store the generator for long periods, it’s a good idea to drain the fuel tank and carburetor. The tank should be filled no higher than the red fuel level mark inside the tank screen.

Starting

Even if it’s the first time or fiftieth time you’re starting the engine, the procedure remains the same:

1. Find the fuel lever, located between the fuel tank and the engine on the starter grip side, to “ON.”

2. Turn the Eco-Throttle switch, located on the control panel to the right of the engine switch, to “OFF.”

3. Pull out the choke rod, located on the upper left of the control panel, to the closed position.

4. Turn the engine switch to “ON.”

5. Hold down the generator with one hand, then gently pull the starter grip until you feel resistance with the other hand. Give the grip a hard pull. It should start.

6. As the engine warms up, slowly move the choke lever back in. Let the generator warm up for three minutes. If the engine runs fine with the choke completely open, the generator is ready to use.

Stopping

Again, there’s no special procedure for your first use of the engine.

1. Disconnect any cables or appliances connected to the generator.

2. Turn the engine switch to “OFF.”

3. Turn the fuel lever to “OFF.”

Getting Parts for Your New Generator

If you want genuine Honda oil for your generator’s engine, or you need parts for maintenance and repairs over its life, you can get everything you need at www.hondalawnparts.com. Our site makes it easy to find parts by letting you search by your model and see factory diagrams and descriptions, so you know you’re ordering exactly what you need. We ship across the U.S. and Canada.