Setting Up the EB2800i and EG2800i Generators

EB2800i

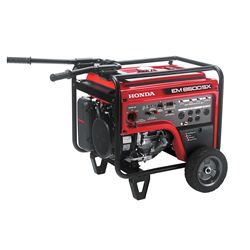
The EB2800i and EG2800i are recent additions to Honda’s generator lineup, combining low noise and low weight with tough frame construction. If you just bought one of these models, there are a few things you should know before you start using it.

Safety

Running an internal combustion engine indoors can kill you in just a few minutes, even if you have doors and windows open. Carbon monoxide in the exhaust keeps red blood cells from carrying oxygen, leading to asphyxiation and death. Plan ahead by getting extension cables to deliver power where you need it while leaving the generator outside. Always run the generator at least three feet (one meter) away from any building walls or roofs.

If you hook your generator up to your household wiring, you are legally required to have it connected to a transfer switch installed by a professional electrician. This switch cuts the connection between the house wiring and the grid, where it could electrocute line workers.

What You Need to Set Up Your Generator

Every generator Honda makes is tested at the factory. There may be some residual fluids left over, but gas and oil still need to be added during setup. Unlike some equipment, oil is not included in the box. Honda recommends using SAE-certified 10W30 motor oil for most operating conditions. Along with oil and fresh gas, you’ll also need a long funnel to add oil to the engine.

Unboxing the Generator

These generators weigh a little under 70 lbs so they can be moved by a single people. The box is designed so that the generator can be lifted straight up out of the top. Inside, you should find three items:

  • The Generator
  • The Owner’s Manual
  • A registration card

Your generator can be registered by sending in the registration card, filling out a form on the Honda Power Equipment website, or scanning the QR code in the “Registration” section of the owner’s manual. You need to register your generator to get recall information and make warranty claims.

Oil

Add oil before trying to start the generator. Even with the Oil Alert system, it’s possible to damage internal components by repeatedly turning over the engine.

To add oil, start by unscrewing the oil dipstick/cap, located at the base of the engine next to the frame rail. Pull it out and set it aside.

Place a rag under the filler neck and use a funnel to add 10W30 oil to the crankcase. It should take between 12-13.5 oz. (340-380 ml.) The oil is at the right level once it’s at the edge of the filler neck. Screw the dipstick back into the engine.

The Oil Alert system will shut down the engine if there isn’t enough oil in the crankcase. Indicator lights for the system are located on the front panel.

Fuel

The engine can run on automotive gasoline that has an octane rating of at least 86 and a maximum of 10% ethanol. This fuel should be fresh, purchased within 30 days, or within 90 days if it has been treated with a stabilizer: if you store the generator for long periods, it’s a good idea to drain the fuel tank and carburetor. The tank should be filled no higher than the red fuel level mark inside the tank screen.

Starting

Even if it’s the first time or fiftieth time you’re starting the engine, the procedure remains the same:

1. Find the fuel lever, located between the fuel tank and the engine on the starter grip side, to “ON.”

2. Turn the Eco-Throttle switch, located on the control panel to the right of the engine switch, to “OFF.”

3. Pull out the choke rod, located on the upper left of the control panel, to the closed position.

4. Turn the engine switch to “ON.”

5. Hold down the generator with one hand, then gently pull the starter grip until you feel resistance with the other hand. Give the grip a hard pull. It should start.

6. As the engine warms up, slowly move the choke lever back in. Let the generator warm up for three minutes. If the engine runs fine with the choke completely open, the generator is ready to use.

Stopping

Again, there’s no special procedure for your first use of the engine.

1. Disconnect any cables or appliances connected to the generator.

2. Turn the engine switch to “OFF.”

3. Turn the fuel lever to “OFF.”

Getting Parts for Your New Generator

If you want genuine Honda oil for your generator’s engine, or you need parts for maintenance and repairs over its life, you can get everything you need at www.hondalawnparts.com. Our site makes it easy to find parts by letting you search by your model and see factory diagrams and descriptions, so you know you’re ordering exactly what you need. We ship across the U.S. and Canada.

Servicing the Carburetor on Your Honda Engine

Honda Servicing the Carburetor on Your Honda Engine

Is your Honda engine not running right? If obvious issues with fuel and spark have been checked, there’s a good chance it’s an issue with the carburetor. This guide will walk you through diagnosing and repairing your carburetor to get your motor working again.

How Carburetors Work

Gas flows in through the fuel line to the float bowl. This bowl has a float connected to a needle valve: once the bowl is full, this float closes the valve, stopping fuel flow.

Gas inside the bowl flows into the pilot jet, which maintains minimum fuel flow, and the main jet, which adds fuel as air flow increases. These are located above the Venturi, a restricted airway that increases air speed through the intake to help mix the fuel with the air.

The throttle valve is just beyond the Venturi, controlling the flow of fuel and air to the engine. The choke valve is before the jet and Venturi, restricting air flow to increase the ratio of fuel to air. This richer mixture makes it easier to run the engine on cold fuel that doesn’t want to atomize.

If everything is working correctly, the float valve keeps just enough fuel inside the bowl to feed the jet, which feeds the right mix of air and fuel into the engine to run efficiently.

Symptoms of Carburetors Problems

Most issues stem from gasoline varnishing and either restricting the jets or keeping the throttle or idle valves from moving. To keep this from happening, always use fresh, stabilized fuel, and drain the fuel tank and carburetor when storing your equipment for the season.

If the engine only wants to run with the choke closed, the main jet is probably clogged. Once the choke opens, the fuel mixture becomes too lean for the engine to run. On some motors, the automatic choke will engage when the engine speed drops, then disengage once the engine speeds up again, causing it to surge when idling.

If the engine doesn’t want to idle regardless of throttle position, the pilot jet is probably clogged.

If the seals break down, they can let air into the engine that hasn’t been mixed with gas, leaning out the mixture. This causes overheating and poor performance.

Rebuilding the Carburetor

Let the engine cool for at least a half hour before attempting this repair. Although the engine may not seem hot, the muffler can stay warm long after the motor has been shut down, making it a possible source of ignition.

1. Drain the fuel the same way you would if you were storing the engine at the end of the season. This may require unscrewing a bolt on the bottom of the carburetor, removing the float bowl, or tipping the motor to pour the fuel out of the tank.

2. Disconnect the cable connected to the throttle and the cable or springs connected to the choke. Unbolt the carburetor and separate it from the engine.

3. Turn the carburetor upside down and remove the large bolt that is now facing up. This will let you lift off the float bowl. It may need a couple of taps to help separate it from the seal.

4. Slide out the pin holding the float to the carburetor. Gently lift up the float: a small bump can dislodge the pilot jet.

5. The main jet can be unscrewed with a small flathead screwdriver. If the jet won’t slide out, try pushing on it from behind with a small Allen key.

6. The jet should be cleaned with a carburetor jet cleaning kit. These thin needles can push out any debris, but care should be taken not to scratch the jet opening, which can increase the jet size, adding too much fuel to the intake. Replacement jets are inexpensive so it may be easier to just put a new one in.

7. Spray the inside and outside of the carburetor with carburetor cleaner, ensuring all holes flow freely and the throttle and choke move without sticking. If the pilot jet is clogged, it can be accessed by removing an adjustment screw on the outside of the carburetor. If there is a small metal tab on the top of this screw, pull up on the head to reveal the true end of the adjuster. Check the service manual for the correct position of the adjustment screw when reinstalling.

Reassemble in reverse order, replacing old parts with new ones and cleaning around the engine to prevent any debris buildup from entering the intake port.

Get the Parts You Need for Your Carburetor

www.hondalawnparts.com is a certified Honda Engines dealer, letting us offer the full line of OEM components, accessories and tools including carburetor jets, seals and rebuild kits. Our site has built-in factory diagrams, making it easy to find the parts you need, and we can ship those parts to any address in the U.S. or Canada.

Changing the Oil on Your Generator

Honda Generator

Changing oil in a small engine is usually straightforward, but generators have some quirks due to their design and the way they’re used. Here’s what you need to know from getting oil out of an engine that has no obvious drain plug to ensuring proper break-in on a device that can go unused for months at a time.

Checking the Oil

It’s possible for oil to burn or leak during operation, especially on engines that have seen a lot of hours of use. Always check the oil before each use, and each time you need to fill the tank. Most generator engines come with Honda’s Oil Alert system, which will shut down the engine if the oil level is too low to protect the motor from damage; being proactive about topping up the oil will prevent unexpected shutdowns.

To get the correct reading when checking the oil, remove the dipstick/filler cap, wipe it off and insert it back into the filler neck without screwing or pushing it in.

When to Change the Oil

On most models, Honda recommends changing the oil after the first month or 20 hours of use, then every 6 months or 100 hours thereafter. You should always replace the oil in the first month, but it’s a good idea to replace the oil after 20 hours of use, even if it has already been changed. That short interval is there to ensure any metal particles left over from break-in don’t stay in the engine where they could cause premature wear.

After the break-in, it’s important to change the oil after the specified time, even if it hasn’t been used. This removes water and other contaminants that may have migrated into the oil during storage.

Draining the Oil on Small Portable Generators

On some models like the EU 2000, the engine doesn’t have a drain plug and the entire unit is surrounded by a case to reduce noise. Once the maintenance panel has been removed to access the engine, the dipstick can be removed and the entire generator tilted so that the oil flows out of the filler neck. This neck has a lip that will pour the oil onto a tab on the cover and then into your oil pan. If you’re having trouble positioning the generator for drainage, a marine oil change pump can be used to transfer the used oil from the crankcase to a suitable container.

Draining the Oil on Frame-mounted Generators

Unlike smaller units, these generators leave the engine fully exposed. The drain plug is located at the base of the engine next to the dipstick, and the frame will clear the drainage area, so the generator does not need to be tilted. Instead, set the generator on a support such as a set of bricks or blocks of wood to lift it off of the ground and slide the oil pan underneath the engine to catch the oil.

Filling the Crankcase

Honda’s engines are designed to be filled while level with the oil coming up to the edge of the filler neck. A funnel will be needed to fill engines that don’t have a drain plug.

Recommended Oil

While Honda Power Equipment oil is the best choice, the engine used in your generator is designed to use multi-weight engine oil, just like your car, making lubricants readily available. 10W30 is recommended for current engines in most conditions, while 5W30 can be used in extreme cold and SAE 30 can be used in warmer temperatures; check your engine owner’s manual for specific temperature recommendations. This oil should at least meet SAE’s SJ standard, which should be true of any oil purchased in the last couple years.

Get Your Generator Working with Help from Honda Lawn Parts

If you need anything for your Honda generator, you can get it from www.hondalawnparts.com. We sell everything from major components to Honda’s own OEM oil so you can be sure your generator will be ready to use whether you use your generator for construction, recreation or as a home backup. We ship parts and accessories across the U.S. and Canada.

Finding and Fixing Mower Noises

honda mower

Is your mower making a strange noise? As the mowing season draws to a close, your mower has more and more hours put on it since its spring service, making it more likely that something will need attention. Finding the source of noises and correcting them now can help you avoid costly repairs later on.

Loudness

Honda makes some of the quietest small engines on the market, but they still produce enough noise to cause hearing damage. Hearing protection should be worn when using a mower just as you would with any other outdoor power equipment, but added noise may be a cause for concern.

If everything seems fine and the engine is just unusually noisy, check the muffler. Before pulling it off of the motor, wait at least a half hour after running the mower to let it cool down completely. Inspect the muffler for holes, and make sure the seal between the exhaust and the engine is intact.

Squeaking

While most greased components are sealed, other areas may occasionally need a light oil or silicone lubricant applied to keep them moving freely. This includes the controls, cables, wheels, and the handle, both where it bolts to the mower and where it folds for storage. Squeaking noises from the engine can be caused by grass and debris packed against the flywheel or engine shaft, or it could indicate a slightly bent shaft.

Some models have sealed cables and wheel bearings which won’t need to be greased. If the squeaking is coming from one of these wheels, spin it to make sure it’s moving freely. If it’s not, the wheel will need to be replaced.

Rattling

Engine vibrations can loosen bolts and nuts over time. Go over your machine and check the tightness of each fastener. Here’s where to check, from the most likely to the least likely source:

– Handle
– Controls
– Muffler cover
– Engine cover
– Wheels
– Deck

Vibration

Some vibration is normal, but excess vibration is usually tied to the mower blade. Remove the blade from the mower and check for bends and cracking; if either is present, the blade needs to be replaced. To check the balance, hang the blade on a nail by its center hole. If one side sits lower, file off a little of the surface until the blade sits even on the nail.

Honda’s MicroCut system uses two blades and a set of washers that need to be installed in a specific order to prevent vibrations. The small blade should be put on first with the top flat edge pointing to the left, while the lower blade goes underneath with the curved ends pointed upward and the top edge to the right. There should be one washer between the blades and a second washer between the blades and the bolt.

The blade bolt on all mowers needs to be tight enough to stay on and prevent the blade from coming loose, but not so tight that it stretches the threads. Torque specs for this bolt can be found in the owner’s manual.

Knocking

Even on engines equipped with Oil Alert, it’s a good idea to start with checking the oil, as a lack of lubrication can cause knocking and quickly lead to engine damage.

Light pinging is normal on engines under a heavy load, but if it occurs constantly, it’s probably caused by the fuel. If you’re running fresh automotive gasoline, it should have a high enough octane to keep this from happening, but its knock resistance can drop as it ages and degrades. Always use fuel within a month from purchase, or three months if treated with a stabilizer. “White gas,” commonly used in camp stoves, is gasoline, but it has a much lower octane rating. Even pouring a little from a leftover tank can reduce the fuel’s antiknock properties that it can cause pre-detonation.

If the fuel is fresh, check the ignition system. The spark plug should be clean and have the correct gap. If the wrong model of a spark plug is used, it can heat up to the point that it ignites the gas before the spark does. The coil may also need to be repositioned to change the ignition timing. Excess carbon build-up can also cause pre-ignition, but usually, this is only seen on motors that have been used for hundreds of hours.

Stop the Noise with Help from Honda Lawn Parts

As a certified dealer for Honda Power Equipment and Honda Engines, www.hondalawnparts.com can provide you with the parts you need to fix your mower, whether you just need a new blade or a major component. We ship across the U.S. and Canada.