Honda Water Pump Accessories: An Overview of What’s Available

red Honda water pump discharging a spray of water; on the right, a hose kit accessory
If it’s Honda, it’s the tool for the job!

Honda water pumps are renowned for their excellent quality and reliability, making them a popular choice among homeowners, farmers, and construction workers alike. While these pumps are already highly efficient on their own, there are accessories that can make their performance even better. These accessories are available from Honda, are Honda quality, and are made to work perfectly with Honda pumps.

In this post we share a list of useful accessories for Honda water pumps:
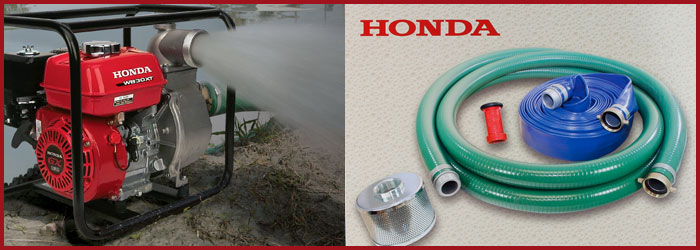
Hose Kits

A high-quality hose kit is essential for getting the most out of your Honda water pump. These kits come with a suction hose, a discharge hose, and a water strainer, all of which are designed to fit perfectly with your pump. You can either purchase a pre-packaged hose kit, or purchase the components separately so that you have all the specific components you need.

Strainers

A strainer is a simple but essential accessory that helps prevent debris from entering your Honda water pump. It fits over the end of the suction hose and filters out any large particles that could damage the pump or clog the hose. There are several types of strainers available, including plastic and stainless steel models. The plastic ones work well for general-purpose pumps. The more durable stainless steel strainers are recommended for use with trash pumps and diaphragm pumps that are often used to pump more abrasive materials.

Couplers and Adaptors

Hose couplers are connectors that attach to the end of the hose, allowing you to easily connect it to the pump or to another hose. They come in various sizes and materials, and are available in 2 main connector styles: camlock connectors (also known as quick-connect couplers) and pin lug connectors. If you purchase a hose kit, all the couplers you need will be included in the kit. These items can also be purchased individually.

Nozzles

Adjustable spray nozzles are available for all discharge hose sizes. The nozzles can be used to create a stream of water, a spray, or anything in between. Nozzles are made of either brass or polycarbonate materials.

Vacuum Gauges

A vacuum gauge is a useful accessory for monitoring the performance of your Honda water pump. It shows how much vacuum is being created on the suction side of the pump, and helps you identify any issues that may be affecting the pump’s ability to prime itself and begin pumping. The vacuum teste can be mounted directly onto the pump or onto a manifold.

Wheel Kits

It can become very tiresome to move around a water pump that needs to be moved frequently. Wheel kit accessories are a great solution to that problem. The kit includes two wheels that attach to the bottom of the pump. A set of handles are also included, which makes it even easier to lift and maneuver the pump on its wheels.


There you have it, a big list of accessories that can help you get the most out of your Honda water pump. Whether you’re looking to improve performance, increase efficiency, or make it easier to use, there’s an accessory that can help.

Honda water pump accessories as well as parts for Honda equipment and engines are available from the popular Honda parts source, hondalawnparts.com.

Maintaining and Troubleshooting the WX10 Pump

WX10 water pumpThe tiny WX10 water pump is perfect for small jobs, and like any Honda product, it will last for years with proper care. Here’s everything you need to know about maintaining this tiny portable water pump.

Maintenance Schedule

These maintenance tasks are simple enough for owners to do themselves
Before every use: Check the oil, air filter, and fasteners
After the first month of ownership or 10 hours of use: Change the oil.
Every three months or 50 hours: Clean the air filter
Every 6 months or 50 hours: Change the oil.
Every year or 100 hours: Check the spark plug. Clean the spark arrester, fuel tank, and fuel filter.
Every two years or 300 hours: Replace the spark plug.
Every two years: Check the fuel hoses and replace as needed.

Honda recommends having the WX10 professionally serviced for the following repairs.
Every year or 100 hours: Idle speed and valve clearance adjustments
Every two years or 300 hours: Pump clearancing and combustion chamber cleaning

Oil

Check the oil level with the engine off and sitting on a level surface. The dipstick is built into the filler cap, next to the recoil starter. Do not screw in the cap when checking the oil level.

To change the oil, remove the oil fill cap and tip the engine over a suitable container. Once the crankcase is empty, set the pump on a level surface and add oil until it comes to the edge of the oil filler opening. This engine holds just over 1/10th of a quart. Honda recommends 10W30 for temperatures above -4°F, and 5W30 for temperatures below 32°F.

Air Filter

The filter is above and to the left of the fuel tank cap. To remove the cover, push in on the sides of the tab at the top of the air box and swing the cover down.

To clean the filter, apply a non-flammable solvent, or wash it in soapy water and rinse it out. Let it air dry, then soak the filter in clean engine oil and squeeze it out. To make this job less messy, put the filter and oil in a plastic bag. Wipe out the air box before reinstalling the filter. If the exhaust is smoky during startup, there’s a little too much oil left in the filter.

Spark Plug

The spark plug is directly behind the pump handle. Disconnect the plug wire and use a 5/8 inch plug wrench to unscrew it from the engine.

The spark plug gap should be between 0.024 and 0.028 inches, or 0.60 and 0.70 mm. Clean the electrodes with a wire brush before reinstalling. Replace the plug if it’s worn or damaged.

When installing, thread the plug-in by hand, then use the wrench to turn it another ¼ turn. If you’re installing a new plug, turn it a full 180 degrees to seat the new washer. Reattach the plug wire.

Cooling Fins and Spark Arrester

To access the fins and arrester, do the following:
1. Remove the four 5 mm bolts on the recoil starter. Set the starter aside.
2. Remove the two 6 mm bolts attaching the carrying handle to the pump. Set the handle aside.
3. Remove the air filter cover.
4. Disconnect the spark plug wire and the hose running under the spark plug.
5. Disconnect the ignition switch connector, next to the start/stop switch.
5. Push the throttle lever link rod until it disconnects from the throttle swivel on the carburetor.
6. Remove the 5 mm bolt on the stop/start switch mount.
7. Remove the two 5 mm bolts from the top cover on the pump side. Remove the cover.

At this point, you’ll have full access to the engine cooling fins. Clean these off with a stiff brush and a damp cloth.

To clean the spark arrester:
1. Remove the three 5 mm screws from the muffler cover. Set the cover aside.
2. Remove the 4 mm screw from the arrester. Pull it out of the tailpipe.
3. Scrub the spark arrester screen with a wire brush to remove any carbon deposits.

Reassemble the engine in reverse order.

Fuel

If you’re having trouble starting the engine, check the fuel filter. To access it, pour the gas in the fuel tank into a suitable container. Use a piece of wire or a paperclip to pull the filter and fuel line out of the tank. Rinse off the filter with a non-flammable solvent. Push the filter back into the tank and add fuel.

The engine has two fuel lines running from the tank next to the fuel up to the carburetor. The black line supplies fuel, while the clear line returns excess fuel. Replace these tubes if they’re cracked or they start leaking.

Need Something for Your Pump?

Hondalawnparts.com is a certified dealer for Honda Power Equipment and Honda Engines, which means we have everything you need to maintain any of their equipment, including water pumps like the WX10. We ship across the U.S. and Canada.