Honda’s Cruise Control Hydrostatic Transmission: Making Mower Control Easy

hondahydrostatic

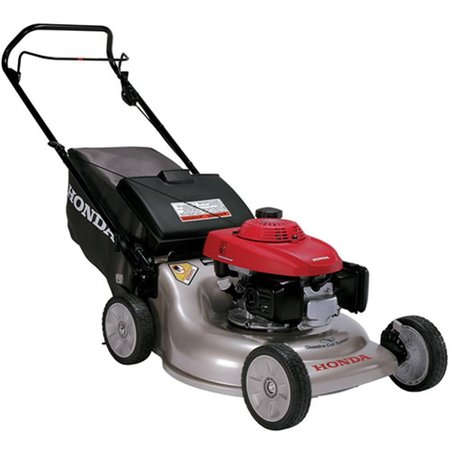
Hydrostatic motors are used in most riding mowers, but walk-behind models have been stuck with clunky geared transmissions. Honda is changing that with their Cruise Control Hydrostatic Transmission. This exclusive feature makes mower speed fully adjustable for better control on hills and around obstacles, and it works with other mower features to make stops and starts easier.

Why Use a Hydrostatic Transmission?

When you want to change your speed when driving a car, you can shift gears or use more or less throttle. You can also do the same thing on a mower, but there’s a problem: if you close the throttle, the engine won’t spin the blade as fast, reducing cutting performance. Instead of setting the speed exactly where you want it, you have to shift the transmission into gear and work around whatever speed it’s going. This makes mowing awkward when going over slopes, as the mower ends up going too slow or too fast. The gears are also too high for slow speed maneuvers, forcing the operator to shut off the drive system and push the mower when operating in narrow spaces and around landscape features.

Hydrostatic transmissions commonly found on riding mowers and wide-area walk-behind mowers get around this by using a hydraulic pump to control drive speed. By changing the amount of fluid pumped by the hydraulic system, the speed can be varied independently of the throttle. The Cruise Control transmission works the same way, but it’s small enough to be used in a regular walk-behind mower.

How Does it Work?

Instead of driving gears, the engine drives a hydraulic pump. This pump has a set of pistons connected to a swash plate. By changing the angle of this plate, the distance the pistons travel changes, increasing or decreasing the amount of fluid they pump. That fluid is used to drive a hydraulic motor connected to the wheels. In effect, it’s like having a second throttle independent of the engine.

With the pump running at its full flow rate, the pump in the Cruise Control transmission can drive the hydraulic motor fast enough to reach a speed of 4 mph. That’s a brisk walking pace.

Less Complicated Than It Sounds

Hydrostatic drive systems in riding mowers often use a combination of pumps, hoses, filters, and motors to drive the vehicle. However, Honda was able to design a complete hydrostatic drive system including the pump and motor into a single unit that’s no larger than a geared walk-behind mower transmission.

This drive unit is sealed, so it requires no maintenance. There’s also no clutch to wear out, nor is there a belt connected to the engine that can slip and break. That means these mowers require less maintenance and have fewer points of failure than a walk-behind with a geared transmission.

Using Hydrostatic Cruise Control

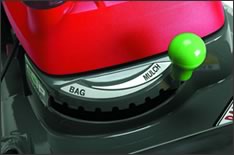
The bail on the top of the handle changes the swash plate angle, increasing speed as it’s closed. The cruise control lever below it limits plate movement, offering 9 settings for maximum speed. Usually, the bail will be fully engaged, so the mower speed will be the maximum set by the cruise control. The lower the cruise control setting is, the finer the speed adjustment is using the bail. This gives the mower precision control when operating in areas filled with obstacles without being erratic at high speeds.

All models that have a hydrostatic transmission also come with the Roto-Stop blade stop system. This uses a clutch between the blade to the engine shaft, stopping the blade when the operator leaves the controls. With both the blade and bail disengaged, the engine can keep running without cutting or rolling away. When you return to the mower, you don’t need to restart the engine, and you can squeeze the bail to return to your original mowing speed as set, using the cruise control lever.

Which Models have a Cruise Control Hydrostatic Transmission?

Currently, Honda fits this transmission to the HRX217HYA, HRX17HZA, and HRC216HXA.

When You Think “Honda,” Think “Honda Lawn Parts”

Honda Lawn Parts is an authorized Honda Engines and Honda Power Equipment dealer so we can supply you with what you need for your mower, generator, snowblower, pump, trimmer or engine. Our site has factory information built-in including parts diagrams and descriptions, making it easy to find exactly what you need. Whether you’re in the US or Canada, you have parts shipped to your door by visiting www.hondalawnparts.com.

Getting the Most from the HRR216PKA Walk-Behind Mower

HRR216PKA Walk-Behind Mower

The HRR216PKA is Honda’s least expensive mower, making it the most common choice for homeowners new to the brand. Despite its price, it still offers all the innovation you expect from Honda, which makes using it different from anything else from the market. Here’s how you can get the most out of this unique mulching mower.

Using the Clip Director

Unlike most walk-behind mowers, the PKA has a rear-mounted discharge chute. The Clip Director, located next to the base of the handle, operates a door that can cover this chute. This eliminates the need for a mulch plug.

To change mowing modes, push in the button and move the lever to either “Bag” or “Mulch.” If you want to discharge clipping without mulching them, set the Clip Director to “Bag.” Clippings will be sent out of the rear discharge chute without being re-cut.

Cutting Height

Height is set by moving the levers next to each of the wheels. With the levers moved all the way toward the rear of the mower, the cutting height is 1 1/8 inches. Adjustment isn’t linear: as the levers are moved forward, the cutting height increases to 1 ¾, 2 ½, 3, 3 ½ and finally 4 inches.

Fuel

The engine used in this mower is designed to use gasoline that contains up to 10% ethanol. This fuel should be used within 30 days of purchase, or within 90 days if it’s treated with a fuel stabilizer. When adding fuel, only fill the tank up to the bright red fuel lever gauge inside the filler neck. After filling the tank, move the mower away from the fueling location. This prevents the ignition of any remaining fuel vapor.

Smart Drive Control

The mower’s self propulsion is controlled by pushing on the palm pads of the smart drive control: the harder you push, the faster the mower will go. Letting up on these pads shuts off the drive system, letting you push the mower when maneuvering around trees and other obstacles.

To adjust the position of the Smart Drive Control, move the adjustment lever on the back of the controls to the left to unlock. Rotate the controls until they’re in a comfortable position, then move the adjustment lever to the right to lock them in place.

If the drive system isn’t engaging like it should check the cable tension. With the engine off, then put the drive control levers in their lowest position. Push down on the levers while rolling the mower backward. The mower should stop before the levers are pointed straight down. If it doesn’t stop, find the adjuster, located between the bottom of the handle and the mower. Loosen the jam nut. It may be helpful to mark one side of the long adjuster nut. Pull the mower backward without using the Smart Drive Control. If you don’t feel resistance, turn the adjuster nut clockwise one turn. Keep rolling the mower and turning the adjuster until the mower wheels lock up when pulling the mower backward. Turn the adjustment nut counterclockwise 8 times and tighten the lock nut.

Microcut Blades

The Microcut system uses two blades stacked on top of each other. The upper blade is narrow with an angled cutting edge, while the lower blade has large winged ends to increase vacuum.

To access the blades, tilt the mower on its right side so the fuel tank is facing up. This keeps fuel from flooding the carburetor.

When fitting blades to your mower, the upper and lower blades should be stacked on top of each other, followed by a set of directional washers and bolts. The outer edge of the washers should face toward the blades. Torque the blade bolts to 36-43 ft-lbs.

Grass Bag

To attach the bag, lift the guard on the back of the mower and set the bottom edge of the bag opening against the bottom of the discharge chute. Push the bag forward to lock it into place.

Over time, the pores in the bag can become clogged, keeping air from passing through and reducing the amount of grass entering the bag. If this happens, remove the bag from the mower and wash it with a garden hose or pressure washer. The grass bag can be used again once it’s completely dry.

Mowing on Hills

This mower is designed to handle slopes up to 20 degrees. When mowing on a hill, go across it instead of up and down.

Getting Parts for Your Honda Mower

Hondalawnparts.com is an authorized Honda Engines and Honda Power Equipment dealer, which means we carry everything you need to maintain your HRR216PKA mower. Our site can show you parts based on your model and serial number, and it even has built-in parts diagrams direct from the manufacturer, making it easy to find what you need. We ship across the US and Canada.

Versamow: Solving Common Problems with Mulching Mowers

Versamow: Solving Common Problems with Mulching Mowers
What is Versamow? Honda touts this as a single feature, but it’s really a combination of design elements included on HRX mowers that give them the flexibility to fit any mowing situation. By using a clever chute control and advanced blades, the mower can mulch wet grass and leaves, get more clippings into a bag and even operate in two mowing modes at one time.

Microcut Twin Blade: More Cuts for Better Performance

Instead of making blades with different amounts of lift that have to be swapped out when going between mowing, bagging or discharge, Honda fits their mowers with a pair of blades that work in any situation. While in discharge mode, the leading edges of these blades cut grass twice with each pass, leaving finer clippings. In mulching mode, the vacuum created by the blades blows clippings upward into the mowing chamber to fall back town for another cut.

The added edges cut down clippings faster, letting HRX models mulch grass that would bog down other mowers while creating a very fine mulch that’s quickly digested by microorganisms, returning nutrients to the soil. The dual cutting action also makes for smaller, more compact clippings when bagging, stuffing up to 40% more grass in the bag than competitors’ walk-behind mowers.

Clip Director: Getting the Right Balance

Instead of being stuck in bagging, mulching or discharging modes, the Clip Director lets you vary the amount of grass that is kept inside the mowing chamber for mulching and the amount that is released to the bag or the discharge chute. With 9 positions, you can balance mulching with discharging for the best results.

The lever moves a door on the back side of the deck. In the highest bagging setting, the door is fully open, drawing all the clippings into the bag. Move it to the highest mulching setting, and the door is fully closed, trapping the clippings in the mowing chamber where they’re cut down to size before falling to the ground. Want to discharge clippings? With the bag removed, clippings that go through the door will fall through a chute and end up on the ground.

Having trouble deciding which mode you should use to mow your lawn? If the lawn is too thick or wet to mulch all of it, you can direct some of the clippings out of the deck, mulching the rest. If you want a clean finish without having to bag lots of grass, you can use the Clip Director to divert some grass toward the deck or chute. This lets you leave a small amount of clippings that will blend in with the lawn and cut down on the amount of yard waste you have to dispose of.

The deck is also designed to work with the Clip Director when mulching leaves. Just set it one or two positions away from the full mulch position, and the leaves will be kept in the mowing chamber long enough to be cut down to size before being discharged.

What Else Can I Expect from a Versamow-Equipped Mower?

When clippings come through the door, they fall out of the rear of the deck like a high-end landscaping mower, spreading them out instead of leaving piles as you mow. Since there’s no chute sticking out of the side, the mower is narrower, making it easier to maneuver.
The chute cover stays on the mower, lifting up when you want to install the bag, and the Microcut blades work for all types of mowing. That means you can switch between mulching, bagging and discharging clippings without needing to use tools or install extra parts like a mulch plug.

Get the Performance Your Honda Mower Was Designed For

When you want quality OEM parts for your mower, visit www.hondalawnparts.com. We’re an authorized dealer for Honda Engines and Honda Power Equipment, so we can provide you with everything you need to keep your HRX cutting as good as it did when it was new. Our site has built-in factory parts diagrams and descriptions so you can be sure you’re ordering exactly what you need. We ship across the USA and Canada.

Caring for Your Generator’s Battery

EB2800iElectric start is one of the best features you can have on a generator, letting you turn a key whenever you need power. However, that starter won’t work if you aren’t keeping up with the maintenance on your generator’s battery. Here’s what you need to know about keeping your generator ready to start the next time you have a power outage, go on camping trip or work in a remote area.

Does My Generator Have a Battery?

The battery is only used to power the generator’s electric starter and has no connection to the unit’s AC power generation system. If your model doesn’t have an electric starter, it doesn’t have a battery.

These current models have electric start, and thus have a battery:
EU3000iS
EM4000S
EB5000
EM5000S
EB6500
EM6500S
EU7000i
EB10000

Honda doesn’t list battery maintenance as part of the regular maintenance schedule, but it’s a good idea to clean the connections at least every 6 months or 100 hours of use. Honda also recommends recharging the battery monthly if the generator isn’t in frequent service.

Battery Handling Safety

Battery components contain lead. Always wash your hands after handling the battery or terminals.

If you spill this acid onto yourself, contact medical personnel immediately and do the following to limit the damage the acid can do to your body:

Eye contact — Flush the eye with water from a cup or container for 15 minutes. Do not use water under pressure, including water directly from a faucet, as this can cause eye damage.

Skin contact — Remove any clothing that came in contact with the acid. Flush the affected area with large quantities of water.

Swallowing — Drink water or milk. Do not induce vomiting.

Accessing the Battery

Current EM series generators store the battery behind a cover directly below the outlets, while earlier open frame generators place the battery behind a metal grid next to the engine. To access the battery on EU Series generators, the entire front panel must be removed.

Once you can access the battery, remove the negative battery terminal first, followed by the positive terminal.

Smaller batteries used in enclosed units have a band that can be unclipped to remove the battery. Larger batteries are held on by a set plate. To remove this plate, loosen the flange nuts on the ends of the plate. Pull the plate off of the battery and slide the battery and battery tray out of the generator.

Battery Electrolyte

The electrolyte level needs to stay between the upper and lower marks on the battery cells. If the level dips below the lower mark, the battery can sulfate, losing the ability to store electrical power.

The lower and upper-level marks are marked on the outside of the battery directly below the terminals. If one of the cells is low, carefully pry up the battery cell caps located next to the terminals. Add distilled water to the cell, then reinstall the cap.

If the battery seems to lose electrolyte rapidly, or the battery is weak despite following maintenance guidelines, have your generator inspected by a dealer. It could be an indication of a dying battery or a faulty charging system.

Cleaning

Any corrosion on the battery or terminals should be cleaned off with a brush and a mix of baking soda and water. This basic solution will neutralize the acid that has collected on these components.

Charging

Charge the battery at 10% of its amp hour rating for three to four hours. It’s common for replacement batteries to have different specifications from the ones originally installed in Honda’s generators. When setting the charge rate, go by the Ah rating printed on top of the battery, not the specifications in your owner’s manual.

Keep Your Generator Running with Genuine Honda Parts

We can’t ship batteries, but if you need anything else for your Honda generator, you can get it from www.hondalawnparts.com. From battery bars to fuses, you can find the right parts for your equipment quickly and easily using our advanced search engine. When you select your model, it will show you factory parts diagrams and descriptions so you can see what you’re ordering and where it fits on your generator. We can ship whatever you need to any address in the USA or Canada.

EM6500s Generator

EM6500s Generator

Are you looking for a generator that’s powerful enough to use for home backup or powering electric tools while still being portable? The EM6500s is Honda’s most powerful residential model, offering up to 7,000 watts of peak power along with an advanced control system that provides steady current that is safe for the most sensitive electronics. It also uses heavy-duty components including the company’s most advanced GX-Series engine, so it’s tough enough for commercial users.

Performance

The EM6500s is powered by Honda’s iGX 390 engine. The iGX’s ECU handles the choke, throttle, and ignition automatically, taking the guesswork out of starting and operation. Honda’s Eco-Throttle automatically adjusts engine RPM to meet load requirements to reduce fuel consumption and noise. At 50% load, this generator can run up to ten and a half hours on one 6.2 gallon tank of fuel. A built-in gauge makes it easy to plan for downtime when refueling. The engine is fitted with a battery-powered electric starter. If the battery is dead, the engine can still be started using the back-up recoil starter.

All of this is packed into a frame with folding handles and wheels, making it easy to move around job sites or set up for emergency power. While running, the noise from this generator is between 64-66 dB, which is about as loud as a chainsaw.

What Can This Generator Power?

The EM6500s can produce 6,500 watts of steady power with a peak of 7,000 watts for up to 10 seconds. This peak power comes into play with reactive loads: devices with electric motors need extra power when they start up, but once underway, their power demand drops. Here are some common appliances that can be powered with this model:

  • Energy Star-certified refrigerator or freezer
  • Microwave
  • Sump pump
  • Furnace fan
  • Hair dryer
  • Electronics including TVs and computers
  • Garage door opener
  • Power tools

Plentiful, Clean Electricity

This model’s iAVR intelligent automatic voltage regulation reduces voltage fluctuation up to 50% compared to other AVR systems. It does this by uses iGX’s electronic control system to all but eliminate RPM fluctuations when loads change. By evening out electricity supplied to the inverter, the EM6500s is able to deliver clean, steady power that won’t burn out electronics.

For connections to household appliances, there are two 20 amp duplex outlets for a total of four GFCI-protected 125-volt sockets. For higher demand applications, there are two locking plugs: one 30 amp 125-volt socket and one 30 amp socket that can be used in 125 or 250-volt modes. By flipping a switch on the panel, the dual mode socket can be set to 125 volts without limiting the generator’s maximum output. All outlets are protected by circuit breakers to prevent overload in case of a short.

There’s also a 12-volt connector that taps into the charging system for the generator’s starter battery. By attaching an optional charging cord, the generator can be used to charge automotive batteries.

Accessories

Honda knows these generators have applications in home and work use, so they’ve created accessories accordingly. For home backup power, there’s an available remote start kit and a transfer switch to wire the generator directly into the house electrical system. For those who want to use this generator for power at job sites, Honda offers a hanger kit to hoist it up buildings or keep it out of reach of thieves.

Warranty

The EM6500s and its iGX engine are guaranteed for three years of residential or commercial use.

Get the Parts and Accessories You Need for Your Honda Generator

Hondalawnparts.com is an authorized Honda Engines and Honda Power Equipment dealer, letting us offer the full line of Honda OEM parts and accessories for the EM6500s including transfer switches, cables, and maintenance parts. Browse our site’s generator accessory section, or find the right part for your equipment by using our advanced search engine. When you enter your model and serial number, our site can show you factory diagrams and descriptions so you can be sure you’re buying something that’s compatible with your model. We can ship your order to any address in the U.S. or Canada.

Generator Safety

Honda generator

A generator makes remote work easier, gives you more options when camping and be a lifesaver when you lose grid power. However, if they aren’t used correctly, they can be dangerous: the CDC estimates around 70 people die each year due to generator misuse. With a little preparation, you can set up your Honda generator to provide the power you need without the risk.

Carbon Monoxide

Dozens of people die each year from carbon monoxide poisoning caused by using a generator.
This odorless gas fills up the spaces on red blood cells that normally carry oxygen, causing asphyxiation. These deaths are caused by using the generator inside or too close to a house. If the engine is inside a garage, the exhaust gases can collect, building up lethal levels of CO.

Why does this happen? Partly it’s because people don’t realize the danger, and partly because they don’t plan ahead to use their generator outdoors. If you’re getting your first generator when you face a major power outage, this probably isn’t going to cross your mind. When you buy a generator, you also need to buy the extension cables needed to get the power where you need it while still keeping the generator in a safe place.

To be safe, the generator should be at least 20 feet away from doors, windows and vents. Plan accordingly, pairing the generator with cords that will carry current into the house where you need it.

Picking the Right Cables

The extension cables you use with your generator should be able to carry the maximum current rated for the outlet, be rated for outdoor use, and the insulator on extension cables should be made out of TPE. Product labeling can be confusing, but you can find the information you need printed on the cable itself. If you see the letters “S,” “E” and either “W” or “W-A,” it meets these requirements. If you see an “O” or “OO,” the cable is also oil resistant, which is good if the cable will be running through a garage.

The wire itself should be thick enough to handle high current loads. Look for “AWG” on the cord followed by a number. This is the wire gauge. A 14 or 12 gauge wire can handle 10-15 amp loads, while 10 gauge can handle loads over 15 amps.

GFCI and Shock Prevention

Most 120-volt duplex outlets on Honda generators come with a Ground Fault Circuit Interrupter (GFCI). This device cuts the circuit if a fault is detected, which can happen if there is a short caused by a failing appliance or a damaged cable. Test the outlet before each use by pushing in the “Test” button. If the reset button pops out, the GFCI is working. Push the reset button to re-enable the outlet. If the red light next to the outlet is blinking, the GFCI has failed and needs to be repaired before the outlet is used.

Protecting the People Restoring Your Power

While you may be safe from electrocution, improper installation can put line workers in danger. If you have your generator wired into your home electrical system, you are legally required to have a professionally-installed transfer switch. This device cuts off the house wiring from the grid, preventing electricity from your generator from reaching outside lines. Without it, a worker could pick up what should be a dead line and be electrocuted.

Fires

Running out of fuel in a mower is a good excuse to take a break, but if you’re using a generator for emergency power, you probably want to keep the engine running. If you have a small spill onto a hot or running engine, the resulting fire could put you in the emergency room. Even enclosed generators can have fires as the result of spilled gas dripping between the maintenance covers or onto the tailpipe.

When it’s time to add more gas, shut off the generator and let the engine cool for 15 minutes. This reduces the chance of starting a fire if fuel drips onto the engine or exhaust.

Move the generator 10 feet away from where you were using it before refilling. Once the tank is full, move it back to where it was. This prevents leftover fumes from igniting when you restart the engine.

Get the Quality Parts and Accessories You Need for Your Generator

Hondalawnparts.com is a certified dealer for Honda Power Equipment and Honda Engines. We carry parts as well as OEM accessories including transfer switches, covers and extension cords. Need help finding the right part? When you select your model and serial number from our search engine, our site will show you factory diagrams and parts listings specific to your generator. We can ship what you need to any address in the United States or Canada.

Servicing the EU7000is Generator

EU7000is GeneratorWhether you use your EU7000is as a work site or backup generator, you really can’t predict when you’re going to need it. Here’s how you can keep your generator ready to use at a moment’s notice and avoid problems down the line.

Maintenance Schedule

Before each use: Check oil, air cleaner and GFCI circuits.
First month or 20 hours of operation: Change the oil.
Every three months or 50 hours: Clean the air filter.
Every 6 months or 100 hours: Change the oil, check the spark plug, and clean the spark arrester.
Every year or 300 hours: Replace the air filter and spark plug.

If the generator is only used occasionally, the battery should be recharged once a month.

Honda recommends having the EU7000is professional serviced for the following maintenance.
Every year or 300 hours: Check the valve clearance.
Every 1,000 hours: Clean the combustion chamber, fuel tank and fuel tube. Replace fuel pump filter.

GFCI

With the engine running, the light next to each GFCI outlet should be green. Push the “Test” button on each duplex outlet. This creates a short that will trigger the system, and the light will turn off. Push the “Reset” button. The light should be green again. If the light blinks red at any time, the plug needs to be serviced before the generator can be used.

Oil

To check the oil, first open the right side maintenance cover. Remove the oil filler cap at the base of the engine. Wipe off the dipstick, then insert it into the filler neck without screwing it in. If the oil level doesn’t come to the top of the marks on the dipstick, add oil.

To change the oil, remove the right side maintenance cover and the rubber seal directly below the engine drain bolt. Place a catch can under the generator and remove the drain bolt. Once the crankcase is empty, reinstall the drain bolt with a new sealing washer. Remove the dipstick and add oil through the filler neck. This engine holds just under 1.2 quarts of oil. When full, the oil level should be at the edge of the filler neck.

Honda recommends SAE 10W30 oil with an API service category of SJ or later. 5W30 can also be used for most temperatures, and SAE 30 can be used at temperatures above 50ºF.

Air Cleaner

To access the air cleaner, remove the left side maintenance cover, lift up on the two clips on the top of the air cleaner cover, then tilt the cover down.

The cleaner has three components: a foam filter, a grid-shaped guide and a paper filter.

To clean the foam filter, wash it in soapy water and squeeze it out. Once dry, dip it in clean engine oil and squeeze it out again. Do not twist the filter.

Do not clean the paper filter. If it’s dirty, it should be replaced.

Wipe the dust off of the air cleaner cover and guide before putting the air cleaner back together.

Spark Plug

To access the plug, remove the left side cover. Next, remove the spark plug inspection cover on the top of the engine. Disconnect the plug cap and use a plug wrench to unscrew the plug.

The electrode gap should be between 0.028 and 0.031 inches (0.7-0.8 mm). Replace the plug if the electrode is worn down, the plug is fouled, or the insulator is damaged.

Thread the plug in by hand, then torque it to 13.3 lb-ft. If you don’t have a torque wrench, turn a used plug 1/8-1/4 turn after it seats. When installing a new plug, turn it ½ turn after it seats to form the sealing washer to the engine.

Spark Arrester

The exhaust can stay hot for up to a half hour after the engine has been used. Let it cool completely before cleaning the spark arrester.

To access the arrester, remove the two screws on the muffler tailpipe on the right side of the generator. Remove the tailpipe and slide out the spark arrester. Clean the spark arrester with a wire brush. If the arrester is damaged, it needs to be replaced.

Battery Charging

To access the battery, lock the handles in the carrying position. Remove the screw for the battery cover on the lower left of the generator’s front panel. Disconnect the battery’s negative terminal, followed by the positive terminal. Unhook the battery strap and slide the battery out of the tray.

Charge the battery at 1.1 amps for 5 to 10 hours. To install, follow the previous instructions in reverse order, being sure to connect the positive terminal before the negative terminal.

Get the Parts You Need Straight from Your Browser

Hondalawnparts.com is a certified Honda Engines and Honda Power Equipment Dealer, so we carry everything you need to maintain and repair your EU7000is generator. We can ship your order anywhere in the U.S. or Canada.

Getting More from Your Trimmer with Blades and Accessories

Honda_HHT35SUKAT

Honda’s trimmers are set up for mowing straight from the manufacturer, but with the right accessories, you can use your HHT Series for a variety of landscaping tasks. Switching to a blade can turn your trimmer into a brush mower or sapling cutter, while improved heads and harnesses can make your equipment easier to use.

Barrier Kit

On older models, the cutting line shield, grass blade cutter shield, and brushcutter shields use different designs. The newer HHT25 and HHT35 now use just two shields: one for string trimming and one that works with any blade.

Both the HHT25 and HHT35 need a different deflector to work with cutting blades. This kit isn’t needed for the HHT35SUKAT, which is equipped for brushcutting from the factory. Kickback can be a problem when using blades, so these kits also include a double harness, letting you carry the weight of the trimmer evenly on your shoulders, letting you use your hands solely for control the cutting head.

Grass / Weed Blade

A string trimmer head can cut grass while bouncing off walls and fences. However, if you won’t be working around these obstacles, a grass/weed blade will cut just as well without needing line or having issues with clogging. This makes these blades are perfect for mowing wide areas.

Honda used to offer weed/brush blades, but new, stronger grass/weed blades can do the same job while still performing well on light growth. These blades are available with different numbers of teeth. A blade with fewer teeth will cut faster, while a blade with more teeth will leave a cleaner cut.

Honda makes 10-inch diameter blades with three or four teeth for the HHT35 series of trimmers. HHT25 owners can equip their trimmer with a 9-inch blade that has three, four or 8 teeth.

Brush / Wood blades

Resembling a circular saw blade, these blades are designed to cut woody growth including high grass and saplings. The tooth profile is similar to the blades found on chainsaws and delivers the same type of cut.

Honda offers a 24 tooth brush/wood blade for HHT25 trimmers and an 80 tooth blade for HHT35 trimmers. If you’re looking to buy a trimmer and want to regularly use it for cutting wood, consider the HHT35SUKA. It has a bicycle handle, which makes it easier to control kickback.

Trimmer Heads

Most models come with the Semi-matic trimmer head. It holds up to 20 feet of line and has both an automatic mechanism to release line as it wears down and a bump feed mechanism that releases line manually by pushing the button on the bottom of the head. More line can also be released by turning the center of the head, which is handy when you need to get the last bit of line off before reloading the spool. The Pro-tap is an upgraded version of the Semi-matic bump feed head. It works the same, but it uses tougher construction to withstand the rigors of commercial use.

For those who want a quieter trimmer or hate dealing with spools, Honda offers the Kwik Loader head. It uses a mechanism that grabs onto pre-cut lengths of line when pushed in and will release the line when pulled outward without needing tools. It’s designed specifically for Prolux Ultra Quiet line which has an aerodynamic spiral shape that reduced noise by 20%. This head comes with the HHT35SUKA from the factory.

Get Blades, Guards and More Shipped to Your Door

As a certified dealer for Honda Power Equipment and Honda Engines, www.hondalawnparts.com is able to offer the full selection of OEM parts and accessories for your trimmer. Check out our String Trimmer Parts & Accessories section, or select your model and serial number to see parts that are compatible with your equipment. We ship across the United States and Canada.

Servicing Your Honda Trimmer

honda trimmersIs your trimmer due for a tune-up? Not sure how to work on the Mini 4 Stroke engine? Here’s what you need to do to keep your Honda string trimmer or brushcutter in top condition.

Maintenance Schedule

The first month or 10 hours: Change the oil.
Every 3 months or 25 hours: Clean the air filter.
Every 6 months or 50 hours: Change the oil, check the drive cable, check cooling fins
Every year or 100 hours: Check spark plug, spark arrester, fuel filter and fuel tank
Every two years or 300 hours: Replace spark plug
Every two years: Check fuel and oil lines, replacing as needed

Honda recommends getting a professional service every year or 100 hours. The technician will check the engine’s idle speed, valve clearance, and clutch shoes as well as lubricate the gear case.

Engine Oil

Used oil can be poured out of the filler neck, then added through the same opening. Using a syringe will make it easy to add the small amount of oil these engines need to stay lubricated. The 25 cc engine holds 2.7 fl. oz. (80 ccs) of oil, while the 35 cc engine holds 3.4 fl. oz. (100 ccs.) Honda recommends using 10W30 oil that meets API service category SJ or later.

Air Filter

To access the filter, close the choke to keep debris from entering the engine, then squeeze tabs on top of the cover and swing the cover down.

To clean the filter, wash it in soapy water. Once dry, place the filter in a plastic bag with about an ounce of clean engine oil. Knead the bag to distribute the oil, then squeeze out the filter to remove any excess oil. Wipe out the air cleaner box before reinstalling the filter.

Removing the Fan Shroud

The fan shroud is held on using a single bolt top-mounted bolt. It can be removed using either a 4 mm or 5/32 inch hex wrench. The shroud needs to be out of the way to access the spark plug, spark arrester and cooling fins.

Spark Plug

The plug can be removed with a 5/8 inch plug wrench. The electrode gap should be between 0.024 and 0.028 inches (0.60-0.70 mm). Replace the plug if it’s fouled or has signs of electrode or insulator damage. If you’re reinstalling a used plug, turn the plug 1/8-1/4 turn once seated. If you’re installing a new plug, turn ½ turn or torque the plug to 8.8 ft-lbs. (12 Nm) to seal the crush washer against the engine.

Cooling Fins

The surface of the engine block should be cleaned occasionally to remove dirt that can reduce heat transfer. Use a brush or cloth to wipe down the fins.

Spark Arrester

The arrester is built into the opening of the muffler and is held in place with two 6 mm screws. Once removed, scrub off any carbon deposits on the underside of the arrester with a wire brush. If the arrester mesh is cracked or has holes, it needs to be replaced.

Throttle Cable

Check the condition of the cable and the action of the throttle lever. If the lever doesn’t move smoothly or there is visible damage to the cable, the cable should be replaced.

There should be between 1/16 and 1/8 inch of free play when moving the throttle lever. If the cable is too loose, adjust the throttle cable tension using the adjuster next to the carburetor. Loosen the 10 mm lock nut, which is the nut closest to the carburetor. Turn the adjusting nut, located on a clamp opposite of the lock nut, to adjust the free play. Once the throttle play is correct, tighten the lock nut.

Fuel Tank and Filter

To clean these parts, remove the fuel filler cap and pour the gasoline into a fuel can. Use a piece of hooked wire to snag the fuel tube and pull it out of the tank. Inspect the fuel filter on the end of this hose. If it’s dirty, clean it with a non-flammable solvent. Replace the filter if it’s damaged or excessively dirty. To clean the tank, rinse it out with a non-flammable solvent. Once everything is clean and dry, push the filter and tube back into the tank.

Get the Parts You Need for Your Honda Delivered to Your Door

Hondalawnparts.com is a certified dealer for Honda Power Equipment and Honda Engines, letting us ship the OEM parts and accessories you need for your trimmer. Browse our string trimmer section, or select your model using our search engine to see parts information specific to your trimmer. We ship to any address in the U.S. or Canada.

Setting Up a Honda Submersible Pump

Setting Up a Honda Submersible Pump
A Honda submersible pump is perfect for stationary pumping, powering fountains, clearing ponds and draining basements. However, you can’t just screw on a couple of hoses and put them to use like a standard pump. To put your WS Series to work, you need to get power to the motor, set up a drainage system and make sure you can retrieve it.

Where Can I Use My Pump?

All pumps are rated for continuous use moving water as hot as 104º and can handle brief spikes up to 140ºF. If the pump does start to overheat, a built-in thermal reset will shut off the motor, then restart it once the pump has cooled down.

The WSP50 and WSP100 can handle solids up to two inches in diameter, while Honda’s other pumps are limited to solids up to 3/8 inches in diameter. All pumps can handle muck water. These pumps should not be used to move corrosive or flammable liquids including mine run-off, seawater, and fuel.

The motors used in these pumps are designed for 115 volts, so they’ll work with household current. Power needs to come from a GFCI-protected outlet on a circuit that can supply 15 amps. Most household circuits supply either 15 or 20 amps, so be aware that it can be easy to overload the circuit if you’re running the pump alongside other appliances.

The pump plug should be connected directly to this outlet. Adding an extension cord can increase resistance, shortening the life of the motor. If you’re looking for a pump that can be used far from an outlet, consider getting a WSP53 or WSP73. Both models come with 50-foot power cables.

The operating location needs to meet the ANSE/NEPA 70-1984 standard, which covers ignitable materials. Fuel cans, sawdust, gas heaters and other natural gas appliances should be kept far away from this pump.

Attaching a Rope

You can lift the pump by the handle, but it’s really there to attach a rope so the pump can be lifted out of deep water. Use a strong rope made out of a waterproof material like pure polypropylene or a polyester and propylene blend. Never pull the pump up by the power cord.

Building a Discharge Pipe

The pump needs to be attached to a PVC or ABS pipe that matches the size of the pump outlet. The highest point of the pipe should be at least 15 inches higher than the highest water surface. Outlets on all models use standard pipe threading, so the discharge pipe can be attached using a standard threaded end. A 90-degree elbow can be attached directly to the threaded end when building a pipe for a side discharge pump.

An in-line check valve should be installed in the pipe to prevent backflow. This valve should be 12-18 inches above the pump outlet. The pipe also needs to have a 1/8 inch hole about 5 inches above the outlet to preventing air locking.

Setting Up a Sump Basin

A sump is the lowest point in a structure, whether it’s a boat or a building. A sump basin is a container placed at this point to collect water, which can then be removed by the pump. This basin should be made of concrete, fiberglass or plastic. The diameter of the basin needs to be sized to keep the pump supplied with water to maintain the pumping rate:

Under 24 inches — Up to 35 GPM
30 inches — up to 60 GPM
36 inches — up to 100 GPM
48 inches — up to 150 GPM

If you’re using an existing basin, clean out any debris before fitting your pump.

Setting Up the Float Switch

The distance between the switch and the pump is set by adjusting the clamp that holds the switch cable to the pump. When the switch is level or tilted upward, it will activate the pump. The seals are oil lubricated so they won’t melt if the pump is starved.

If you’re placing your pump in a sump basin, the switch should turn on when the water reaches a height of 13-14 inches. To test this out, pour water into the area around the pump, check that it’s switching on, and repeat. If you’re getting consistent results, the switch is set up correctly.

Missing Something?

Do you need parts for your submersible pump? Hondalawnparts.com specializes in Honda small engine and power equipment including everything from lawnmower engines to these electric pumps. Our site has factory diagrams and descriptions built in so you can be sure you’re ordering exactly what you need. We ship across the USA and Canada.