Breathe Easy – The Benefits of Honda Dual-Element Air Filters

two Honda air filters: a red single-element filter, and a yellow dual-element filter
Some engines use one, and some the other!

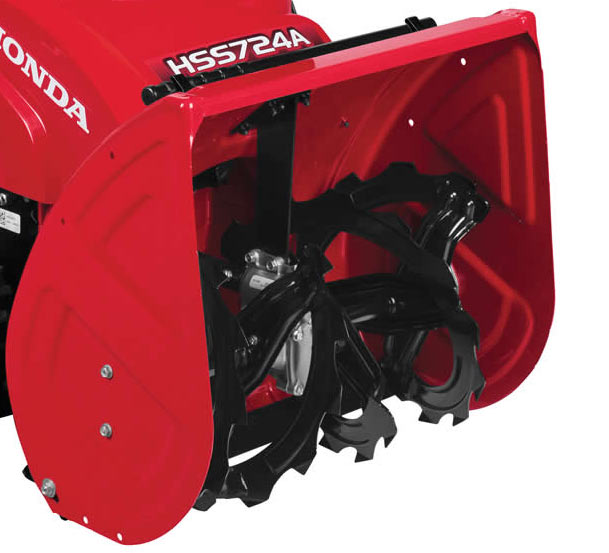
Breathing clean air is essential to our overall health and well-being, and the same holds true for engines. The air filter in your Honda engine plays a critical role in keeping it running smoothly and efficiently, but not all air filters are created equal. Dual-element air filters, such as are found in Honda engine models such as the Honda GX series, offer benefits that traditional single-element filters simply can’t match.

In this article, we’ll explore the advantages of dual-element air filters and why keeping both elements in good condition is such an important part of Honda engine maintenance. From improved engine power and fuel efficiency to reduced emissions and longer engine life, the benefits of dual-element air filters are clear. So sit back, take a deep breath, and let’s dive into the world of Honda engine air filters!

How Air Filters Work

First, let’s take a quick look at how air filters work in general. As an engine runs, it pulls a constant stream of air to be mixed with the fuel before it enters the combustion chamber to be burned.

The air filter in your engine is designed to remove contaminants from the air before it enters the combustion chamber. If particles of dirt would enter the chamber, they would damage the mirror-smooth finish on the inside of the cylinder, reducing performance and the engine’s ability to burn the fuel efficiently.

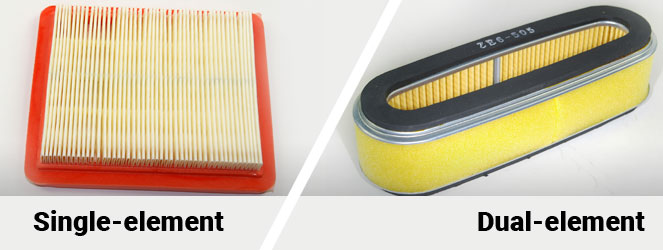
Single-element air filters, as the name suggests, have a single layer of filtration material. While they are effective at removing larger particles, they can struggle to capture the smallest particles, which can lead to a decrease in engine performance over time.

Dual-element air filters, on the other hand, have two layers of filtration material, which allows them to capture a wider range of particles. The two layers are separate components and can often be removed or replaced separately. The first filter is like a foam sleeve that slides onto the outside of the cartridge-like second filter. They work together to clean the air in two stages, keeping your engine running at peak performance for longer.

Benefits of Dual-Element Air Filters over Traditional Air Filters

Now that we know how air filters work, let’s take a closer look at the benefits of dual-element air filters over traditional air filters.

Improved Engine Performance and Efficiency

One of the main benefits of dual-element air filters is engine performance. By capturing the maximum amount of dirt particles, dual-element air filters can help keep the air inside your engine cleaner, which results in cleaner burning, less fuel consumption, less air pollution, less internal damage, easier starting, and more power. When your engine is running on clean air, it can perform at its best.

Extended Engine Life and Reduced Maintenance Costs

Another advantage of dual-element air filters is that they can reduce wear and tear on the engine. This in turn reduces the need for costly repairs and extends the life of the engine.

Why You Should Never Operate a Honda Engine with One or Both of the Filter Elements Missing

It’s important to note that dual-element air filters are designed to work with both filter elements in place. If one or both filter elements are missing, your engine may not receive the necessary filtration, causing damage. That’s why it’s important to always make sure both filter elements are in place and in good condition.

Air Filter Cleaning Tips for Honda Dual-Element Air Filters

To keep your dual-element air filter performing at its best, it’s important to clean it regularly. The filter should be checked often to see if it needs to be cleaned, especially when running the engine in dusty conditions. Here are some tips for cleaning your Honda dual-element air filter:

  1. Remove the air filter from your engine and gently tap it on a hard surface to remove any loose dirt and debris.
  2. Use compressed air to blow out any remaining dirt and debris.
  3. If the filter is still dirty, wash it with a mild soap and warm water, then rinse thoroughly and allow it to dry completely.
  4. Once the filter is dry, apply a light coat of air filter oil to the filter element to help trap dirt and debris.

It’s important to follow these cleaning tips regularly to ensure your dual-element air filter is working at its best.

How to Order Air Filters on Hondalawnparts.com

If you’re in need of a new dual-element air filter for your Honda engine, you can easily order one online at hondalawnparts.com. Simply select your engine model to pull up all the parts related to that model. If you know the Honda part number for the filter you need, you can simply search for that number.

Genuine Honda parts are designed to fit your engine perfectly. With fast shipping and competitive pricing, hondalawnparts.com is the perfect place to order all your Honda engine parts and accessories.

Honda Water Pump Accessories: An Overview of What’s Available

red Honda water pump discharging a spray of water; on the right, a hose kit accessory
If it’s Honda, it’s the tool for the job!

Honda water pumps are renowned for their excellent quality and reliability, making them a popular choice among homeowners, farmers, and construction workers alike. While these pumps are already highly efficient on their own, there are accessories that can make their performance even better. These accessories are available from Honda, are Honda quality, and are made to work perfectly with Honda pumps.

In this post we share a list of useful accessories for Honda water pumps:

Hose Kits

A high-quality hose kit is essential for getting the most out of your Honda water pump. These kits come with a suction hose, a discharge hose, and a water strainer, all of which are designed to fit perfectly with your pump. You can either purchase a pre-packaged hose kit, or purchase the components separately so that you have all the specific components you need.

Strainers

A strainer is a simple but essential accessory that helps prevent debris from entering your Honda water pump. It fits over the end of the suction hose and filters out any large particles that could damage the pump or clog the hose. There are several types of strainers available, including plastic and stainless steel models. The plastic ones work well for general-purpose pumps. The more durable stainless steel strainers are recommended for use with trash pumps and diaphragm pumps that are often used to pump more abrasive materials.

Couplers and Adaptors

Hose couplers are connectors that attach to the end of the hose, allowing you to easily connect it to the pump or to another hose. They come in various sizes and materials, and are available in 2 main connector styles: camlock connectors (also known as quick-connect couplers) and pin lug connectors. If you purchase a hose kit, all the couplers you need will be included in the kit. These items can also be purchased individually.

Nozzles

Adjustable spray nozzles are available for all discharge hose sizes. The nozzles can be used to create a stream of water, a spray, or anything in between. Nozzles are made of either brass or polycarbonate materials.

Vacuum Gauges

A vacuum gauge is a useful accessory for monitoring the performance of your Honda water pump. It shows how much vacuum is being created on the suction side of the pump, and helps you identify any issues that may be affecting the pump’s ability to prime itself and begin pumping. The vacuum teste can be mounted directly onto the pump or onto a manifold.

Wheel Kits

It can become very tiresome to move around a water pump that needs to be moved frequently. Wheel kit accessories are a great solution to that problem. The kit includes two wheels that attach to the bottom of the pump. A set of handles are also included, which makes it even easier to lift and maneuver the pump on its wheels.


There you have it, a big list of accessories that can help you get the most out of your Honda water pump. Whether you’re looking to improve performance, increase efficiency, or make it easier to use, there’s an accessory that can help.

Honda water pump accessories as well as parts for Honda equipment and engines are available from the popular Honda parts source, hondalawnparts.com.

Who Supplies Honda Parts?

Where do Honda parts come from? Ask any third grader and you’ll probably get a fair answer. From Honda.  

Okay, correct answer.  

Yet the question deserves some investigation, because an important test of an equipment brand’s value is whether you can easily get parts for the equipment. Often, the longevity of the equipment depends solely on whether a certain replacement part can be acquired.   

Honda parts packaging

So, if you own Honda equipment or a Honda engine, where do you go for parts? What distribution channels does Honda use to make their parts available?  

To get the big picture, let’s look first at how Honda sells their power equipment products.  

Overview of the Honda Distribution Network  

Honda power equipment is sold through two main channels: independent Honda dealerships and national “big-box” retailers.  

At a Honda power equipment dealership you can find a full range of services for the Honda brand. There you can browse and buy equipment and accessories. There you can get maintenance or repairs done by Honda-trained technicians.  

And there you can buy any part you may need for your Honda equipment or engine.  

Honda also sells some equipment products through national retailers such as The Home Depot and Lowe’s. These large stores form an important part of Honda’s sales strategy. They are easily accessible to many suburban areas across the country.  

The large retail stores generally offer a limited selection of Honda equipment. They may sell only one or two product categories, lawnmowers and generators for example, rather than the full array of Honda products. And although they may sell some commonly-needed replacement parts, they do not provide maintenance or repair service after the sale. 

As you can see, real interaction with the Honda brand happens at Honda dealerships. With their ability to offer ongoing customer support, Honda dealerships are key to the Honda parts distribution network.  

The Role of Honda Dealers in Parts Distribution  

Honda holds their dealers to high standards of customer service. Dealers must be able to answer any question that customers might have while shopping for equipment, and to solve any problem that might arise after the purchase.  

That includes being able to readily provide replacement parts.  

Many dealerships are staffed by people who have years of experience with Honda equipment and thus have a thorough knowledge of product iterations, systems, and components. This deep knowledge helps them to accurately identify Honda models and their corresponding parts.  

Honda dealerships also have access to Honda’s comprehensive product data. They can use detailed parts reference diagrams to identify parts assemblies, repair kits, and accessory compatibility.  

The amount of parts inventory that dealerships keep on hand varies. Some stock a large number of parts and others stock a smaller number of high-demand parts. However, all dealers can use Honda’s efficient ordering systems to source original parts for their customers at any time, directly from Honda.  

The Role of HondaLawnParts.com  

HondaLawnParts.com is owned by Shank’s Lawn Equipment, a top-tier Honda power equipment dealer with decades of experience and a large parts warehouse. The company became a pioneer in using web technologies to make Honda parts easily available online.  

HondaLawnParts.com is a key player in Honda’s parts distribution network.  

The website provides a high-quality interface for ordering parts for Honda equipment and engines. Anyone can use the site to access robust Honda parts resources from their mobile device. It has become popular among mower shops, do-it-yourself homeowners, and on-the-go landscaping teams across North America.  

In spite of supply chain challenges, HondaLawnParts.com and the rest of the Honda parts distribution network is alive and well.  

Maintaining and Troubleshooting the WX10 Pump

WX10 water pumpThe tiny WX10 water pump is perfect for small jobs, and like any Honda product, it will last for years with proper care. Here’s everything you need to know about maintaining this tiny portable water pump.

Maintenance Schedule

These maintenance tasks are simple enough for owners to do themselves
Before every use: Check the oil, air filter, and fasteners
After the first month of ownership or 10 hours of use: Change the oil.
Every three months or 50 hours: Clean the air filter
Every 6 months or 50 hours: Change the oil.
Every year or 100 hours: Check the spark plug. Clean the spark arrester, fuel tank, and fuel filter.
Every two years or 300 hours: Replace the spark plug.
Every two years: Check the fuel hoses and replace as needed.

Honda recommends having the WX10 professionally serviced for the following repairs.
Every year or 100 hours: Idle speed and valve clearance adjustments
Every two years or 300 hours: Pump clearancing and combustion chamber cleaning

Oil

Check the oil level with the engine off and sitting on a level surface. The dipstick is built into the filler cap, next to the recoil starter. Do not screw in the cap when checking the oil level.

To change the oil, remove the oil fill cap and tip the engine over a suitable container. Once the crankcase is empty, set the pump on a level surface and add oil until it comes to the edge of the oil filler opening. This engine holds just over 1/10th of a quart. Honda recommends 10W30 for temperatures above -4°F, and 5W30 for temperatures below 32°F.

Air Filter

The filter is above and to the left of the fuel tank cap. To remove the cover, push in on the sides of the tab at the top of the air box and swing the cover down.

To clean the filter, apply a non-flammable solvent, or wash it in soapy water and rinse it out. Let it air dry, then soak the filter in clean engine oil and squeeze it out. To make this job less messy, put the filter and oil in a plastic bag. Wipe out the air box before reinstalling the filter. If the exhaust is smoky during startup, there’s a little too much oil left in the filter.

Spark Plug

The spark plug is directly behind the pump handle. Disconnect the plug wire and use a 5/8 inch plug wrench to unscrew it from the engine.

The spark plug gap should be between 0.024 and 0.028 inches, or 0.60 and 0.70 mm. Clean the electrodes with a wire brush before reinstalling. Replace the plug if it’s worn or damaged.

When installing, thread the plug-in by hand, then use the wrench to turn it another ¼ turn. If you’re installing a new plug, turn it a full 180 degrees to seat the new washer. Reattach the plug wire.

Cooling Fins and Spark Arrester

To access the fins and arrester, do the following:
1. Remove the four 5 mm bolts on the recoil starter. Set the starter aside.
2. Remove the two 6 mm bolts attaching the carrying handle to the pump. Set the handle aside.
3. Remove the air filter cover.
4. Disconnect the spark plug wire and the hose running under the spark plug.
5. Disconnect the ignition switch connector, next to the start/stop switch.
5. Push the throttle lever link rod until it disconnects from the throttle swivel on the carburetor.
6. Remove the 5 mm bolt on the stop/start switch mount.
7. Remove the two 5 mm bolts from the top cover on the pump side. Remove the cover.

At this point, you’ll have full access to the engine cooling fins. Clean these off with a stiff brush and a damp cloth.

To clean the spark arrester:
1. Remove the three 5 mm screws from the muffler cover. Set the cover aside.
2. Remove the 4 mm screw from the arrester. Pull it out of the tailpipe.
3. Scrub the spark arrester screen with a wire brush to remove any carbon deposits.

Reassemble the engine in reverse order.

Fuel

If you’re having trouble starting the engine, check the fuel filter. To access it, pour the gas in the fuel tank into a suitable container. Use a piece of wire or a paperclip to pull the filter and fuel line out of the tank. Rinse off the filter with a non-flammable solvent. Push the filter back into the tank and add fuel.

The engine has two fuel lines running from the tank next to the fuel up to the carburetor. The black line supplies fuel, while the clear line returns excess fuel. Replace these tubes if they’re cracked or they start leaking.

Need Something for Your Pump?

Hondalawnparts.com is a certified dealer for Honda Power Equipment and Honda Engines, which means we have everything you need to maintain any of their equipment, including water pumps like the WX10. We ship across the U.S. and Canada.

How to Get Better Performance from Your Snow Blower

HSS928Do you feel like you’re not getting the best performance from your Honda single or dual stage snow blower? Are you looking for ways to make snow clearing easier on yourself? These tips will help you clear snow faster and avoid common problems with starting and clogging.

Prepare the Area You’re Clearing Ahead of Time

Removing hazards, including rocks, chains, garden hoses and extension cords from the area before it snows will keep you from running over them. Placing markers around the edges of driveways and sidewalks will let you see the area you need to clear once the landscape is covered in snow. This doesn’t just save time by limiting what you clear, it protects your lawn, which can be damaged by your blower’s auger.

Do you get the newspaper? Make sure it’s out of the driveway before you start clearing. The paper and the plastic bag it comes in will have no problem jamming up your auger and breaking the shear pins.

Keep Your Fuel Fresh

There are few places where snow storms are constant, so it pays to be prepared for the next storm whether it’s tomorrow or in a couple months. Straight gasoline starts going stale after a month, but by adding a stabilizer shortly after purchase, the fuel will stay fresh for up to three months, making your machine easier to start. Between storms, keeping the tank topped up will reduce the amount of contact it has with oxygen, keeping it fresher longer.

Move Snow While It’s Still Snowing

This seems counter-intuitive: by clearing snow while it’s falling, you’ll have to go back and remove any remaining snow once the storm stops. However, the less snow your machine has to move at one time, the faster it can work. Clearing snow as it falls also keeps the weight of fresh snow from packing down lower layers, making it easier to remove. That means breaking up the job into two clearings can decrease the total time you have to spend out in the cold.

Throw Snow Where You Want It the First Time

When your snow blower picks up snow, it should be forced through the chute far enough to land outside the area you’re clearing. If it isn’t, changing your methods can keep you from having to make a second pass to move snow you already tried to clear:

– Overlap more with each pass, letting the auger pick up less snow at a time.
– Go slower and increase engine speed.
– Increase the chute angle.
– Aim the chute to work with the wind.

Keep the Chute from Clogging

Wet snow may not be dense, but it likes to stick to the auger housing and chute. If you’re having trouble with chute clogs, go slower, even if the snow isn’t that deep or dense.

Applying polymer car wax to the inside of plastic chutes can keep snow from sticking, while silicone spray lubricant can be used on the surface of the impeller and inside metal chutes to help snow slide through the machine.

Wait Before Refueling

You may be tempted to refill your blower’s fuel tank as soon as possible so you can get back to work, but it only takes a few spilled drops of fuel on a hot engine to start a fire. When your Honda runs low on fuel, take a break to let the engine cool down and your body warm up. Once you’ve refueled, move your snow blower at least 10 feet away before restarting to prevent the ignition of fuel vapors.

Consider a Snow Cab

Wind chill can make cold temperatures dangerous while blowing snow is unpleasant regardless of temperature. A snow cab may not look like much, but it can shield you from these two hazards, making it easier and safer to clear large areas. Honda makes cabs that fit all of their two-stage models.

Plan Ahead for Parts Replacement

Shear pins and belts can break at any time, so it pays to have some extras on hand to keep your snow blower running. Hondalawnparts.com has these parts as well as everything else you need to keep your Honda snow blower working. When you select your model and serial number in our search engine, you’ll see factory parts diagrams and descriptions, making it easy to find the right item for your equipment. Want to add a snow cab or a set of drift cutters? We sell those, too. We ship across the U.S. and Canada.

Servicing HSS1332 Snow Blowers

HSS1332The HSS1332AT and HSS1132ATD are powerful machines, but like any piece of equipment, they only work well when they’re maintained. Here’s everything you need to know to take care of basic maintenance tasks on these Honda snow blowers.

Service Schedule

Before Every Use:
– Check the scraper and shoes, adjusting as needed.
– Check the bolts and fasteners on the machine for tightness
– Check the engine oil level.

Every 100 hours of Use:
– Change the engine oil

Every 300 hours or Four Years of Ownership:
– Replace the Spark Plug

Getting Your Snow Blower Out of Storage:

– Change the engine oil.
– Check the spark plug.
– Check the track tension.
– Charge the battery on electric start (ATD) models
– Have your snow blower serviced professionally. This includes cable adjustment and auger transmission maintenance.

Putting Your Snow Blower in Storage:

– Drain fuel system and clean carburetor sediment cup.
– Lubricate drive chains on track models
– Lubricate joints
– Charge the battery on electric start (ATD) models

Battery

The HSS1332ATD comes equipped with an electric starter powered by a battery. This battery is stored in a box directly behind the gas tank. To open the box, pull down on the rubber strap to release it from the pin, then tilt the top of the box top up and forward.

Check the output of the battery with a multimeter. If it reads below 12.9 volts, the battery needs to be recharged. Honda recommends limiting current to two amps. Charging should take between 5 and 10 hours.

When removing the battery, disconnect the smaller negative terminal first, followed by the positive terminal. Next, push down on the battery strap to unhook it from the base. Reinstall in reverse order.

The starter is protected by a 5 amp fuse, located in a cover next to the battery.

Oil

The GX390 engine that powers these blowers is designed to use 5W-30 oil for gasoline engines. When draining the oil, use a wrench to keep the drain extension in place while you unscrew the drain bolt.

To get an accurate measurement, check the oil with the blower on a flat surface and do not screw in the oil filler cap/dipstick. When filling, the oil should reach the edge of the filler neck.

Lubrication

There are three points on the snow blower that should be lubricated with waterproof grease:
– On the guides, the bolts slide on to adjust the chute angle
– On the sliding surface where the chute meets the auger housing
– On the sliding part of the levers, between the lever and the mount.

The drive chains for the tracks should be lubricated with Hondalube graphite or moly chain lube, or an equivalent high-quality lubricant.

Spark Plug

The gap between the electrodes should be between 0.028 and 0.031 inches. Some wear is normal, but the plug will need to be replaced sooner than recommended if the insulator or electrodes are damaged.

When installing the plug, turn it until you feel it seat. If the plug was used previously, turn it an additional 90 degrees. If you’re installing a new plug, turn it 180 degrees to crush the sealing washer. You can also use a torque wrench, tightening both used and new plugs to 13 ft-lbs.

Track Tension

To check the tension, place 11 lbs. of weight on the top center of the track. With this weight in place, the track should move 7/16 to 5/8ths of an inch.

To change the tension, find the adjusters on the bottom rear of the machine. These look like studs with two nuts threaded onto them. Loosening the outer nut will let you turn the inner nut to adjust the tension. Once the track deflection is within specifications, tighten the outer nut to 16 ft-lbs.

Skid Shoes and Blades

The skid shoes have two friction surfaces. Once one side wears out, the shoe can be unbolted and flipped upside down to use the other surface. Replace the scraper blade if it’s less than 1/16 of an inch thick.

Get the Parts You Need Without Leaving Your Home

Honda Lawn Parts sells parts for everything from Honda’s Power Equipment line including snow blowers. If you need something for your HSS1332, check out our snowblower parts & accessories section, or enter your model and serial number to see parts for your machine. Our site has factory information including exploded diagrams and descriptions built in, making it easy to find exactly what you’re looking for. We ship across both America and Canada. To order, visit www.hondalawnparts.com.

Servicing HSS928 Snow Blowers

HSS928Are you having problems with your Honda HSS928 snow blower? Is it due for some preventative maintenance, or needs to be readied for storage. This is everything you need to know to keep your HSS928AW or HSS928AWD clearing snow.

Maintenance Schedule

Before putting your blower to work: Check the level of the auger shoes and scraper. Inspect the auger and blower shear bolts. Check the engine oil level.
First 30 days or 20 hours of operation: Change the engine oil and check the track adjustment (if equipped.)
Every 100 hours: Change the oil.
Every 300 hours or four years: Replace the spark plug.

When getting your blower out of storage: Change the oil, adjust the spark plug gap, adjust the track tension (if equipped) and charge the battery on AWD blowers.
Before putting up the blower at the end of the season: Check the tires (if equipped,) drain the fuel system, lubricate the drive chains (track models only,) check the chute control cable.

To keep your machine in top condition, Honda recommends professional service after 20 hours or one month of use, before the start of the season, every 300 hours, every 1,000 hours and every four years. These services will handle adjustments and repairs that are too difficult for most owners, including cable adjustments, idle adjustment, and fuel system cleaning.

Oil

To get oil past the frame, the 928 comes with an extension installed in the engine drain hole. To drain the oil, use a 17 mm wrench to keep the extension in place and loosen the drain plug with a 10 mm wrench. Use a new drain plug sealing washer when changing the oil.

Honda recommends using 5W30 motor oil that meets the API’s SJ service category or later. When fully drained, the engine should hold about 1.2 quarts of oil, which is enough for the level to reach the edge of the dipstick cap hole.

Spark Plug

The plug gap should be anywhere from 0.7 to 0.8 mm, or 0.028 to 0.031 inches. When installing, tighten the plug to 13 lb-ft, or tighten it until it seats, then turn it another ¼ turn for a used plug or ½ turn for a new plug.

Track Adjustment

With 11 lb-ft. of force on the top middle of the track, the track should move 11-16 mm or 7/16-5/8 inches. The tensioner can be moved by turning the adjusting nut. It’s threaded onto a stud sticking out of the rear frame member. Loosen the lock nut on top of to this nut, then turn the adjuster nut until the track deflection is within spec. Tighten the lock nut to 16 lb-ft.

Tires

The tires are designed to perform best at 20 psi. Replace the tires if they’re cracked, damaged or have worn down treads.

Shear Bolts

The shear bolts will break under pressure, protecting the drivetrain if an object jams the auger or impeller. Shut off the engine and disconnect the spark plug before replacing broken bolts. The auger and impeller have sharp edges, so you should wear heavy gloves when working around them.

Start by using the cleanout tool, attached to the back of the auger housing, to clear out snow buildup and dislodge debris. If the auger or impeller is bent, stop using your snow blower and have it looked at by a dealer. Once everything is freed up, install the new shear bolts.

The auger is split into two pieces, each connecting to the transmission with a single bolt. Slide the bolt through the side of the hole closest to the transmission, then thread on and tighten the nut.

The impeller attaches to the transmission using a carriage bolt. This bolt goes through plates on the auger and transmission output shaft. You may need to spin the impeller to line up these two plates. Insert the bolt from the back of the plates, lining up the square end with the hole in the impeller, then screw on the nut.

Skid Shoes

The shoes used on the HSS928 are double-sided, so once one side is worn down, the shoe can be flipped upside down to use the other surface.

When adjusting skid shoe height, track models need to be lifted up using the height adjusting lever, then slowly lowered to the ground until the shoes make contact with the ground.

The shoes can be moved by loosening the two nuts holding them onto the auger housing. The height of the shoes will depend on your operating conditions:
Ordinary snow on paved surfaces – 4-8 mm (5/32 to 5/16 inches)
Snow on ice-covered pavement – 0-5 mm (0 to 3/16 inch)
Uneven surfaces – 25-30 mm (1 to 1 3/16 inches)

Getting Parts for Your HSS928

Hondalawnparts.com is an authorized dealer of Honda Engines and Power Equipment, so we carry everything you need for your two-stage snow blower including shear bolts, skid shoes, air filters. We ship across the U.S. and Canada.

Servicing HSS724 Snow Blowers

HSS724 Snow BlowersWant to make sure your light-duty Honda snow blower maintains its performance? Here’s what you need to know to keep your HSS724AT, ATD, AW or AWD two-stage snow blower working reliably.

Maintenance Schedule

Before use: Check engine oil level, skid shoes, scraper, tire pressure, shear bolts, and bolts and nuts.
Before the start of the season: Change the oil. Check the tracks (if equipped) and charge the battery (if equipped.)
Before storage: Lubricate joints and chains, drain fuel system and charge battery.
First month or 20 hours of use: Change engine oil. Check tracks (if equipped,) belts and cables.
Every 100 hours: Change oil and clean spark arrester.
Every four years or 300 hours: Replace spark plug.

Honda recommends having these snow blowers professionally serviced before the start of the season for cable and belt adjustment, every 300 hours for engine maintenance, every two years for fuel system cleaning, and every 1,000 hours for combustion chamber cleaning.

Fuel

To drain the fuel system, remove the sediment cup on the bottom of the carburetor and turn on the fuel valve. Once drained, replace the cup and run the engine until it stalls.

Oil

When checking the oil, do not screw the dipstick into the filler neck.

The engine has an extension on the drain plug to allow oil to drain outside of the snowblower frame. When draining the crankcase, use a 17 mm wrench to keep the extension from spinning and a 10 mm to unscrew the drain bolt. Always use a new washer when reinstalling the drain bolt. Torque the drain bolt to 8.1 ft-lbs. to get a tight seal.

This engine holds 0.6 quarts of 5w20 oil. When filled, the oil level should come up to the bottom edge of the filler neck opening.

Spark Plug

The spark plug is above the cylinder head, just to the right of the muffler. Wait 20-30 minutes after running the engine before checking the plug to prevent burns from the exhaust.

The spark plug gap should be between 0.028 to 0.031 inches. When installing the plug, torque it to 13 ft-lbs.

Tracks

With 11 lb-ft. of pressure on the top center of the tread, the tread should deflect 7/16 to 5/8 inches. Tension is controlled by tensioner bolts on the rear axle. To change the tension, loosen the outer lock nut, then turn the inner tension nut. Once the tension is correct, torque the lock nut to 16 ft-lbs.

Tires

On wheeled models, the tires should be aired up to 20 PSI. When checking the tire pressure, be sure to check the tire surface for signs of damage and dry rot, replacing as needed.

Shear Bolts

Shear bolts are designed to snap if the auger or impeller is jammed, cutting power transfer. Always use genuine Honda shear bolts to ensure they break away before your machine is damaged.

If a bolt breaks, shut off the engine and wait until everything on the snow blower has come to a complete stop before walking to the auger.

Inspect the auger housing for debris build-up or other issues that may have caused the break. Once the problem has been addressed, the broken bolts can be replaced. HSS724 snow blowers use two types of shear bolts:

The carriage shear bolt is for the impeller. It goes into a hole directly behind the transmission.
The auger connects to the transmission using a pair of standard shear bolts. These go in holes next to the transmission. All shear bolts thread into 6 mm self-locking nuts.

Skid Shoes and Scraper

Shoe wear: If the edge of the shoe is less than 0.02 inches thick, flip the shoe upside down to use the other edge. If both edges are worn, replace the shoe.

Shoe and scraper adjustment: If your model has track drive, push auger height adjustment lever and push on handlebars to raise to max position. Release pressure on the bars and let the auger slowly lower until the skid shoes contact ground.

Loosen bolts and adjust the height to meet snow conditions:
Normal clearing conditions – 5/32-5/16 inches
Ice-covered surfaces – 0-3/16 inches
Rough, uneven surfaces – 1-1 3/16 inch

Scraper ground clearance should be 3/32 to 5/32 inch under all operating conditions.

Torque scraper bolts to 18.5 lb-ft. and skid shoe nuts to 19.5 lb-ft.

Battery

Electric start models have a battery inside a housing next to the handles. Check the voltage every 6 months. If the output is under 12.9 volts, it needs to be recharged at 1.2 amps for 5-10 hours.

Get the Quality OEM Parts You Need for Your Snow Blower

Hondalawnparts.com is an authorized Honda Engines and Honda Power Equipment dealer. That means we’re able to ship OEM parts and accessories for your snow blower and its engine to any location in the U.S. or Canada. Our site has a section for commonly needed snowblower parts including belts and shear pins, or you can use our search engine to find parts specific to your model.

Servicing the HS1336iAS Snow Blower

HS1336iAS Snow BlowerIt may be a hybrid, but the HS1336iAS snow blower is as easy to service as any other piece of Honda outdoor equipment. Here’s everything you need to know about keeping this two-stage blower running from adjusting the tracks to changing the oil.

Tool Box

This snow blower has a toolbox built into the back panel with everything you need for maintenance. Here’s what you should find inside.

Tools:
10 and 12 mm box wrench
10 and 14 mm open end wrench
Two 12 and 17 mm open end wrenches
Spark plug wrench and handle
Pliers

Spare parts:
5 blower shear bolts
10 auger shear bolts
15 8 mm lock nuts
2 cotter pins
2 battery terminal covers
5 and 15 amp fuses
Fuse cover

Maintenance Schedule

Each Use: Check engine oil, skid shoes, scraper, shear bolts, and battery electrolyte level.
Each year before use: Change the engine oil. Check the gear reduction oil, spark plug, and tracks.
Every year before storing: Drain the fuel tank and carburetor. Clean the sediment cup. Apply oil to unpainted parts to prevent corrosion.
First month or 20 hours of operation: Change the engine oil and check the tracks.
Every 100 hours: Change the engine oil.
Every four years or 300 hours: Replace the spark plug.

Honda recommends having this snow blower serviced professionally before storage, after the first month or 20 hours of operation and every 300 hours. These services include repairs that are too complex for most owners.

Auger wear will vary depending on the surfaces you operate on. The blades at the end of the auger have wear marks. If the blades are worn down to these marks, the auger should be replaced by a mechanic.

Engine Oil

The dipstick is located on the right side of the snow blower next to the tracks. When checking the oil level, do not screw the dipstick into the hole.

To change the oil, place a drain pan on the right track. Remove the dipstick and unscrew the 10 mm drain bolt directly below the filler neck. Once the crankcase is empty, reinstall the drain bolt, using a new washer.

Honda recommends 5W30 motor oil that meets API service category SJ or later. The oil level should come up to the edge of the filler neck. The iGX390 holds 1.16 quarts.

Spark Plug

The plug is behind the muffler. The plug gap should be between 0.028 and 0.031 inches or 0.7-0.8 mm.

Track Adjustment

The tracks must be clean and dry to get accurate measurements. To check the tension, push down on the top middle section of the track with 22 lb-ft. of force. The track should deflect 0.62-0.79 inches (16-20 mm.)

To adjust the track tension, loosen the lock nut on the tension bolt, located just behind the front wheel. Turn the adjusting nut until the track tension is correct, then tighten the lock nut.

Shear Bolt Replacement

1. Turn the auger clutch switch to “Off.”
2. Release the drive clutch lever.
3. Set the auger to its lowest position.
4. Turn the engine off and remove the key. Let the snowblower come to a complete stop.
5. Look over the snow blower for signs of debris or damage that may have caused the bolt to break.
6. Remove the broken bolts and replace them with new shear bolts and lock nuts.

Batteries and Fuses

To access the batteries, loosen the two knobs on the sides of the rear cover. Rotate the rear cover down and slide it off of the snow blower. The fuses are inside a box directly above the batteries.

The electrolyte level should be between the “Lower Level” and “Upper Level” marks on the side of the battery case. If the level is low, remove the caps from the top of the battery and add distilled water. Clean any corrosion on the battery terminals with baking soda and water.

To remove the batteries, disconnect the negative cable from the left battery, followed by the positive terminal on the right battery. Loosen the nuts holding the battery clamp, then disconnect the joint cable from the left battery’s positive terminal, then the right battery’s negative terminal. Remove the batteries from the snow blower. When reinstalling the batteries, connect them in the reverse order you disconnected them.

Charge the batteries individually. The output of each battery should be within 10% of 35 Ah. Charge the battery at 3.5 amps for 5-10 hours.

Need Parts?

If you need some shear pins, an oil plug washer or even a new toolkit, you can get it from www.hondalawnparts.com. We’re a certified dealer for Honda Power Equipment and Honda Engines, which means we carry OEM replacements for everything on your snow blower. Our site has built-in factory information including diagrams and descriptions, making it easy to find compatible parts for your model.

Servicing Honda Single Stage Snow Blowers

Honda Single Stage SnowblowerDo you want to make sure your Honda single stage snow blower will be reliable and deliver maximum performance? Here’s everything you need to do to keep your HS720AM, HS720AS or HS720AA performing at its best.

Maintenance Schedule

Before use: Check the oil and scraper blade.
Every year before use: Change the oil. Inspect the spark plug, auger clutch, auger paddles and chute guide lever (if equipped.)
Every year before storage: Check the spark plug and drain the fuel tank and carburetor. Grease the chute tension bolts if you have an AM blower.
After the first 5 hours of use and every 50 hours of operation: Change the oil.
Every 100 hours: Check the spark plug.
Every 150 hours: Replace the spark plug.

Honda recommends having the snow blower professionally serviced every 100 hours to check engine speed and valve clearance, and every two years to inspect the fuel system.

Oil

Oil should be checked with the dipstick inserted in the filler neck but not screwed in. Honda recommends 5W30 oil when temperatures are above 10°F and 5W20 when operating in weather below 10°F.

1. Place the snow blower on a level surface.
2. Place a drain pan between the wheels.
3. Remove the dipstick.
4. Remove the drain bolt and washer from the back of the engine, next to the filler neck.
5. Install the drain plug, using a new washer.
6. Add oil through the filler neck. Stop when the oil is at the edge of the neck.
7. Install the dipstick.

Spark Plug

Let the engine cool off before removing the spark plug.

1. Open the plug access panel next to the fuel filler cap. Disconnect the spark plug cap, then unscrew the plug using a spark plug wrench.
2. Replace the plug if it’s heavily worn or has cracks or other damage. Set the gap to 0.028-0.031 inches.
3. Screw the plug in by hand, then tighten it down with the wrench. If the plug is new, rotate the plug a half turn after it seats to crush the sealing washer. Honda recommends torquing the plug to 14 ft-lbs. if you have a torque wrench on hand.
4. Snap the access panel back into place.

Clutch Lever and Belt Tension

To check the tension, squeeze the bail until you feel some resistance. Measure the distance between the bail and the handle: it should be between 7 ½ and 8 inches.

There are several adjustment holes for both the clutch spring and the cable near the base of the handle. Slide the cover up to expose the spring and access these holes. Moving the spring down one hole adjusts the lever distance by ¼ inch, and adjusting the cable position moves it by 3/8 inch.

To check the belt tension, slide the spring cover up on the drive cable. Engage the auger clutch bail. The spring should be 2.93-3.15 inches long. To adjust the tension, move the cable end from the lower hole to the upper hole on the bail.

Auger Paddle

To inspect the paddles, place the snow blower on a level surface. Disconnect the spark plug and turn the fuel valve off to prevent an accidental start. Measure the distance between the edge of the paddle and the metal part of the auger. If the distance is less than 5/8 inch, have the paddles replaced by a dealer.

Scraper Blade

To check the blade alignment, place the snow blower on a level surface. Disconnect the spark plug and turn the fuel valve off to prevent an accidental start.

The blade should be level and come in contact with the ground. The distance between the lower rubber paddle and the ground should be 1/16-1/8 of an inch. If the blade is uneven or the paddle is too high, adjust the blade. If the blade is less than 1/16” thick, replace it.

To adjust the blade, tilt the snow blower forward. Loosen the three flange nuts and move the blade. Tighten the nuts and recheck the clearance.

If the blade needs to be replaced, simply remove the nuts, washers and carriage bolts, then remove the old blade. Install the new blade, reusing the fasteners. Check the blade adjustment.

Chute Guide Cable (A and AS models)

Pull the chute control lever rearward. The chute should point up with the top of the deflector lining up with the back of the chute. Push the lever down. The deflector should be pointed up just slightly.

If the deflector isn’t moving through its full range of motion, loosen the lock nut on the end of the cable next to the deflector. Turn the adjusting nut below it to change the cable tension, then tighten the lock nut, torquing it to 48-83 in-lbs.

Get the Parts You Need for Your Honda

Need to make some repairs to your snow blower? Hondalawnparts.com isn’t just for mowers: we carry OEM parts for everything from Honda Engines and Honda Power Equipment. Our site can show you parts specific to your mode using factory diagrams and descriptions, so it’s easy to find what you need. We ship across the USA and Canada.