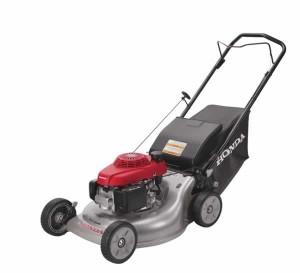
 Like all of Honda’s products, the HRR216PKA mower will provide years of trouble free service, but only if it’s properly maintained. Here’s everything you need to know from how to change the oil to when to take it in for service.
Safety Disclaimer
This mower is designed to always have two blades mounted to the output shaft. A single blade won’t seat correctly and could fly off, causing serious injuries and damage.
The muffler can remain hot long after the engine has been shut off. Let the engine cool completely before working on it. The spark plug cap should also be removed to prevent accidental starts when performing maintenance.
Maintenance Schedule
Before each use: Check the rear shield, engine oil, air filter, grass bag, blade control operation, blades and blade mounting bolts.
After the first month or 5 hours of use: Change the oil.
After the first 25 hours of use: Clean the air filter.
After every 50 hours or 6 months of use: Change the engine oil and clean the air filter. If you are mowing in dusty areas, clean the air filter more often. If you mow in high temperatures or under heavy loads, change the oil more often.
After 100 hours or every year: Check the spark plug, blade control operation and spark arrester (if equipped.) The mower should also be brought to a dealer to check the fuel tank, fuel filter, flywheel brake pad and valve clearance.
After every 150 hours or two years: Replace the air filter and spark plug. Have a dealer inspect and grease the rear wheel adjuster bushings.
Every two years: Check the fuel lines.
Blade and Blade Mounting Bolts
To reach the blades, start by turning the fuel valve off: the knob will be perpendicular to the fuel line. Tilt the mower onto its right side to keep fuel from leaking into the carburetor.
Check the blade for signs of excessive wear, bends and cracking. The blade can be sharpened, but if the edge is thin, the blade will need to be replaced.
The blade bolts should be torqued to 36-43 ft-lbs. (49-59 N m.) Replace them if they are damaged.
To replace the blades, wedge a wood block into the deck to keep the blades from turning, then remove the two bolts with a 14 mm socket wrench. Clean off any clippings that have gathered on the mount, then install the new parts in this order: the small upper blade, the larger lower blade with the fins pointing downward, and the bolts with directional washers. Tighten the bolts to the correct torque.
Oil Change
Leaning the mower over a piece of cardboard will prevent scratches to the deck, and draining the oil while it’s warm will help it flow out faster.
1. Turn the fuel valve off. The knob should be perpendicular to the fuel line.
2. Wipe off any dirt from around the filler neck. Remove the oil filler cap/dipstick.
3. Tilt the mower on its side so the oil drains out of the neck into a suitable container. Recycle the used oil.
4. Set the mower upright and add fresh oil. The engine holds 12-13.5 oz (0.35-0.40 L) of 10W30 or 5W30. SAE 30 can also be used if the mower is only used between temperatures of 50 and 100°F (10-40°C.) Honda recommends oils that meet SAE standard SJ or later.
Air Filter
The filter is located behind a panel on the left side of the engine. To reach it, push down on the tabs at the top of the cover and swing the cover away from the motor.
Replace the filter if it shows any signs of damage. To remove dust, tap it against a flat surface or blow it out using compressed air not exceeding 30 PSI (207 kPa.) Never brush off dirt: this can force it into the filter media, restricting airflow.
Wipe off any dirt inside the air cleaner housing before reinstalling the filter.
Spark Plug
1. Remove the spark plug cap and clean away any dirt around the plug.
2. Unscrew the plug using a 13/16 in (21 mm) spark plug wrench.
3. Inspect the plug. Replace it if the electrodes are worn or the insulator is damaged.
4. Measure the electrode gap. It should be between 0.028 and 0.031 in (0.7-0.8 mm.)
5. Screw the plug back in by hand to avoid cross-threading. Seat it into the engine with the plug wrench. When using a new plug, tighten it an extra 1/2 turn to ensure a tight seal.
6. Reattach the spark plug cap.
Spark Arrester
This is an optional part that can be added as needed to meet local fire safety requirements.
1. Remove the heat shield: it’s attached to the muffler by three bolts.
2. Slide the arrestor out of the muffler. Use a brush to remove any carbon deposits. Replace the arrestor if it is cracked.
3. Reinstall the arrestor, shield and cap in reverse order.
Blade Control Check
Start the mower, then release the blade control lever on the handlebar. If the engine doesn’t shut down immediately, bring the mower in for service.
Where to buy Honda Mower parts
From spark plugs to engines, if it’s used in Honda small engine equipment, www.hondalawnparts.com has it. Ordering is simple thanks to online parts diagram and an experienced parts staff that can answer your questions.
