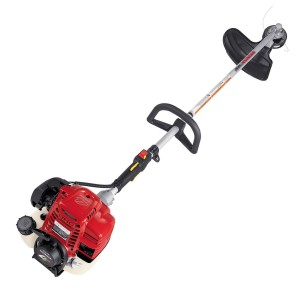
 Getting started with any new piece of equipment often means taking a moment to learn about its controls and how to safety start and stop the equipment in typical landscaping scenarios. The Honda trimmer is no different. Those who recently purchased one of the company’s trimmers, or those who simply need a brief refresher on how to properly start, operate, and stop the trimmer, can benefit from following a few simple guidelines and step-by-step approaches to their trimming needs all around the home.
Safety Comes First: What to Know Prior to Operation
Trimmers can pose a serious risk of injury to operators who don’t take proper precautions before starting the equipment. Make sure that the trimmer pre-operation procedures have been followed exactly. Also make sure that the trimming area has been cleared of any debris or large objects that might become airborne or cause trimmer kickbacks. Before starting the trimmer, make sure to wear protective gloves and eyewear that will keep damaging debris away from the body. Ensure that all pets, children, and other bystanders have been removed from the area, preferably by going indoors until trimming has completed. If fluids need to be added, make sure to do so in a well-ventilated area prior to engine ignition.
What to Know and Check Prior to Operation
Before starting the trimmer and getting underway with landscaping work, make sure to check the trimmer’s fluid level. A lack of fuel and gasoline can cause the equipment to simply refuse to start, or it could cause the equipment to suffer from extensive damage while being used. Another key thing to check before turning the equipment on is the status of the area to be trimmed. Make sure that grass and weeds are dry, that debris has been removed, and that any other objects are moved out of the way during trimming. Give the trimmer blades a quick check to ensure they’re damage-free and tightly fastened, and then prepare to start trimming.
Key Things to Know About Honda Trimmer Controls
It’s simply not safe to operate any piece of power equipment without a full understanding of the included controls and how they can be used to keep the equipment safe and efficient. The Honda trimmer comes with several key controls that need to be understood:
– Choke Lever
The choke lever is used to open or close the choke valve during ignition and use. The “closed” position is appropriate when starting a cold engine, while “open” is a better choice for warm engines.
– Ignition Switch
Located near the top of the handle, the ignition switch is set to “ON” when the trimmer is in use, and should be set to “STOP” when the trimmer is ready for storage afterward.
– Operator Presence Lever
This lever is squeezed during operation to keep the trimmer on, and is released to stop the trimmer when work is finished or in the event of an emergency.
– Throttle Trigger and Set
The throttle trigger is used to control engine speed during operation, and the throttle set is used to hold the trigger in place at a given speed during trimming.
– Priming Bulb
This small bulb is pushed several times prior to ignition to get the engine ready for ignition, making the engine much easier to start.
Starting the Engine
To start the Honda trimmer’s engine, operators simply need to follow a few basic steps and procedures.
1. Move the choke lever to “closed” for a cold engine, or “open” for a warm engine. Next, press the priming bulb to further ease the ignition process.
2. Use the throttle trigger and throttle set to place the engine speed in its starting position. Also set the ignition switch to “ON.”
3. Rest the trimmer on the ground and hold it down with one hand. use the other hand to pull the starter grip until the engine turns on.
4. Allow the engine to idle until the trimmer is in position. Next, adjust the throttle trigger to the appropriate trimming speed and allow the throttle set to maintain that speed during trimming.
Stopping the Engine
To stop the trimmer’s engine, simply release the throttle trigger from its set position and then move the ignition switch to “STOP.” Wait for the trimming blades to stop spinning, and then store the trimmer in a dry, secure place.
Find OEM Honda Trimmer Parts at HondaLawnParts.com
Over the course of the typical summer season, maintenance will need to be performed on a typical Honda trimmer several times. While most maintenance is as quick as checking and cleaning key parts, some replacements will likely be needed to ensure high-quality trimming and performance over the long-term. HondaLawnParts.com can help with replacement parts, since the website features an intuitive parts lookup tool and an extensive array of OEM options for today’s equipment owners.
