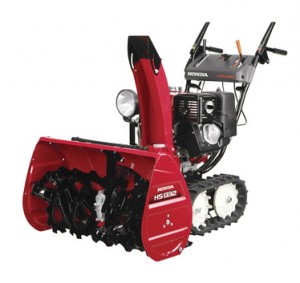
 One of the best features of Honda’s HS1332 snowblower is the equipment’s overall intuitive controls. Though there are many ways to adjust how the equipment performs and how it handles snow at all depths, the available controls and adjustments make it easy to perform the job efficiently and at a pretty quick rate of speed. The key to using the snowblower effectively, and maximizing the power of its intuitive controls, is to review the function of each prior to using the snowblower for the first time.
Don’t Start Clearing Snow Without Adhering to Safety First
Though snowblowers represent a real leap forward in terms of the convenience of clearing snow, they’re still powerful pieces of equipment that can result in serious injury if they’re not safely used. Before getting started, be sure that the equipment is placed outdoors, on a solid and level surface. Start the equipment only after all family, friends, bystanders, and pets have gone indoors. Check for debris prior to starting the snowblower and, to guard against injury from undetected debris, always wear protective eyewear and gloves while clearing snow. With that in mind, here’s what to know about the HS1332’s controls.
Fuel Valve Lever
The fuel valve lever controls whether or not fuel is allowed to flow into the engine. If the equipment is being stored, or if maintenance is being performed on the snowblower, this lever should be placed firmly in the “off” position. The fuel valve lever should only be switched to “on” immediately before the operator turns on the equipment and begins clearing snow.
Engine Switch
The engine switch governs whether or not the engine is allowed to turn on and stay on. The switch should be placed into the “on” position before going through the snowblower start-up routine. This allows the starter grip to work, and it allows the engine to spark and spring into action. The switch should be turned to “off” either in the event of an emergency or during the standard procedure used when turning the equipment off.
Fuel Gauge
The snowblower’s fuel gauge reports on how much fuel is left in the equipment. If the gauge points to “Empty,” be sure to turn the equipment off and refill it immediately before continuing work. If the gauge points to “Empty” prior to clearing snow, fill the fuel tank before turning the equipment on in the first place.
Chute Crank
This crank adjusts the discharge chute, which allows snow to be thrown in the proper direction for visibility around the home and effective storage of frozen precipitation after the storm. Turn the crank left to move the discharge chute to the left, and turn it to the right for the opposite result.
Starter Grip
The starter grip is the key method of starting the snowblower’s engine in models that lack an electric starter. The grip should be pulled toward the end of this process, with a great deal of force that will cause the engine to spark the snowblower’s fuel and turn on.
Throttle Lever
Engine speed is controlled by the throttle lever, which can be placed in either “slow” or “fast” positions. Each of these positions is better for a different type of operation and snow clearing work. The “slow” setting is great for deeper or more challenging accumulations, while “fast” is perfect for lighter snow accumulations and other work around the home.
Choke Knob
The snowblower’s choke knob is used to govern the snowblower’s fuel mixture and make it easier to start the equipment under certain conditions. The knob should be placed into the “closed” position for a cold engine, and adjusted to “open” if the engine is warm.
Shift Lever
When it comes to determining whether the equipment will stay in neutral, move in reverse, or go forward, the shift lever is the central control that operators will need to use. The lever also governs the drive ratio during active snow clearing.
Discharge Deflector Lever
This lever is centrally concerned with the angle of the discharge deflector, which has the effect of throwing snow further from the equipment or keeping it closer to the snowblower during snow clearing.
Foot Pedal
For Honda models with tracks, the foot pedal controls the height of the equipment relative to the tracks. This can help with cleaning up deeper snow, slick and icy surfaces, or moderate accumulations.
Drive Clutch Lever and Auger Clutch Lever
The drive clutch lever, located on the left, engages the snowblower’s drive system and self-propulsion features. On the right side, the auger clutch lever engages the actual snow clearing system and begins the intake and discharge routine.
Transmission Release Lever
When set to “engaged,” the transmission release lever will engage the self-propulsion mechanism of the snowblower. If put into the “released” position, the snowblower can be pushed manually by the operator. This setting is sometimes required in particularly deep snow accumulations.
For OEM Honda Snowblower Parts and More, Visit HondaLawnParts.com
HondaLawnParts.com is an authorized retailer of Honda snowblowers and OEM replacement parts, which makes it easy for equipment owners to find exactly what they need to keep their equipment in like-new condition. With an online parts lookup tool that separates available replacements by engine type, model number, and part number, it’s easy to find an exact match for every need.
