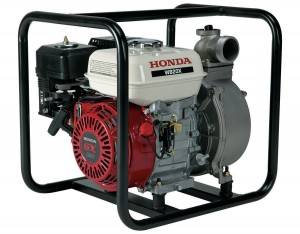
Is your pump not working as fast as you think it should? How long does it take to prime? Are the hoses on right? If you just got a new water pump, using it can be confusing. Here’s what you need to know to get your Honda WB20 or WB30 to perform at its full potential.
Operating at High Altitudes
If you will regularly operate your pump at altitudes above 5,000 feet above sea level, the carburetor needs to be re-jetted to get the air/fuel ratio in line with the available air. Without this modification, the fuel mixture will be too rich, leading to hard starting, poor performance and fouled spark plugs. If an engine with a high altitude kit is run at altitudes below 5,000 feet, the fuel mixture will be too lean, leading to overheating and engine damage. Even with the kit installed, maximum power will go down by about 3.5% for every 1,000 feet above sea level.
Maximum intake head decreases by about a foot every 500 feet above sea level. Above 11,000 feet, the pump will need to be at the same height or slightly lower than the surface of the water being pumped.
Setting Up the Pump
A reinforced hose and strainer should be fitted to the pump’s inlet port, while a standard hose can be used with the pump outlet. Be sure to check the hose clamps for tightness: small air leaks can have a major impact on performance.
The total head for the WB20 is 105 ft, while the larger diameter inlet and outlet of the WB30 limits its total head to 85 ft. Both pumps have a maximum suction head of 25 ft. When setting up your pump, try to get it as close to the level of the water as possible: you’ll get better performance with a shorter suction head than a shorter outlet head.
If you need to run the discharge hose across a roadway, place it so it goes perpendicular to the flow of traffic. Place boards on both sides of the hose to keep vehicles from driving over the hose.
Priming
Remove the cap next to the pump discharge outlet and add clean water until the pump chamber is completely filled. Screw the cap back onto the pump.
If you accidentally started the engine without priming the pump, shut it off immediately. Once the pump has had time to cool down, prime the pump and restart the engine. Running the pump without priming it will cause overheating and seal failure.
Starting the Pump
To start the engine, you’ll need to adjust the choke, fuel valve, throttle, and ignition. The choke lever is located directly below the air cleaner box on the carburetor, and the fuel lever is below that. The throttle is to the right of the air box, and the ignition switch is on the opposite side of the engine below the recoil starter.
To start the engine, the fuel valve and ignition switch need to be on. If the engine is cold, close the choke. Move the throttle out 1/3 of the way from the “Slow” position. The engine should start after one or two pulls of the starter grip.
Operating the Pump
Slowly open the choke as the engine warms up. Once the choke is open and the engine is running smoothly, adjust the throttle to set the pumping speed. It can take a couple of minutes before the pump has moved enough water to have it flowing out of the end of the discharge hose.
Stopping the Engine
Set the throttle to the “Slow” position and wait for the engine to return to idle. Turn the ignition switch off. The engine will shut down. Close the fuel valve. In emergencies, the engine can be shut off immediately using the ignition switch.
Get Everything You Need for Your Pump from One Place
www.hondalawnparts.com is a certified dealer for Honda Power Equipment and Honda Engines, so we’re able to supply you with everything you need for your pump. That includes the hoses and strainers you need to move water as well as seals, spark plugs and other components to keep the pump and engine working. Browse our selection of pump accessories or use our search engine to find parts for your specific model. We ship across the U.S. and Canada.

