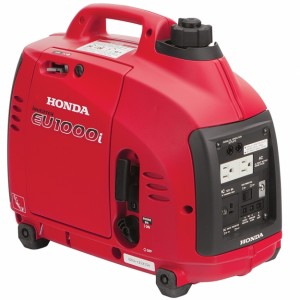
 The EU1000i may be fully enclosed to keep down noise, but it’s still simple enough that owners can do most of the maintenance themselves. Here’s how you can keep Honda’s tiny EU1000i generator ready to power your tailgate parties and camping trips.
Maintenance Schedule
Most maintenance is easy enough that you can do it yourself:
Before each use – Check the oil and air filter.
After the first month or 10 hours of use – Change the oil.
Every three months or 50 hours – Clean the air filter.
Every 6 months or 100 hours – Change the oil, check the spark plug and clean the spark arrester.
Every two years or 300 hours – Replace the spark plug.
Honda recommends having a professional perform the following maintenance:
Every year – Clean the fuel tank and fuel filter
Every two years – Check the fuel line for cracking.
Every 300 hours Clean the combustion chamber.
Fuel
Fuel should be used within one month of purchase. If the fuel is treated with a stabilizer, it can be used up to three months after purchase.
When adding fuel, do not fill past the red mark inside the filler neck. The top of the cap has a lever that opens and closes a vent. This vent should be open while the engine is running and while the engine is cooling down after use. Once the generator is cool, the vent should be shut to prevent fuel from leaking during transport and storage.
Accessing the Engine
The EU1000i has three maintenance covers:
To access the air filter, dipstick and drain plug, remove the maintenance cover on the left side of the generator. Turn the cover screw counter-clockwise and lift the cover up.
To access the spark plug, remove the access cover on top of the generator next to the handle.
To access the muffler, remove the cover on the rear of the generator. It’s held in by four 5 mm screws.
Oil
10W30 and 5W30 oil are recommended for all operating conditions. SAE 30 can be used at temperatures above 50°F.
This engine has Oil Alert, which will shut off the engine if the oil level is too low. If this feature is triggered, it will turn on a light on the control panel.
To check the oil level, remove the dipstick from the filler neck, located on the bottom left of the engine. Wipe off any oil and reinsert the dipstick, but don’t screw it back into the filler neck.
To change the oil, turn off the engine switch and close the fuel filler cap vent. Remove the dipstick and unscrew the drain plug at the base of the engine. Tilt the generator, letting the used oil flow down through the channel on the case into a container. Reinstall the drain plug. Add oil through the filler neck. With the generator sitting on a level surface, the oil should come up to the edge of the neck. This engine holds about 8 ounces of oil.
Air Filter
The air box is located to the right of the engine. To access the filter, push down on the tab at the top of the air box cover and lift the cover straight up.
Clean the filter in warm, soapy water. Squeeze out the filter and let it air dry. Dip the filter in clean engine oil and squeeze it out. To make this process cleaner, consider putting the filter and oil in a plastic bag. Do not twist the filter when washing or oiling.
Spark Plug
The spark plug is accessed through a maintenance cover on top of the generator. The plug gap should be between 0.024-0.028 inches (0.6-0.7 mm.) Replace the plug if the washer or insulator are damaged, or the electrode is worn down.
When installing the plug, thread it in by hand until it seats. Use a spark plug wrench to turn it another ¼ turn if you’re reinstalling a used plug, or ½ turn to crush the washer on a new plug.
Spark Plug Arrester
The arrester is inside the tailpipe, sandwiched between the muffler and the engine’s exhaust port. Once the back cover is off, remove the three 6 mm bolts holding the muffler onto the back of the engine. Remove the muffler. It should come off with the spark arrester and gasket. Pull the spark arrester out of the muffler and scrub off any carbon deposits with a wire brush. If the arrester or gasket are damaged, they should be replaced. Reinstall in reverse order.
Need Something For Your Honda Generator?
Hondalawnparts.com is an authorized Honda Engines and Honda Power Equipment dealer. That means we can ship OEM parts and accessories to your door whether you live in the U.S. or Canada. We have sections for common parts and generator accessories, or you can use our search engine to find the right part for your specific equipment model. Our site even has factory diagrams and descriptions, so you know exactly what you’re ordering.
