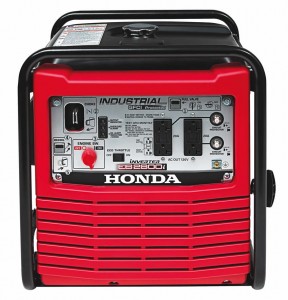
The EB2800i and EG2800i are the latest generators from Honda, and as with any new design, maintenance requirements and procedures are a little different from older models. Here’s what you need to know to keep your generator running like new for years to come.
Safety
Carbon monoxide build-up from the generator’s exhaust can kill you. Even if you’re just starting the motor to check how it’s running, it should first be moved outdoors.
Unless you’re changing the oil, make sure the engine has had time to cool down before you start working it. Some parts, like the exhaust, can stay hot enough to cause burns up to a half hour after use.
Oil
The engine oil should be changed after the first 5 hours or month of use, then every 50 hours or 6 months thereafter. Always check the engine oil before using the generator.
To check the oil, remove the dipstick/filler cap from the oil filler neck, located on the engine at the back of the generator. Wipe the dipstick clean, then insert it into the filler neck without screwing it in. The level should be between the marks on the dipstick.
To change the oil, let the engine run long enough to get warm, but not hot to help the oil flow out of the engine, taking dirt and sludge along with it.
Support the generator on blocks, keeping it level to provide space to slide an oil drain pan underneath it. The drain bolt is located at the base of the engine to the left of the dipstick. Remove the dipstick/filler cap and the bolt to let oil flow out of the engine. Once the oil has drained, reinstall the plug using a new sealing washer.
Using a funnel, refill the engine with SAE 10W30 oil. The oil level is correct when it reaches the edge of the filler neck. Reinstall the dipstick/filler cap.
Air Filter
Check the air filter before using the generator, and clean it every 25 hours or three months of use. If you use the generator in a dusty area, clean the filter more frequently.
The air cleaner box is located on the left side of the generator near the control panel. To access the filter, push in the tabs on the top of the cover and swing the cover downward. The air filter should come out with the cover.
The air filter uses three components: a paper element, a foam element and a plastic screen that separates these elements. Dust can be cleaned from the paper element by knocking it against a hard surface. The foam element should be cleaned by rinsing it in warm water and dish detergent. Once dry, soak the foam element in clean engine oil. Squeeze out any excess oil before installing. The easiest, cleanest way to do this is by putting the filter and oil in a resealable plastic bag.
When reinstalling the filter elements, the foam element should be placed above the tabs inside the cover. Follow this with the plastic screen and the paper element. Reinstall the cover on the motor, making sure the rubber seal fits into the groove on the inner half of the air box.
Spark Plug
Check the plug every year or 100 hours of operation, and change it every two years or 250 hours.
The spark plug is located at the top of the engine. It can be reached from the back of the generator between the two humps in the gas tank.
To remove the spark plug, disconnect the plug wire, then unscrew the plug with a 13/16 inch or 21 mm plug socket or wrench. The plug should be replaced if it’s fouled, has a worn electrode or shows cracks in the insulator. The plug gap should be between 0.028-0.031 inches (0.7-0.8 mm.)
To reinstall, screw the plug in by hand to keep it from cross-threading. Tighten down the plug with the plug socket or wrench, tightening 1/8-1/4 of a turn once the plug is seated. If the plug is new, tighten it 1/2 turn to ensure the plug washer makes a tight seal. Reconnect the plug wire.
Spark Arrester
The arrester should be cleaned every year or 100 hours. Unlike other Honda equipment, these generators always come with an arrester from the factory.
Disconnect the spark plug wire to prevent an accidental start. Remove the screw on the side of the exhaust opening with a Phillips or 4 mm screwdriver and slide the plug arrester out of the muffler. Use a wire brush to clean carbon deposits off of the arrester screen. If there are cracks or holes in the arrester, it should be replaced. Reinstall the arrester and reconnect the plug wire.
Getting Parts for Your Honda Generator
From spark plugs to spark arresters, if it’s Honda, you can get it from www.hondalawnparts.com. As a certified Honda Power Equipment dealer, we’re able to ship the full line of Honda OEM parts and accessories across the U.S. and Canada.

